

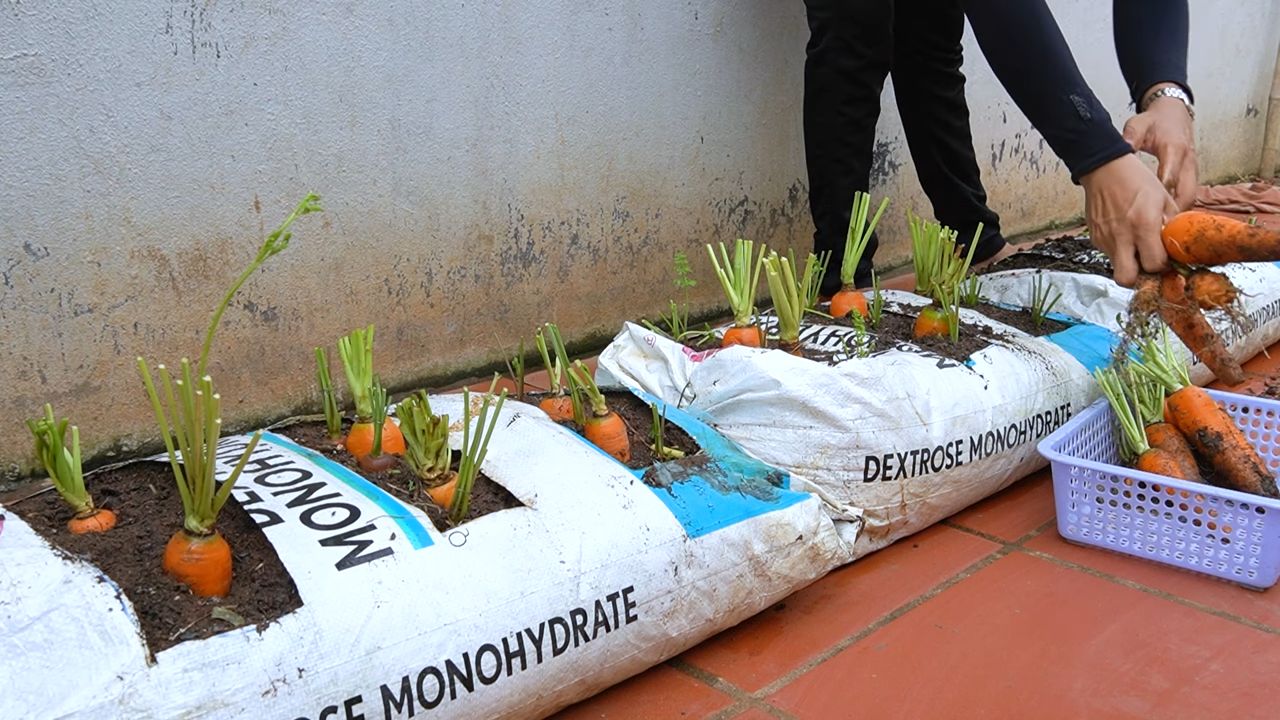
Growing Carrots in Soil Bags: Unlock the secrets to a bountiful harvest, even without a traditional garden! Have you ever dreamed of pulling vibrant, crunchy carrots straight from your own backyard, but thought you didn’t have the space? Well, dream no more! This DIY guide will revolutionize your gardening game, showing you how to cultivate delicious carrots using a simple, space-saving technique: soil bags.
Carrots, with their vibrant orange hue and earthy sweetness, have been a staple in diets around the world for centuries. Originating in Central Asia, they were initially cultivated for their aromatic leaves and seeds, with the root taking center stage much later. Today, they’re a symbol of healthy eating and a versatile ingredient in countless dishes. But what if you live in an apartment, have poor soil, or simply want a more controlled growing environment? That’s where the magic of soil bag gardening comes in!
I’m going to show you how growing carrots in soil bags is not only incredibly easy but also offers several advantages. It allows you to control the soil quality, ensuring your carrots get the nutrients they need. It minimizes weeding, saving you time and effort. And best of all, it’s perfect for small spaces, making fresh, homegrown carrots accessible to everyone. So, grab your soil bags, some carrot seeds, and let’s get started on this exciting gardening adventure! You’ll be amazed at how rewarding it is to harvest your own sweet, juicy carrots, grown with your own two hands.
Growing Carrots in Soil Bags: A Gardener’s Guide
Hey there, fellow gardening enthusiasts! Are you short on space but dreaming of harvesting your own crunchy, sweet carrots? Well, I’ve got the perfect solution for you: growing carrots in soil bags! It’s a fantastic way to enjoy fresh, homegrown carrots even if you only have a balcony, patio, or small yard. Plus, it’s super easy and budget-friendly. Let’s dive in!
Why Grow Carrots in Soil Bags?
Before we get started, let’s talk about why this method is so great:
* Space-Saving: Soil bags take up minimal space compared to traditional garden beds.
* Easy to Move: You can easily relocate your carrot patch to follow the sun or protect it from harsh weather.
* Good Drainage: Soil bags generally provide excellent drainage, which is crucial for healthy carrot growth.
* Weed Control: Less weeding compared to in-ground gardening.
* Cost-Effective: Soil bags are relatively inexpensive, especially if you recycle old potting soil bags.
* Fun and Accessible: It’s a great project for beginners and experienced gardeners alike.
Materials You’ll Need
Alright, let’s gather our supplies. Here’s what you’ll need to get started:
* Soil Bags: Choose sturdy plastic soil bags. Empty potting soil bags work perfectly! Aim for bags that are at least 12 inches deep to accommodate carrot growth.
* Potting Mix: Use a high-quality, loose potting mix. Avoid garden soil, as it can be too heavy and compact. Look for a mix that contains peat moss, perlite, and vermiculite for good drainage and aeration.
* Carrot Seeds: Select a carrot variety that’s suitable for container gardening. Shorter, rounder varieties like ‘Parisian’ or ‘Thumbelina’ are ideal. ‘Nantes’ varieties also work well.
* Slow-Release Fertilizer: A balanced slow-release fertilizer will provide your carrots with the nutrients they need throughout the growing season.
* Watering Can or Hose: For watering your carrots regularly.
* Scissors or Utility Knife: To cut drainage holes in the soil bags.
* Optional: Compost or well-rotted manure to enrich the soil.
Step-by-Step Instructions: Planting Your Carrots
Okay, let’s get our hands dirty! Here’s how to plant your carrots in soil bags:
1. Prepare the Soil Bags:
* Lay the soil bag flat on the ground.
* Using scissors or a utility knife, carefully cut several drainage holes in the bottom of the bag. Space them about 4-6 inches apart. This is crucial to prevent waterlogging, which can lead to root rot.
* If you’re using a recycled soil bag, make sure it’s clean and free of any debris.
2. Fill the Soil Bags:
* Carefully open the top of the soil bag.
* Gradually fill the bag with your potting mix, leaving about 2-3 inches of space at the top.
* If you’re adding compost or well-rotted manure, mix it in with the potting mix as you fill the bag. A ratio of about 1 part compost to 3 parts potting mix is a good starting point.
* Gently pat down the soil to remove any air pockets.
3. Sow the Carrot Seeds:
* Carrots need space to grow, so don’t overcrowd them. Sprinkle the carrot seeds evenly over the surface of the soil. Aim for about 1-2 inches between seeds.
* Cover the seeds with a thin layer of potting mix, about 1/4 inch deep.
* Gently water the soil using a watering can or hose with a gentle spray nozzle. Be careful not to wash away the seeds.
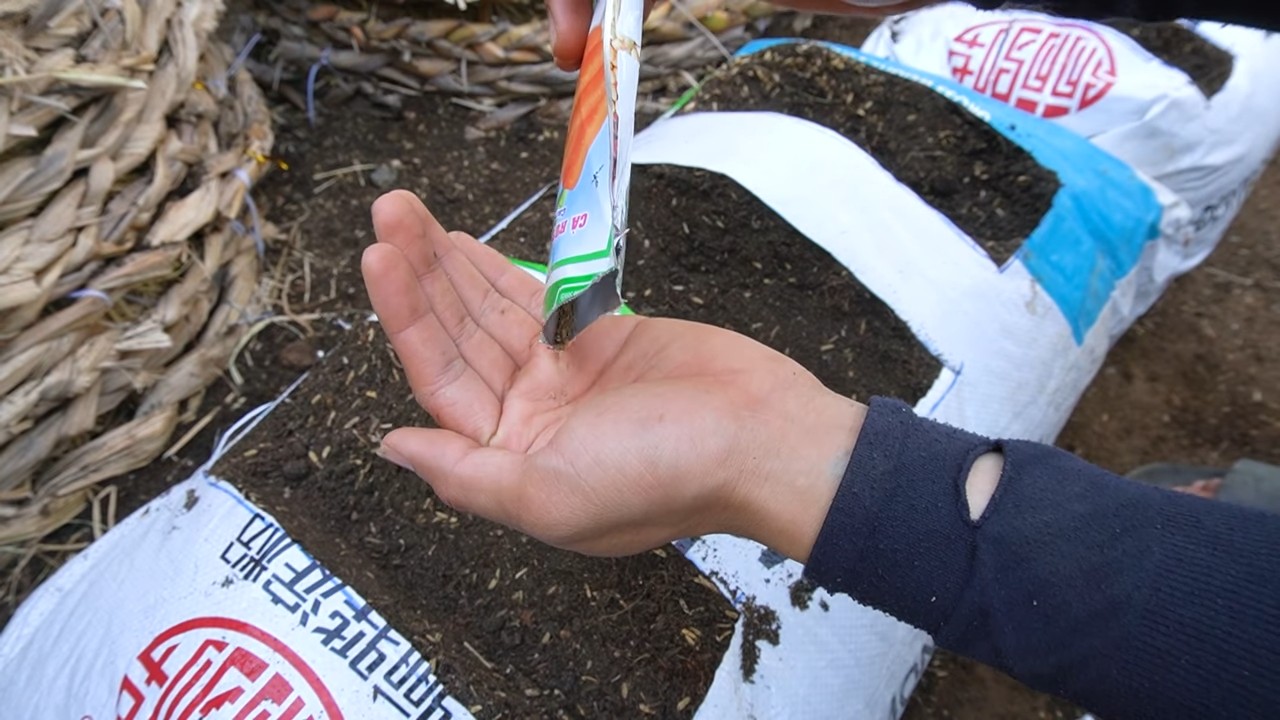
4. Fertilize:
* Sprinkle a slow-release fertilizer over the surface of the soil, following the instructions on the fertilizer package.
* Gently mix the fertilizer into the top layer of soil.
5. Watering:
* Keep the soil consistently moist, but not waterlogged. Water deeply whenever the top inch of soil feels dry to the touch.
* Water in the morning to allow the foliage to dry before nightfall, which can help prevent fungal diseases.
6. Placement:
* Place the soil bags in a location that receives at least 6-8 hours of direct sunlight per day. Carrots need plenty of sunlight to thrive.
* If you live in a hot climate, consider providing some afternoon shade to prevent the soil from drying out too quickly.
Thinning Your Carrot Seedlings
Thinning is a crucial step for growing healthy carrots. If you don’t thin them, the carrots will compete for resources and you’ll end up with a bunch of small, spindly carrots.
1. When to Thin:
* Thin your carrot seedlings when they are about 2-3 inches tall and have developed their first true leaves (the leaves that appear after the initial seed leaves).
2. How to Thin:
* Carefully pull out the weaker seedlings, leaving the strongest ones spaced about 1-2 inches apart.
* Hold the base of the seedling you want to remove and gently pull it straight up.
* Avoid disturbing the roots of the remaining seedlings.
* Water the soil after thinning to help settle the remaining seedlings.
3. Second Thinning (Optional):
* If you want even larger carrots, you can thin them again when they are about 4-5 inches tall, spacing them about 3-4 inches apart.
Caring for Your Carrots
Now that your carrots are planted and thinned, here’s how to keep them happy and healthy:
1. Watering:
* Continue to water regularly, keeping the soil consistently moist.
* Check the soil moisture daily, especially during hot, dry weather.
* Avoid overwatering, as this can lead to root rot.
2. Fertilizing:
* Carrots are heavy feeders, so they need regular fertilization.
* Apply a liquid fertilizer every 2-3 weeks, following the instructions on the fertilizer package.
* Choose a fertilizer that is high in phosphorus and potassium, which are essential for root development.
3. Weed Control:
* Keep the soil bags free of weeds. Weeds compete with carrots for nutrients and water.
* Hand-pull any weeds that appear, being careful not to disturb the carrot roots.
* Mulching around the carrots can help suppress weed growth.
4. Pest Control:
* Carrots can be susceptible to certain pests, such as carrot rust flies and aphids.
* Inspect your carrots regularly for signs of pests.
* If you find pests, you can try using insecticidal soap or neem oil to control them.
* Companion planting with herbs like rosemary and sage can also help deter pests.
5. Sunlight:
* Ensure your carrots continue to receive at least 6-8 hours of direct sunlight per day.
* If you live in a hot climate, provide some afternoon shade to prevent the soil from overheating.
Harvesting Your Carrots
The most exciting part! Here’s how to harvest your homegrown carrots:
1. When to Harvest:
* Carrots are typically ready to harvest 60-80 days after planting, depending on the variety.
* Check the seed packet for specific maturity dates.
* You can harvest carrots at any size, but they will be sweetest and most flavorful when they are fully mature.
2. How to Harvest:
* Gently loosen the soil around the carrot with your hands or a small trowel.
* Grasp the carrot by the base of the foliage and gently pull it straight up.
* If the carrot is difficult to pull, try wiggling it back and forth to loosen it.
* Brush off any excess soil from the carrot.
3. Storing Your Carrots:
* Cut off the foliage, leaving about 1/2 inch of stem.
* Wash the carrots thoroughly.
* Store the carrots in the refrigerator in a plastic bag or container.
* Carrots can be stored for several weeks in the refrigerator.
Troubleshooting
Even with the best care, you might encounter some challenges. Here are a few common problems and how to address them:
* Forked Carrots: This can be caused by rocks or compacted soil. Make sure your potting mix is loose and free of debris.
* Small Carrots: This can be caused by overcrowding,
Conclusion
So, there you have it! Growing carrots in soil bags is not just a gardening hack; it’s a game-changer for anyone looking to enjoy fresh, homegrown carrots, regardless of their space constraints or soil quality. We’ve explored the simplicity, efficiency, and sheer joy of this method, and hopefully, you’re as excited as we are to give it a try.
Why is this a must-try? Because it democratizes carrot cultivation! No longer are you limited by rocky, clay-heavy soil or the lack of a sprawling garden. Soil bags provide a controlled environment, allowing you to tailor the growing conditions precisely to the needs of your carrot crop. This translates to straighter, sweeter, and more abundant harvests. Plus, the portability of soil bags means you can chase the sun, protect your carrots from unexpected frosts, or even move them indoors during extreme weather.
But the beauty of this method lies not only in its practicality but also in its adaptability. Feel free to experiment with different carrot varieties. Shorter, rounder varieties like ‘Parisian’ or ‘Thumbelina’ are particularly well-suited for soil bags, but don’t let that stop you from trying longer types. Just ensure your bag is deep enough to accommodate their growth.
Consider companion planting within your soil bags. Marigolds can help deter nematodes, while basil can repel carrot flies. A sprinkle of radish seeds alongside your carrots can also help break up the soil and mark the rows.
And don’t be afraid to get creative with your soil mix. While a standard potting mix works well, you can amend it with compost, perlite, or vermiculite to improve drainage and aeration. Adding a slow-release fertilizer will provide your carrots with a steady supply of nutrients throughout the growing season.
The key to successful growing carrots in soil bags is consistent moisture. Check the soil regularly and water deeply whenever the top inch feels dry. Avoid overwatering, as this can lead to root rot. A layer of mulch on top of the soil will help retain moisture and suppress weeds.
We wholeheartedly encourage you to embark on this gardening adventure. It’s a rewarding experience that will connect you with nature and provide you with delicious, homegrown carrots to enjoy in countless ways. Imagine the satisfaction of pulling your own carrots from the soil, knowing that you nurtured them from seed to harvest.
So, grab some soil bags, choose your favorite carrot seeds, and get planting! We’re confident that you’ll be amazed by the results. And most importantly, we want to hear about your experiences. Share your tips, tricks, and triumphs with us in the comments below. Let’s build a community of soil bag carrot growers and learn from each other. Happy gardening!
Frequently Asked Questions (FAQ)
What size soil bag is best for growing carrots?
The ideal size soil bag depends on the carrot variety you plan to grow. For shorter, rounder varieties like ‘Parisian’ or ‘Thumbelina,’ a bag that is at least 12 inches deep and 12 inches wide should suffice. However, for longer varieties like ‘Nantes’ or ‘Danvers,’ you’ll need a bag that is at least 18 inches deep and 12 inches wide. Remember, carrots need room to grow downwards, so depth is more important than width. You can also use larger bags and plant multiple rows of carrots within the same bag.
What type of soil should I use in my soil bag?
A well-draining potting mix is the best option for growing carrots in soil bags. Avoid using garden soil, as it can be too heavy and compacted, which can hinder root development. You can amend your potting mix with compost, perlite, or vermiculite to improve drainage and aeration. A good mix would be equal parts potting mix, compost, and either perlite or vermiculite. This will provide your carrots with the nutrients they need while ensuring proper drainage.
How often should I water my carrots in soil bags?
Carrots in soil bags need consistent moisture, but they don’t like to be waterlogged. Check the soil regularly, especially during hot and dry weather. Water deeply whenever the top inch of soil feels dry to the touch. Avoid frequent, shallow watering, as this can encourage shallow root growth. When you water, water thoroughly until water drains from the bottom of the bag. This ensures that the entire root zone is moistened.
Do I need to fertilize my carrots in soil bags?
Yes, carrots are heavy feeders and will benefit from fertilization, especially when grown in soil bags. You can incorporate a slow-release fertilizer into the soil mix at planting time. Alternatively, you can feed your carrots with a liquid fertilizer every two to three weeks during the growing season. Choose a fertilizer that is balanced or slightly higher in phosphorus and potassium, as these nutrients are essential for root development. Follow the instructions on the fertilizer label carefully to avoid over-fertilizing.
How do I prevent carrot flies from attacking my carrots in soil bags?
Carrot flies are a common pest that can damage carrot roots. To prevent carrot flies from attacking your carrots in soil bags, you can use several strategies. One effective method is to cover your soil bags with a fine mesh netting or row cover. This will prevent the carrot flies from laying their eggs near your carrots. You can also plant companion plants like marigolds or basil, which are known to repel carrot flies. Another tip is to avoid thinning your carrots during the day, as the scent of damaged foliage can attract carrot flies. Thin them in the evening when the flies are less active.
Can I grow carrots in soil bags in full sun?
Yes, carrots need at least six hours of sunlight per day to thrive. Place your soil bags in a location that receives full sun. However, in very hot climates, you may need to provide some afternoon shade to prevent the soil from drying out too quickly. You can use shade cloth or move the soil bags to a slightly shaded area during the hottest part of the day.
How do I know when my carrots are ready to harvest?
The time it takes for carrots to mature depends on the variety. Generally, carrots are ready to harvest when they reach the size specified on the seed packet. You can gently brush away the soil around the top of the carrot to check its size. If the carrot is large enough, you can carefully pull it out of the soil. If the soil is dry, water it thoroughly before harvesting to make it easier to pull the carrots.
Can I reuse the soil from my soil bags after harvesting my carrots?
You can reuse the soil from your soil bags, but it’s important to replenish the nutrients and improve the soil structure. After harvesting your carrots, remove any remaining plant debris and weeds. Amend the soil with compost, aged manure, or a slow-release fertilizer. You may also want to add some perlite or vermiculite to improve drainage. Avoid planting carrots in the same soil bag for consecutive seasons, as this can increase the risk of soilborne diseases. Rotate your crops to different soil bags each year.
What are some other vegetables I can grow in soil bags?
Soil bags are a versatile growing medium and can be used to grow a wide variety of vegetables. Some other vegetables that thrive in soil bags include tomatoes, peppers, cucumbers, lettuce, spinach, radishes, and herbs. The key is to choose the right size bag for the vegetable you plan to grow and to provide adequate water and nutrients.
My carrots are forking or splitting. What am I doing wrong?
Forking or splitting carrots are often caused by uneven watering, rocky soil, or soil that is too rich in nitrogen. Ensure that you are watering your carrots consistently and deeply. Remove any rocks or debris from the soil before planting. Avoid using fertilizers that are high in nitrogen, as this can promote leafy growth at the expense of root development. A balanced fertilizer or one that is slightly higher in phosphorus and potassium is a better choice.

Leave a Comment