

Growing peanuts in containers might sound like a quirky experiment reserved for seasoned gardeners, but trust me, it’s a surprisingly rewarding and accessible project for anyone, even if you’re short on space! Have you ever imagined harvesting your own homegrown peanuts right from your patio or balcony? It’s not just a fun conversation starter; it’s a tangible connection to the earth and a delicious treat waiting to happen.
Peanuts, despite their name, aren’t actually nuts! They’re legumes, and their history stretches back thousands of years to South America, where they were cultivated by ancient civilizations. From there, they journeyed across the globe, becoming a staple in cuisines worldwide. Think about it – peanut butter, peanut brittle, savory sauces – the humble peanut has truly conquered the culinary world!
But why bother growing peanuts in containers? Well, for starters, it’s incredibly satisfying to nurture a plant from seed to harvest. More practically, container gardening allows you to control the soil quality and growing conditions, protecting your precious peanuts from pests and diseases that might plague in-ground gardens. Plus, it’s a fantastic way to enjoy fresh, homegrown produce even if you live in an apartment or have limited outdoor space. I’m excited to share some simple DIY tricks and hacks that will make your peanut-growing journey a resounding success. Let’s get our hands dirty and unlock the secrets to a bountiful peanut harvest, right from the comfort of our own homes!
Growing Peanuts in Containers: A Beginner’s Guide
Hey there, fellow gardening enthusiasts! Ever thought about growing your own peanuts? It might sound a little crazy, especially if you don’t live in a traditional peanut-growing region, but trust me, it’s totally doable – and incredibly rewarding – to grow peanuts in containers. I’ve done it myself, and let me tell you, there’s nothing quite like harvesting your own homegrown peanuts. Plus, it’s a fantastic conversation starter!
This guide will walk you through everything you need to know to successfully grow peanuts in containers, from choosing the right container and soil to harvesting your delicious, nutty bounty. Let’s get started!
Choosing the Right Container and Soil
First things first, you’ll need to select the perfect home for your peanut plants. And, of course, the right soil to help them thrive.
* Container Size: Peanuts need room to spread their roots and develop those underground treasures. I recommend a container that’s at least 18 inches in diameter and 12 inches deep. The bigger, the better, really! A half-barrel planter or a large, sturdy plastic container works great.
* Drainage: Excellent drainage is absolutely crucial. Peanuts don’t like soggy feet! Make sure your container has plenty of drainage holes at the bottom. If not, drill some!
* Material: The material of the container isn’t as important as size and drainage. Plastic, terracotta, or even fabric grow bags can work well. I personally prefer plastic because they retain moisture a bit better, which is helpful in hot weather.
* Soil Mix: Forget about using regular garden soil. It’s too heavy and compacts easily, which will hinder peanut development. Instead, opt for a well-draining, sandy loam potting mix. You can buy a pre-made mix or create your own by combining:
* Equal parts of potting soil
* Coarse sand (builder’s sand, not play sand)
* Compost (for added nutrients)
* pH Level: Peanuts prefer a slightly acidic to neutral soil pH, ideally between 6.0 and 7.0. You can test your soil pH with a simple soil testing kit available at most garden centers. If your soil is too alkaline, you can amend it with sulfur.
Planting Your Peanut Seeds
Now for the fun part – planting! You can either start with raw, unsalted peanuts from the grocery store (make sure they’re unroasted!) or purchase peanut seeds specifically for planting from a seed supplier. I’ve had success with both methods.
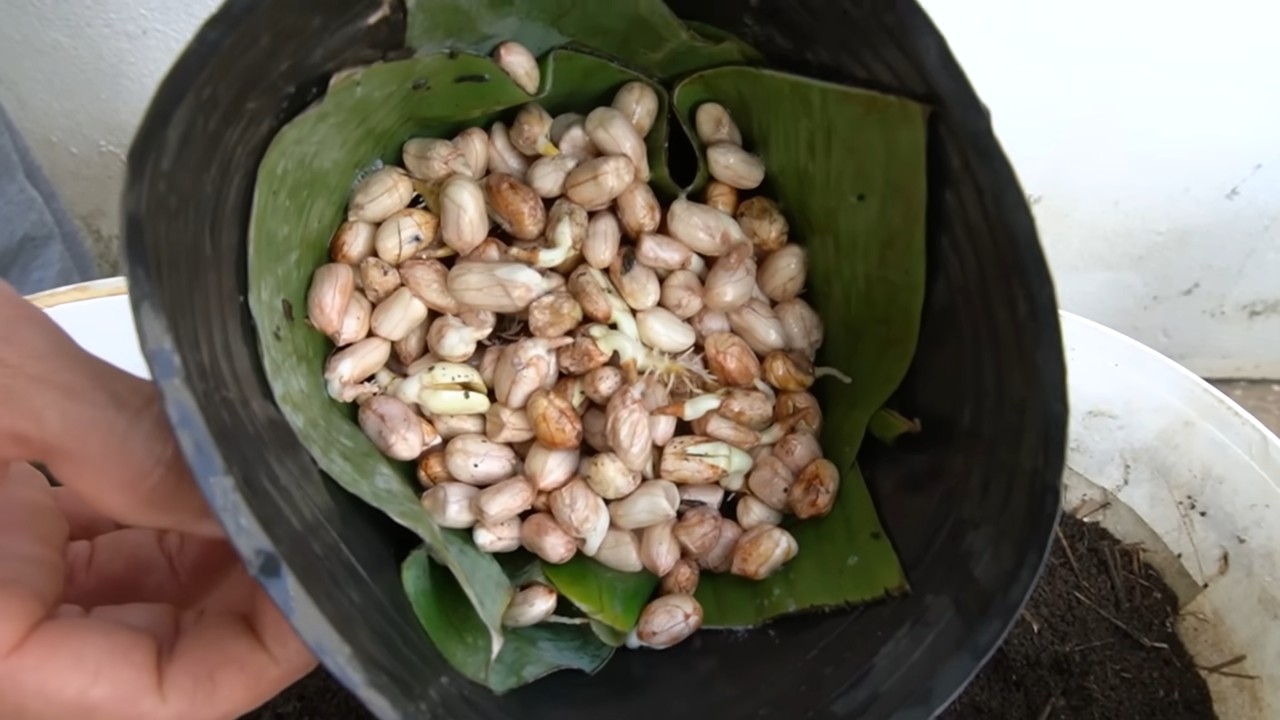
* Soaking the Seeds (Optional): Soaking the peanut seeds in water for 24 hours before planting can help speed up germination. I usually do this, but it’s not strictly necessary.
* Planting Time: Peanuts need warm weather to thrive. Wait until after the last frost and the soil temperature has warmed to at least 65°F (18°C) before planting. In my area, that’s usually late May or early June.
* Planting Depth: Plant the peanut seeds about 1-2 inches deep.
* Spacing: Space the seeds about 4-6 inches apart in the container. If you’re using a very large container, you can plant them a bit closer together.
* Watering: Water the soil thoroughly after planting. Keep the soil consistently moist, but not waterlogged, until the seedlings emerge.
Here’s a step-by-step breakdown:
1. Prepare the Container: Fill your chosen container with the well-draining potting mix, leaving about an inch or two of space at the top.
2. Water the Soil: Moisten the soil thoroughly before planting. This helps settle the soil and provides initial moisture for the seeds.
3. Plant the Seeds: Make small holes in the soil, 1-2 inches deep, spaced 4-6 inches apart.
4. Place the Seeds: Drop one peanut seed into each hole.
5. Cover the Seeds: Gently cover the seeds with soil and pat it down lightly.
6. Water Again: Water the soil again gently to ensure good contact between the seeds and the soil.
7. Label: Label your container with the date and type of peanut you planted. This helps you keep track of your progress.
8. Placement: Place the container in a sunny location that receives at least 6-8 hours of direct sunlight per day.
Caring for Your Peanut Plants
Once your peanut seedlings emerge, it’s time to provide them with the care they need to grow and produce those delicious peanuts.
* Sunlight: Peanuts are sun-loving plants and need at least 6-8 hours of direct sunlight per day. Place your container in the sunniest spot you can find.
* Watering: Water regularly, especially during hot, dry weather. The soil should be consistently moist, but not waterlogged. Check the soil moisture by sticking your finger into the soil. If the top inch feels dry, it’s time to water.
* Fertilizing: Peanuts are legumes, which means they can fix nitrogen from the air. However, they still benefit from occasional fertilization. Use a balanced fertilizer (e.g., 10-10-10) every 4-6 weeks. Avoid over-fertilizing, as this can lead to excessive foliage growth at the expense of peanut production. I like to use a liquid seaweed fertilizer diluted according to the package instructions.
* Weeding: Keep the container free of weeds, which can compete with your peanut plants for nutrients and water. Hand-pull any weeds that appear.
* Hilling: As the peanut plants grow, they will produce “pegs” that grow downwards from the base of the plant into the soil. These pegs are what develop into peanuts. To encourage peanut production, you can “hill” the soil around the base of the plants by adding more soil or compost. This helps the pegs penetrate the soil more easily. I usually do this a couple of times during the growing season.
* Pest and Disease Control: Peanuts are generally relatively pest-resistant, but they can be susceptible to certain pests and diseases, such as aphids, spider mites, and leaf spot. Inspect your plants regularly for signs of pests or diseases. If you spot any problems, treat them promptly with an appropriate insecticide or fungicide. I prefer to use organic pest control methods whenever possible, such as insecticidal soap or neem oil.
Harvesting Your Peanuts
The moment you’ve been waiting for! Harvesting your homegrown peanuts is the most rewarding part of the process.
* Timing: Peanuts typically take about 120-150 days to mature. The exact timing will depend on the variety of peanut you’re growing and the weather conditions. A good indicator that your peanuts are ready to harvest is when the foliage starts to turn yellow and brown.
* Testing: Before harvesting the entire plant, dig up a few peanuts to check their maturity. The peanut shells should be well-formed and the kernels inside should be plump and fully developed.
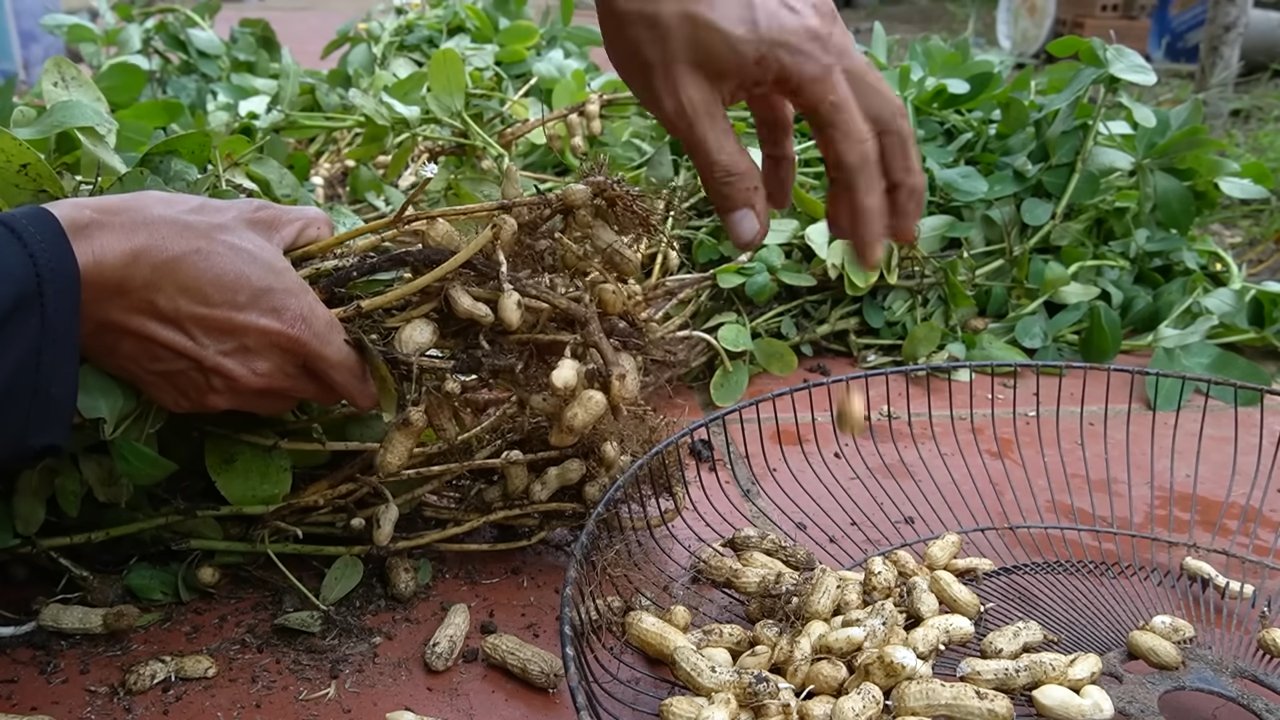
* Harvesting Method: To harvest your peanuts, gently loosen the soil around the base of the plant with a garden fork or trowel. Then, carefully pull the entire plant out of the container, being careful not to break off any of the peanuts.
* Cleaning: Shake off as much soil as possible from the peanuts.
* Curing: Curing is essential for developing the flavor and preventing mold growth. Hang the entire plant upside down in a warm, dry, well-ventilated place for 2-4 weeks. You can hang them in a garage, shed, or even indoors.
* Separating the Peanuts: Once the plants are cured, you can separate the peanuts from the vines. Simply pull them off by hand.
* Drying: After separating the peanuts, spread them out in a single layer on a screen or tray and let them dry for another week or two.
* Storage: Store your dried peanuts in an airtight container in a cool, dry place. They can be stored for several months.
Here’s a step-by-step guide to harvesting:
1. Observe the Plants: Watch for the foliage to turn yellow and brown, indicating maturity.
2. Test a Few Peanuts: Dig up a few peanuts to check for well-formed shells and plump kernels.
3. Loosen the Soil: Gently loosen the soil around the base of the plant.
4. Pull the Plant: Carefully pull the entire plant out of the container.
5. Shake Off Soil: Shake off as much soil as possible from the peanuts.
6. Hang to Cure: Hang the plant upside down in a warm, dry, well-ventilated place for 2-4 weeks.
7. Separate Peanuts: Separate the peanuts from the vines by hand.
8. Dry
Conclusion
So, there you have it! Growing peanuts in containers is not only achievable, but it’s also a surprisingly rewarding experience. Forget the sprawling peanut farms of Georgia; you can cultivate your own little peanut patch right on your balcony, patio, or even indoors with the right setup. This DIY trick transforms the often-intimidating world of agriculture into an accessible and enjoyable hobby for anyone, regardless of their gardening experience.
Why is this a must-try? Because it offers a unique connection to your food. There’s something incredibly satisfying about nurturing a plant from seed to harvest, especially when that harvest yields delicious, homegrown peanuts. You control the entire process, ensuring your peanuts are free from unwanted chemicals and pesticides. Plus, it’s a fantastic educational opportunity, particularly for children, to learn about plant life cycles and where their food comes from.
Beyond the satisfaction and control, growing peanuts in containers is also incredibly space-efficient. If you’re limited on yard space, this is the perfect solution. You can easily move your containers to follow the sun or protect them from harsh weather. And let’s not forget the sheer novelty of it all! How many of your friends can say they grow their own peanuts?
Ready to take your peanut growing to the next level? Consider these variations:
* **Experiment with different peanut varieties:** There are several types of peanuts, each with its own unique flavor and size. Try growing Virginia peanuts for large, flavorful nuts, or Spanish peanuts for their sweet taste and compact size.
* **Companion planting:** Enhance your peanut crop by planting beneficial companion plants in the same container. Marigolds can deter nematodes, while herbs like basil can attract pollinators and repel pests.
* **Roasting your own peanuts:** Once you’ve harvested your peanuts, try roasting them yourself for a truly fresh and flavorful snack. Simply spread them on a baking sheet and roast at 350°F (175°C) for 15-20 minutes, or until golden brown.
* Add organic matter: Peanuts love well-draining soil that is rich in organic matter. Adding compost or aged manure to your container mix will give your plants a boost.
* Consider using a self-watering container: This can help to regulate moisture levels and prevent over or under-watering, which is especially important for peanuts.
Ultimately, the best way to discover the joys of growing peanuts in containers is to simply dive in and try it yourself. Don’t be afraid to experiment and learn from your mistakes. Every gardener, no matter how experienced, started somewhere.
We’re confident that you’ll find this DIY trick to be a rewarding and enjoyable experience. So, grab a container, some peanut seeds, and get ready to embark on your peanut-growing adventure!
We’d love to hear about your experiences! Share your tips, tricks, and photos of your container-grown peanuts in the comments below. Let’s create a community of peanut-growing enthusiasts and learn from each other. Happy growing!
Frequently Asked Questions (FAQ)
What kind of container is best for growing peanuts?
The ideal container for growing peanuts should be at least 12 inches deep and 12 inches wide. This provides enough space for the roots to develop and for the peanuts to form underground. A wider container is generally better than a taller one, as peanuts spread out more than they grow deep. Plastic or terracotta pots are both suitable, but ensure the container has adequate drainage holes to prevent waterlogging. Fabric pots are also a great option, as they allow for better aeration and drainage.
What type of soil should I use for growing peanuts in containers?
Peanuts thrive in well-draining, sandy loam soil. Avoid heavy clay soils, as they can become compacted and hinder peanut development. A good potting mix for peanuts can be created by combining equal parts of potting soil, sand, and compost. The compost will provide essential nutrients, while the sand will improve drainage. You can also add a small amount of perlite or vermiculite to further enhance drainage and aeration. The pH level of the soil should be slightly acidic to neutral, around 6.0 to 7.0.
How often should I water my peanut plants in containers?
Peanut plants need consistent moisture, especially during flowering and peanut development. Water deeply whenever the top inch of soil feels dry to the touch. Avoid overwatering, as this can lead to root rot. During hot, dry weather, you may need to water daily. In cooler, more humid conditions, you can water less frequently. A good rule of thumb is to check the soil moisture regularly and adjust your watering schedule accordingly. Using a moisture meter can be helpful in determining the moisture levels in the soil.
How much sunlight do peanut plants need?
Peanut plants require at least 6-8 hours of direct sunlight per day to thrive. Choose a location for your container that receives plenty of sunlight throughout the day. If you’re growing peanuts indoors, you may need to supplement with grow lights to provide adequate light. Insufficient sunlight can result in weak, leggy plants and reduced peanut production. Rotate your container periodically to ensure all sides of the plant receive equal exposure to sunlight.
When is the best time to plant peanuts in containers?
The best time to plant peanuts is after the last frost, when the soil has warmed up to at least 65°F (18°C). Peanuts are warm-season crops and will not germinate well in cold soil. In most regions, this is typically in late spring or early summer. You can start peanut seeds indoors 4-6 weeks before the last frost to get a head start, but be sure to transplant them carefully to avoid disturbing the roots.
How long does it take for peanuts to mature in containers?
Peanuts typically take 120-150 days to mature, depending on the variety and growing conditions. You’ll know your peanuts are ready to harvest when the foliage begins to turn yellow and the pods feel plump and full. To harvest, gently dig up the entire plant and shake off the excess soil. Hang the plants upside down in a warm, dry place for several weeks to cure the peanuts. Once cured, you can remove the peanuts from the pods and store them in an airtight container.
What are some common pests and diseases that affect peanut plants in containers?
Common pests that can affect peanut plants include aphids, spider mites, and nematodes. Aphids and spider mites can be controlled with insecticidal soap or neem oil. Nematodes can be more challenging to manage, but planting marigolds as companion plants can help deter them. Diseases that can affect peanut plants include leaf spot and root rot. Leaf spot can be prevented by ensuring good air circulation and avoiding overhead watering. Root rot can be prevented by using well-draining soil and avoiding overwatering.
Can I grow peanuts indoors?
Yes, you can grow peanuts indoors, but it requires providing them with adequate light and warmth. Place your container in a sunny south-facing window or use grow lights to provide at least 12-14 hours of light per day. Maintain a consistent temperature of around 70-80°F (21-27°C). Ensure good air circulation to prevent fungal diseases. Indoor peanut plants may not produce as many peanuts as those grown outdoors, but it’s still a fun and rewarding experience.
How do I know when to harvest my peanuts?
The best way to determine when to harvest your peanuts is to check the maturity of the pods. Dig up a few plants and examine the pods. The pods should be plump and full, with a distinct veining pattern on the shell. The inside of the shell should be dark brown. If the pods are still small and white, they are not yet mature. You can also check the foliage of the plant. When the leaves begin to turn yellow and the plant starts to die back, it’s a good indication that the peanuts are ready to harvest.
Is it possible to grow organic peanuts in containers?
Absolutely! Growing peanuts in containers provides an excellent opportunity to grow organic peanuts. Use organic potting mix and fertilizers, and avoid using synthetic pesticides or herbicides. You can use compost tea or fish emulsion to provide nutrients to your plants. Companion planting with herbs like basil and rosemary can help deter pests naturally. By following organic gardening practices, you can enjoy delicious, homegrown peanuts that are free from harmful chemicals.

Leave a Comment