

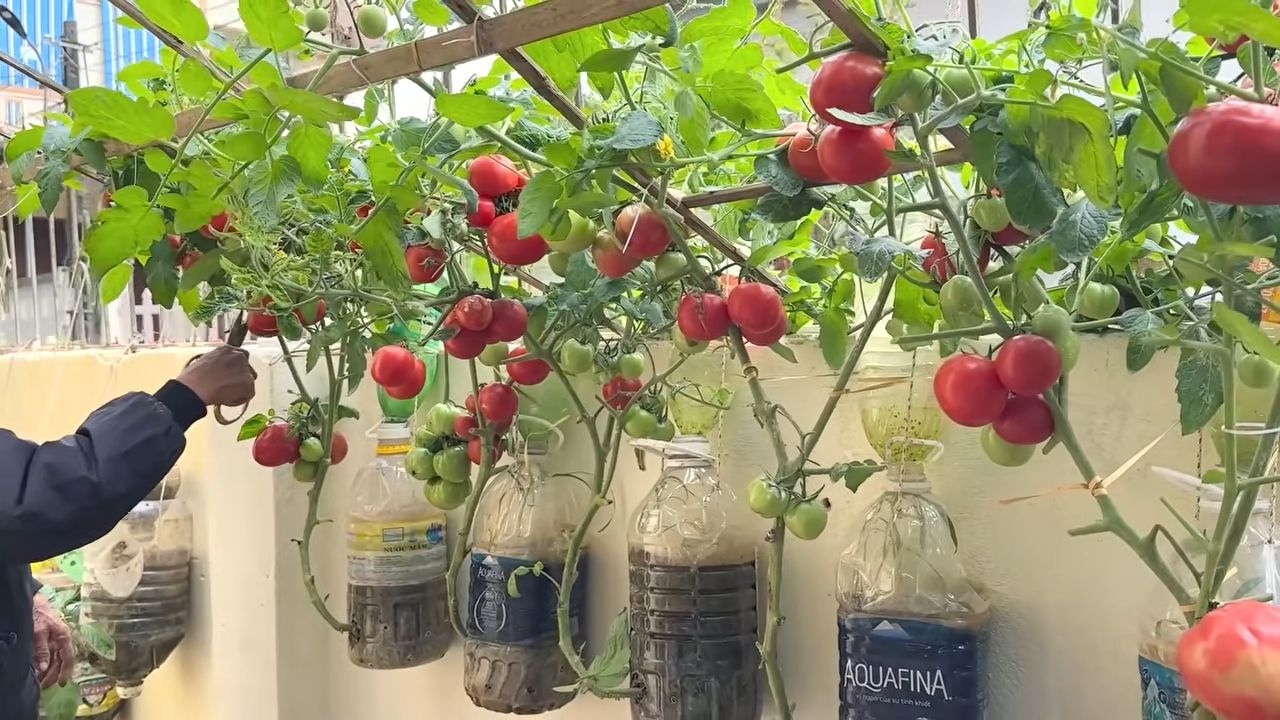
Tomato plant fruit routine: Ever dream of biting into a juicy, sun-ripened tomato, bursting with flavor, straight from your own backyard? I know I have! For centuries, cultivating tomatoes has been a cherished tradition, from the ancient Aztecs who first domesticated them to the Italian Nonnas who perfected their sauces. But let’s face it, sometimes our tomato plants just don’t deliver the bumper crop we’re hoping for.
That’s where a smart tomato plant fruit routine comes in! You might be wondering, “Why do I need a special routine? Can’t I just water them and hope for the best?” Well, you could, but if you’re serious about maximizing your yield and getting those delicious, plump tomatoes, a little extra care goes a long way. This DIY guide is packed with simple yet effective tricks and hacks to help you establish the perfect routine, ensuring your tomato plants are thriving and producing an abundance of fruit. We’ll cover everything from pruning techniques to watering schedules, all designed to give your plants the boost they need. So, grab your gardening gloves, and let’s get started on creating the ultimate tomato-growing experience!
DIY Tomato Plant Fruit Boosting Routine: My Secret for a Bountiful Harvest
Hey fellow gardeners! I’m so excited to share my tried-and-true method for getting your tomato plants to produce an absolute explosion of delicious, juicy tomatoes. I’ve spent years tweaking and perfecting this routine, and I’m confident it will work wonders for you too. Get ready for a tomato harvest that will make your neighbors jealous!
Understanding Tomato Plant Needs
Before we dive into the routine, let’s quickly cover the basics. Tomatoes are heavy feeders, meaning they need a lot of nutrients to thrive and produce fruit. They also need plenty of sunlight and consistent watering. Think of them as little divas who demand attention, but the reward is so worth it!
* Sunlight: Aim for at least 6-8 hours of direct sunlight per day.
* Watering: Water deeply and consistently, especially during hot weather. Avoid overhead watering to prevent fungal diseases.
* Soil: Use well-draining soil that is rich in organic matter.
* Nutrients: Tomatoes need a balanced diet of nitrogen, phosphorus, and potassium, as well as micronutrients like calcium and magnesium.
The Fruit Boosting Routine: A Step-by-Step Guide
This routine is broken down into weekly tasks, making it easy to manage and incorporate into your gardening schedule. I promise, it’s not as daunting as it sounds!
Weekly Feeding Schedule
This is the heart of the fruit-boosting routine. Consistent feeding is key to providing your tomato plants with the nutrients they need to produce an abundance of fruit.
1. Monday: Epsom Salt Foliar Spray.
* Why Epsom Salt? Epsom salt is magnesium sulfate. Magnesium is crucial for chlorophyll production (which helps with photosynthesis) and helps the plant absorb phosphorus and nitrogen.
* How to Prepare: Dissolve 1 tablespoon of Epsom salt in 1 gallon of water.
* How to Apply: Use a spray bottle to thoroughly coat the leaves of your tomato plants, both top and bottom. Do this in the early morning or late evening to avoid burning the leaves in direct sunlight.
* Frequency: Once a week.
2. Wednesday: Fish Emulsion Fertilizer.
* Why Fish Emulsion? Fish emulsion is a fantastic organic fertilizer that provides a balanced source of nitrogen, phosphorus, and potassium, as well as micronutrients. It’s like a superfood smoothie for your tomato plants!
* How to Prepare: Follow the instructions on the fish emulsion bottle for dilution. Typically, it’s around 2 tablespoons per gallon of water.
* How to Apply: Pour the diluted fish emulsion around the base of each tomato plant, being careful not to get it on the leaves. Water the soil thoroughly after application.
* Frequency: Once a week.
3. Friday: Calcium Boost (Eggshell Tea or Calcium Nitrate).
* Why Calcium? Calcium is essential for preventing blossom-end rot, a common problem in tomatoes that causes the bottom of the fruit to turn black and leathery.
* Option 1: Eggshell Tea
* How to Prepare: Save your eggshells! Rinse them thoroughly and let them dry completely. Crush them into small pieces and simmer them in water for about 30 minutes. Let the tea cool completely before using.
* How to Apply: Pour the eggshell tea around the base of each tomato plant.
* Frequency: Once a week.
* Option 2: Calcium Nitrate
* How to Prepare: Dissolve 1 teaspoon of calcium nitrate in 1 gallon of water.
* How to Apply: Pour the diluted calcium nitrate around the base of each tomato plant. Be careful not to over-apply, as too much nitrogen can lead to excessive foliage growth and fewer fruits.
* Frequency: Once a week.
* Important Note: If you choose calcium nitrate, be very careful with the dosage. Too much can burn your plants. Start with a smaller amount and observe how your plants respond.
4. Sunday: Compost Tea.
* Why Compost Tea? Compost tea is a liquid fertilizer made by steeping compost in water. It’s packed with beneficial microbes and nutrients that improve soil health and boost plant growth.
* How to Prepare: Place a handful of compost in a burlap sack or old sock. Submerge the sack in a bucket of water and let it steep for 24-48 hours, stirring occasionally.
* How to Apply: Remove the sack of compost and use the compost tea to water your tomato plants.
* Frequency: Once a week.
Additional Tips for Tomato Success
Besides the weekly feeding schedule, here are a few extra tips that will help you maximize your tomato harvest:
1. Pruning:
* Why Prune? Pruning helps to improve air circulation, reduce disease, and encourage fruit production.
* How to Prune: Remove suckers (the small shoots that grow between the main stem and the branches) regularly. Also, remove any yellowing or diseased leaves.
* Frequency: Once a week.
2. Staking or Caging:
* Why Stake or Cage? Staking or caging provides support for your tomato plants, preventing them from falling over and keeping the fruits off the ground.
* How to Stake or Cage: Install stakes or cages when you plant your tomato seedlings. As the plants grow, tie them to the stakes or guide them through the cages.
* When to do it: At planting time and as needed throughout the growing season.
3. Mulching:
* Why Mulch? Mulching helps to retain moisture in the soil, suppress weeds, and regulate soil temperature.
* How to Mulch: Apply a layer of organic mulch, such as straw, wood chips, or shredded leaves, around the base of your tomato plants.
* When to do it: After planting.
4. Watering Deeply:
* Why Water Deeply? Deep watering encourages roots to grow deeper into the soil, making the plants more drought-tolerant and resilient.
* How to Water Deeply: Water slowly and deeply, allowing the water to soak into the soil. Avoid frequent, shallow watering.
* When to do it: Whenever the top inch of soil feels dry.
5. Pollination Assistance (If Needed):
* Why Assist Pollination? Sometimes, especially in hot or humid weather, tomato flowers may not pollinate properly.
* How to Assist Pollination: Gently shake the tomato plants or use a small paintbrush to transfer pollen from one flower to another.
* When to do it: During flowering, especially if you notice that fruits are not setting.
6. Pest and Disease Control:
* Why Control Pests and Diseases? Pests and diseases can significantly reduce your tomato yield.
* How to Control Pests and Diseases: Regularly inspect your tomato plants for signs of pests or diseases. Use organic pest control methods, such as insecticidal soap or neem oil, to control pests. Remove any diseased leaves or plants immediately.
* When to do it: Regularly throughout the growing season.
Troubleshooting Common Tomato Problems
Even with the best care, tomato plants can sometimes encounter problems. Here are a few common issues and how to address them:
1. Blossom-End Rot: As mentioned earlier, blossom-end rot is caused by a calcium deficiency. Make sure you’re providing your plants with enough calcium through eggshell tea or calcium nitrate. Also, ensure consistent watering, as fluctuations in soil moisture can exacerbate the problem.
2. Early Blight: Early blight is a fungal disease that causes dark spots on the leaves. Remove any infected leaves and apply a fungicide. Improve air circulation by pruning your plants.
3. Tomato Hornworms: Tomato hornworms are large green caterpillars that can quickly defoliate your tomato plants. Handpick them off the plants or use Bacillus thuringiensis (Bt), a natural insecticide.
4. Aphids: Aphids are small, sap-sucking insects that can weaken your tomato plants. Spray them with insecticidal soap or neem oil.
5. Sunscald: Sunscald occurs when tomatoes are exposed to too much direct sunlight, causing white or yellow patches on the fruit. Provide shade for your plants during the hottest part of the day.
My Personal Experience and Tips
I’ve been using this routine for years, and it has consistently produced amazing results. I’ve gone from struggling to get a handful of tomatoes to harvesting baskets full of them!
* Don’t be afraid to experiment. Every garden is different,
Conclusion
So, there you have it! This simple yet effective DIY trick for encouraging your tomato plant fruit routine is a game-changer for any gardener, whether you’re a seasoned pro or just starting out. We’ve walked you through the process, highlighting the ease and affordability of this method. But why is it a must-try?
Firstly, it’s about maximizing your yield. Imagine baskets overflowing with juicy, ripe tomatoes, all thanks to a little strategic intervention. This technique helps your plants focus their energy on fruit production, leading to a more abundant harvest. Secondly, it’s about control. You’re taking an active role in guiding your plant’s growth, ensuring it thrives and produces the best possible fruit. And finally, it’s about sustainability. By using simple, readily available materials, you’re reducing your reliance on potentially harmful chemicals and promoting a healthier environment for your plants and your family.
But don’t just take our word for it! We encourage you to experiment and adapt this technique to your specific needs and growing conditions. For instance, if you live in a particularly hot climate, you might want to provide additional shade during the hottest part of the day to prevent sunscald on the developing fruit. Alternatively, if you’re growing your tomatoes in containers, ensure they have adequate drainage to prevent root rot. You could also try different variations of the technique, such as gently shaking the entire plant instead of just tapping the flower stems. Some gardeners swear by using an electric toothbrush on the base of the flower stem for a more thorough vibration.
The possibilities are endless, and the best way to discover what works best for you is to get your hands dirty and give it a try. Remember to observe your plants closely and adjust your approach as needed. Gardening is a journey of learning and discovery, and this DIY trick is just one step along the way.
We’re confident that you’ll be amazed by the results. So, grab your tools, head out to your garden, and start encouraging your tomato plant fruit routine today! And most importantly, we want to hear about your experience. Share your successes, your challenges, and your variations in the comments below. Let’s build a community of tomato-growing enthusiasts and learn from each other. Happy gardening!
Frequently Asked Questions (FAQ)
What exactly does this DIY trick do for my tomato plants?
This DIY trick essentially mimics the natural pollination process. Tomato plants are self-pollinating, meaning they have both male and female parts within the same flower. However, sometimes they need a little help to transfer the pollen from the stamen (male part) to the pistil (female part). Wind and insects usually do this job, but in enclosed spaces like greenhouses or during periods of low wind, pollination can be less efficient. This trick helps to vibrate the flower, releasing the pollen and increasing the chances of successful fertilization and fruit set. By ensuring proper pollination, you’re directly contributing to a more abundant and consistent tomato harvest.
How often should I be doing this to my tomato plants?
The frequency depends on your local climate and the growing environment. Generally, you should aim to do this every 2-3 days, especially when the plants are actively flowering. If you notice that your plants are already setting fruit well on their own, you might not need to do it as often. However, if you’re experiencing poor fruit set, increasing the frequency to once a day might be beneficial. Pay close attention to your plants and adjust accordingly. Early morning is often the best time, as the pollen is typically drier and more easily released.
Will this work for all types of tomato plants?
Yes, this technique is generally effective for all types of tomato plants, including determinate (bush) and indeterminate (vining) varieties. However, some varieties may be more prone to self-pollination than others. Experiment and observe your plants to determine the best approach for your specific varieties. Heirloom varieties, in particular, may benefit from this extra encouragement.
Is there a risk of damaging my tomato plants by doing this?
If done gently and carefully, the risk of damaging your tomato plants is minimal. The key is to be gentle when tapping or shaking the flower stems. Avoid excessive force, which could damage the delicate flowers or stems. If you’re using an electric toothbrush, use a low setting and only apply it to the base of the flower stem for a brief period. Always observe your plants for any signs of stress or damage and adjust your technique accordingly.
What if I don’t see any results after trying this DIY trick?
If you’re not seeing the desired results, there could be several factors at play. First, ensure that your plants are receiving adequate sunlight, water, and nutrients. Poor growing conditions can hinder fruit set regardless of pollination efforts. Second, consider the temperature. Tomato plants prefer temperatures between 60°F and 85°F (15°C and 29°C) for optimal fruit set. Extreme temperatures can inhibit pollination. Third, check for any signs of pests or diseases that could be affecting your plants. Finally, be patient. It may take some time to see the results of your efforts. Continue to monitor your plants and adjust your approach as needed.
Can I use a fan to help with pollination instead of tapping the flowers?
Yes, using a fan can be a helpful alternative, especially in enclosed spaces like greenhouses. The gentle breeze created by the fan can help to distribute pollen and encourage pollination. Simply position the fan so that it gently blows across your tomato plants for a few hours each day. Be sure to avoid creating a strong wind, which could damage the plants.
What are some other tips for encouraging tomato fruit production?
Besides this DIY trick, there are several other things you can do to encourage tomato fruit production. These include:
* **Providing adequate sunlight:** Tomato plants need at least 6-8 hours of direct sunlight per day.
* **Watering deeply and consistently:** Water your plants deeply and regularly, especially during hot weather.
* **Fertilizing properly:** Use a balanced fertilizer specifically formulated for tomatoes.
* **Pruning suckers:** Remove the suckers (small shoots that grow between the main stem and branches) to encourage the plant to focus its energy on fruit production.
* **Providing support:** Use stakes, cages, or trellises to support your tomato plants and prevent the fruit from touching the ground.
* **Mulching:** Apply a layer of mulch around your plants to help retain moisture and suppress weeds.
How do I know if my tomato flowers have been successfully pollinated?
After successful pollination, the base of the flower (the ovary) will begin to swell, indicating that a fruit is developing. The flower petals will typically wither and fall off. If the flower withers and falls off without any swelling at the base, it likely wasn’t successfully pollinated.
Is this DIY trick a substitute for having bees in my garden?
While this DIY trick can help to improve pollination, it’s not a complete substitute for having bees in your garden. Bees are highly efficient pollinators and play a vital role in the ecosystem. Encourage bees to visit your garden by planting bee-friendly flowers and avoiding the use of pesticides. This DIY trick is more of a supplemental technique to ensure optimal pollination, especially in situations where bee activity is limited.
Leave a Comment