

Growing Sweet Baby Carrots at home might seem like a challenge reserved for seasoned gardeners, but I’m here to tell you it’s totally achievable, even if you’re a beginner! Forget those bland, store-bought carrots – imagine biting into a crisp, intensely sweet baby carrot you nurtured yourself. Sounds delicious, right?
For centuries, carrots have been a staple in diets across the globe, with their cultivation dating back to ancient times. While the vibrant orange variety we know and love is a relatively modern development, the history of carrots is rich and diverse. But let’s be honest, who wouldn’t prefer a sweet baby carrot over a regular one?
In today’s fast-paced world, taking the time to connect with nature and grow your own food is more important than ever. Not only is it incredibly rewarding, but it also allows you to control exactly what goes into your produce, avoiding harmful pesticides and ensuring maximum freshness. Plus, growing sweet baby carrots is a fantastic way to get kids involved in gardening and teach them about healthy eating habits. This DIY guide will provide you with simple, effective tricks and hacks to cultivate these delightful little veggies right in your own backyard (or even on your balcony!). So, grab your gardening gloves, and let’s get started!
Süße Baby-Karotten selbst anbauen: Ein DIY-Leitfaden
Hallo liebe Gartenfreunde! Ich liebe es, frische, knackige Karotten direkt aus dem Garten zu ernten, und Baby-Karotten sind einfach unwiderstehlich. Sie sind nicht nur super süß und zart, sondern auch perfekt für Snacks, Salate und als gesunde Beilage. In diesem Artikel zeige ich euch, wie ihr eure eigenen süßen Baby-Karotten ganz einfach zu Hause anbauen könnt. Keine Sorge, es ist einfacher als ihr denkt!
Was du für den Anbau von Baby-Karotten brauchst
Bevor wir loslegen, hier eine Liste der Dinge, die du benötigst:
* Karottensamen: Wähle eine Sorte, die für Baby-Karotten geeignet ist. Sorten wie ‘Parisienne’, ‘Thumbelina’ oder ‘Little Finger’ sind ideal.
* Gute Erde: Lockere, sandige Lehmböden sind am besten. Vermeide steinige oder klumpige Erde, da dies das Wachstum der Karotten behindern kann.
* Kompost oder gut verrotteter Mist: Um den Boden anzureichern und die Nährstoffversorgung zu gewährleisten.
* Gießkanne oder Gartenschlauch: Für die Bewässerung.
* Gartenwerkzeuge: Eine kleine Schaufel oder Kelle, eine Harke und eventuell ein Unkrautstecher.
* (Optional) Reihenmarkierer: Um gerade Reihen zu ziehen.
* (Optional) Mulch: Um die Feuchtigkeit im Boden zu halten und Unkraut zu unterdrücken.
* Geduld: Karotten brauchen Zeit zum Wachsen!
Die Vorbereitung: Der Schlüssel zum Erfolg
Die richtige Vorbereitung ist das A und O für eine erfolgreiche Karottenernte. Hier sind die Schritte, die du beachten solltest:
1. Den Boden vorbereiten:
* Entferne alle Steine, Wurzeln und Unkräuter aus dem Beet. Karotten mögen es nicht, wenn sie auf Hindernisse stoßen.
* Lockere den Boden gründlich auf. Ich verwende dafür gerne eine Grabegabel oder eine Hacke.
* Arbeite Kompost oder gut verrotteten Mist in den Boden ein. Das sorgt für eine gute Nährstoffversorgung und verbessert die Bodenstruktur.
* Harke den Boden glatt, um eine ebene Oberfläche zu erhalten.
2. Reihen ziehen:
* Ziehe mit einer Harke oder einem Reihenmarkierer flache Reihen. Der Abstand zwischen den Reihen sollte etwa 15-20 cm betragen.
* Die Reihen sollten nicht tiefer als 1 cm sein. Baby-Karotten brauchen nicht viel Platz, um zu wachsen.
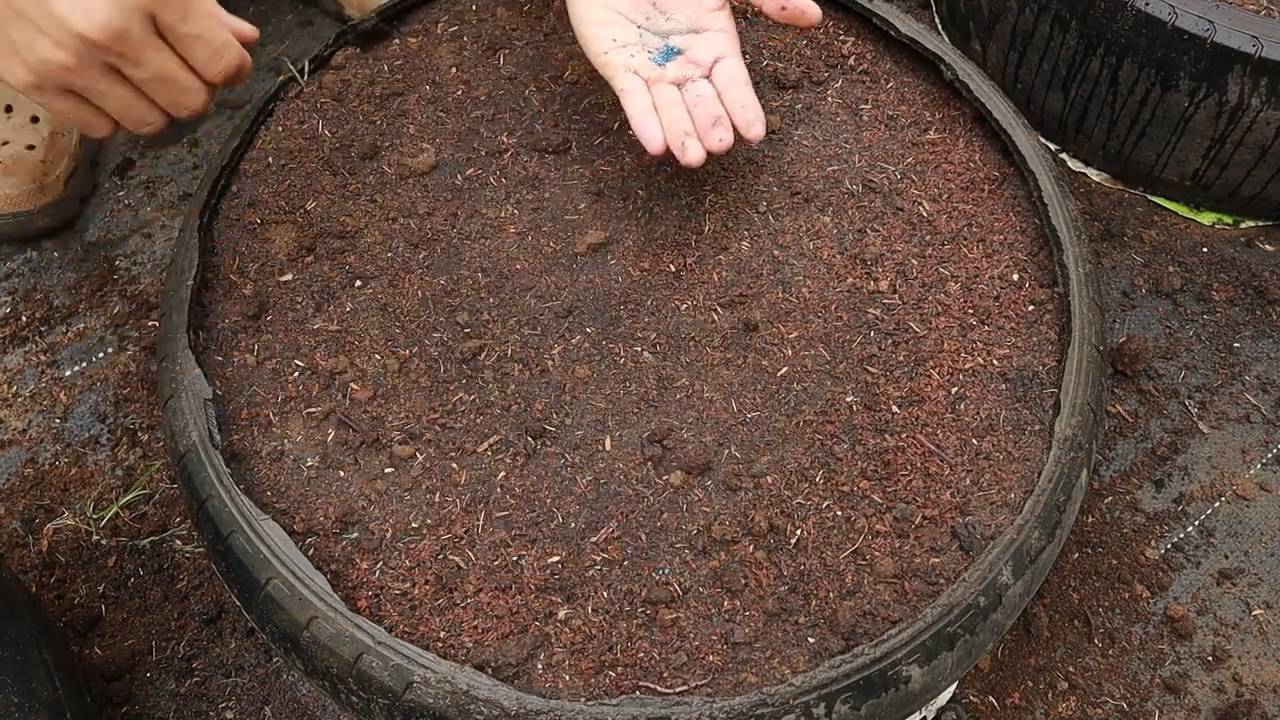
Die Aussaat: Kleine Samen, große Wirkung
Jetzt kommt der spannende Teil: die Aussaat der Karottensamen!
1. Samen aussäen:
* Verteile die Karottensamen gleichmäßig in den Reihen. Karottensamen sind sehr klein, daher ist es wichtig, nicht zu viele Samen auf einmal auszusäen. Ich mische die Samen manchmal mit Sand, um sie besser verteilen zu können.
* Bedecke die Samen mit einer dünnen Schicht Erde (ca. 0,5 cm).
* Drücke die Erde leicht an.
2. Bewässern:
* Gieße die Reihen vorsichtig mit einer Gießkanne oder einem Gartenschlauch mit Brauseaufsatz. Achte darauf, dass die Erde nicht weggespült wird.
* Halte die Erde feucht, aber nicht nass.
Die Pflege: Geduld und Aufmerksamkeit
Nach der Aussaat ist es wichtig, die Karotten regelmäßig zu pflegen.
1. Bewässerung:
* Halte die Erde feucht, besonders während der Keimung und des Wachstums.
* Gieße am besten morgens, damit die Blätter tagsüber abtrocknen können. Das hilft, Pilzkrankheiten vorzubeugen.
2. Unkrautbekämpfung:
* Entferne regelmäßig Unkraut, da es den Karotten Nährstoffe und Platz wegnimmt.
* Sei vorsichtig beim Jäten, um die zarten Karottenpflanzen nicht zu beschädigen.
3. Vereinzeln:
* Sobald die Karottenpflanzen etwa 2-3 cm groß sind, solltest du sie vereinzeln. Das bedeutet, dass du einige Pflanzen entfernst, um den verbleibenden Pflanzen mehr Platz zum Wachsen zu geben.
* Der Abstand zwischen den Pflanzen sollte etwa 2-3 cm betragen.
* Ziehe die Pflanzen vorsichtig heraus, um die Wurzeln der verbleibenden Pflanzen nicht zu beschädigen.
4. Mulchen (optional):
* Eine Schicht Mulch (z.B. Stroh oder Rasenschnitt) kann helfen, die Feuchtigkeit im Boden zu halten und Unkraut zu unterdrücken.
* Achte darauf, dass der Mulch nicht zu dick ist, damit die Karottenpflanzen noch genügend Licht bekommen.
Die Ernte: Der Lohn der Mühe
Nach etwa 50-70 Tagen (je nach Sorte) sind deine Baby-Karotten erntereif.
1. Erntezeitpunkt:
* Du kannst die Karotten ernten, sobald sie die gewünschte Größe erreicht haben. Baby-Karotten sind in der Regel etwa 5-10 cm lang.
* Wenn du dir unsicher bist, kannst du eine Karotte vorsichtig aus der Erde ziehen, um zu sehen, ob sie reif ist.
2. Erntemethode:
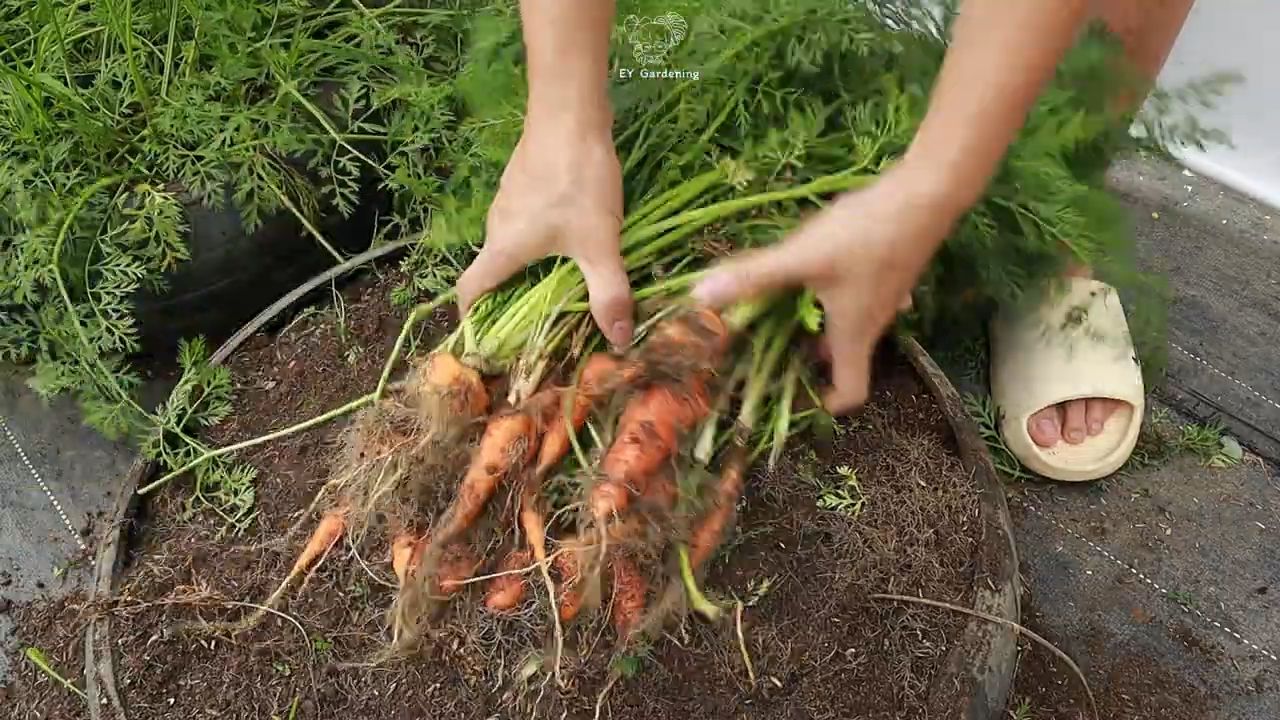
* Lockere die Erde um die Karotten herum mit einer kleinen Schaufel oder Kelle.
* Ziehe die Karotten vorsichtig am Grün aus der Erde.
* Wenn die Erde sehr fest ist, kannst du die Karotten auch mit einer Grabegabel ausheben.
3. Lagerung:
* Entferne das Grün von den Karotten.
* Wasche die Karotten vorsichtig ab.
* Lagere die Karotten im Kühlschrank in einem Plastikbeutel oder einer luftdichten Dose. Sie halten sich so etwa 1-2 Wochen.
Häufige Probleme und Lösungen
Auch beim Anbau von Baby-Karotten können Probleme auftreten. Hier sind einige häufige Probleme und wie du sie lösen kannst:
* Schlechte Keimung:
* Ursache: Zu trockene oder zu nasse Erde, zu tiefe Aussaat, schlechte Samenqualität.
* Lösung: Achte auf eine gleichmäßige Feuchtigkeit, säe die Samen nicht zu tief aus und verwende frische Samen.
* Karottenfliege:
* Ursache: Die Larven der Karottenfliege fressen an den Wurzeln der Karotten.
* Lösung: Verwende ein Insektenschutznetz, um die Karotten vor der Karottenfliege zu schützen. Du kannst auch Nematoden einsetzen, die die Larven der Karottenfliege bekämpfen.
* Verkrümmte Karotten:
* Ursache: Steiniger oder klumpiger Boden, zu wenig Platz zwischen den Pflanzen.
* Lösung: Bereite den Boden sorgfältig vor und vereinzele die Pflanzen rechtzeitig.
* Blattläuse:
* Ursache: Blattläuse saugen Pflanzensaft und können die Karottenpflanzen schwächen.
* Lösung: Spritze die Karottenpflanzen mit einem Wasserstrahl ab oder verwende eine Seifenlauge.
Zusätzliche Tipps für eine reiche Ernte
* Fruchtfolge beachten: Baue Karotten nicht jedes Jahr am selben Standort an, um Krankheiten und Schädlingen vorzubeugen.
* Begleitpflanzen: Pflanze Begleitpflanzen wie Ringelblumen, Salbei oder Rosmarin in der Nähe der Karotten, um Schädlinge abzuhalten.
* Regelmäßig düngen: Dünge die Karotten während der Wachstumsphase regelmäßig mit einem organischen Dünger.
Ich hoffe, dieser Leitfaden hilft dir dabei, deine eigenen süßen Baby-Karotten anzubauen. Es ist ein lohnendes Projekt, das dir frische, gesunde und leckere Karotten direkt aus dem Garten beschert. Viel Spaß beim Gärtnern!
Conclusion
So, there you have it! Growing sweet baby carrots at home is not only achievable but also incredibly rewarding. Forget the bland, pre-packaged carrots from the supermarket. With a little patience and this simple DIY trick, you can cultivate a vibrant harvest of tender, flavorful baby carrots that will elevate your salads, snacks, and side dishes to a whole new level.
Why is this a must-try? Because the taste difference is undeniable. Homegrown baby carrots boast a sweetness and freshness that you simply can’t replicate with store-bought varieties. Plus, you have complete control over the growing process, ensuring that your carrots are free from harmful pesticides and chemicals. You’re not just growing carrots; you’re cultivating a healthier, more sustainable lifestyle.
But the benefits extend beyond just taste and health. Gardening is a therapeutic activity that can reduce stress, improve your mood, and connect you with nature. Watching those tiny seeds sprout and develop into plump, juicy baby carrots is an incredibly satisfying experience. It’s a project the whole family can enjoy, teaching children about where their food comes from and fostering a love for gardening.
Looking for variations? Consider experimenting with different carrot varieties. Nantes carrots are known for their sweetness and cylindrical shape, making them ideal for baby carrots. Chantenay carrots are another excellent choice, offering a slightly more robust flavor. You can also try interplanting your carrots with companion plants like radishes or onions, which can help deter pests and improve soil health. Another variation is to use different containers. While raised beds are great, you can also use large pots or even repurposed containers like buckets or tubs. Just make sure they have adequate drainage.
Don’t be intimidated if you’re a beginner gardener. Growing sweet baby carrots is a relatively easy project, and the rewards are well worth the effort. Follow the steps outlined in this guide, pay attention to your plants’ needs, and you’ll be harvesting your own delicious baby carrots in no time.
We encourage you to give this DIY trick a try. Start small, learn as you go, and don’t be afraid to experiment. And most importantly, share your experience with us! We’d love to hear about your successes, challenges, and any tips you’ve discovered along the way. Post photos of your homegrown baby carrots on social media using #HomegrownBabyCarrots and tag us so we can celebrate your gardening achievements. Let’s build a community of passionate gardeners who are dedicated to growing their own fresh, flavorful food.
So, grab your seeds, prepare your soil, and get ready to embark on a delicious gardening adventure. Your taste buds (and your health) will thank you!
Frequently Asked Questions (FAQ)
What is the best time of year to plant baby carrots?
The best time to plant baby carrots depends on your climate. In general, carrots are a cool-season crop, so they thrive in spring and fall. For a spring crop, sow seeds 2-3 weeks before the last expected frost. For a fall crop, sow seeds 2-3 months before the first expected frost. In warmer climates, you can even grow carrots throughout the winter. The key is to avoid planting during the hottest months of the year, as high temperatures can cause the roots to become bitter and stunted.
How much sunlight do baby carrots need?
Baby carrots need at least 6 hours of direct sunlight per day. Choose a location in your garden that receives plenty of sunlight throughout the day. If you’re growing carrots in containers, you can move them around to ensure they get enough sunlight. If you live in a particularly hot climate, you may want to provide some afternoon shade to prevent the soil from drying out too quickly.
What kind of soil is best for growing baby carrots?
Baby carrots need loose, well-drained soil that is rich in organic matter. Avoid heavy clay soils, as they can restrict root growth and result in misshapen carrots. Amend your soil with compost or other organic matter to improve drainage and fertility. A slightly acidic soil pH of 6.0 to 6.8 is ideal. Before planting, remove any rocks or debris from the soil, as these can also interfere with root development.
How often should I water my baby carrots?
Baby carrots need consistent moisture to thrive. Water deeply and regularly, especially during dry periods. Aim to keep the soil consistently moist but not waterlogged. Avoid overhead watering, as this can promote fungal diseases. Instead, water at the base of the plants. Mulching around your carrots can help retain moisture and suppress weeds.
How do I thin baby carrots?
Thinning is essential for growing healthy baby carrots. When the seedlings are about 2 inches tall, thin them to about 1-2 inches apart. This will give the remaining carrots enough space to grow and develop properly. Use scissors to snip off the unwanted seedlings at the soil line, rather than pulling them out, as this can disturb the roots of the remaining plants.
When are baby carrots ready to harvest?
Baby carrots are typically ready to harvest 50-70 days after planting, depending on the variety. You can harvest them when they are about ½ to ¾ inches in diameter. Gently loosen the soil around the carrots and pull them out by the tops. If the soil is dry, water it beforehand to make harvesting easier.
Can I grow baby carrots in containers?
Yes, you can definitely grow baby carrots in containers! Choose a container that is at least 8-10 inches deep and has drainage holes. Fill the container with a well-draining potting mix. Sow the seeds according to the instructions on the seed packet. Water regularly and fertilize every few weeks with a balanced fertilizer.
What are some common pests and diseases that affect baby carrots?
Some common pests that affect baby carrots include carrot rust flies, aphids, and nematodes. Diseases include leaf blight and root rot. To prevent pests and diseases, practice good garden hygiene, such as removing weeds and debris. You can also use organic pest control methods, such as insecticidal soap or neem oil. Ensure proper drainage to prevent root rot. Crop rotation can also help minimize pest and disease problems.
Can I eat the carrot greens?
Yes, carrot greens are edible and nutritious! They have a slightly bitter taste, similar to parsley. You can use them in salads, soups, or pesto. Just be sure to wash them thoroughly before eating.
How do I store baby carrots after harvesting?
After harvesting, remove the greens from the carrots and wash them thoroughly. Store them in a plastic bag or container in the refrigerator. They should last for several weeks. You can also freeze baby carrots for longer storage. Blanch them in boiling water for a few minutes, then transfer them to an ice bath. Drain well and freeze in a single layer on a baking sheet. Once frozen, transfer them to a freezer bag or container.


Leave a Comment