

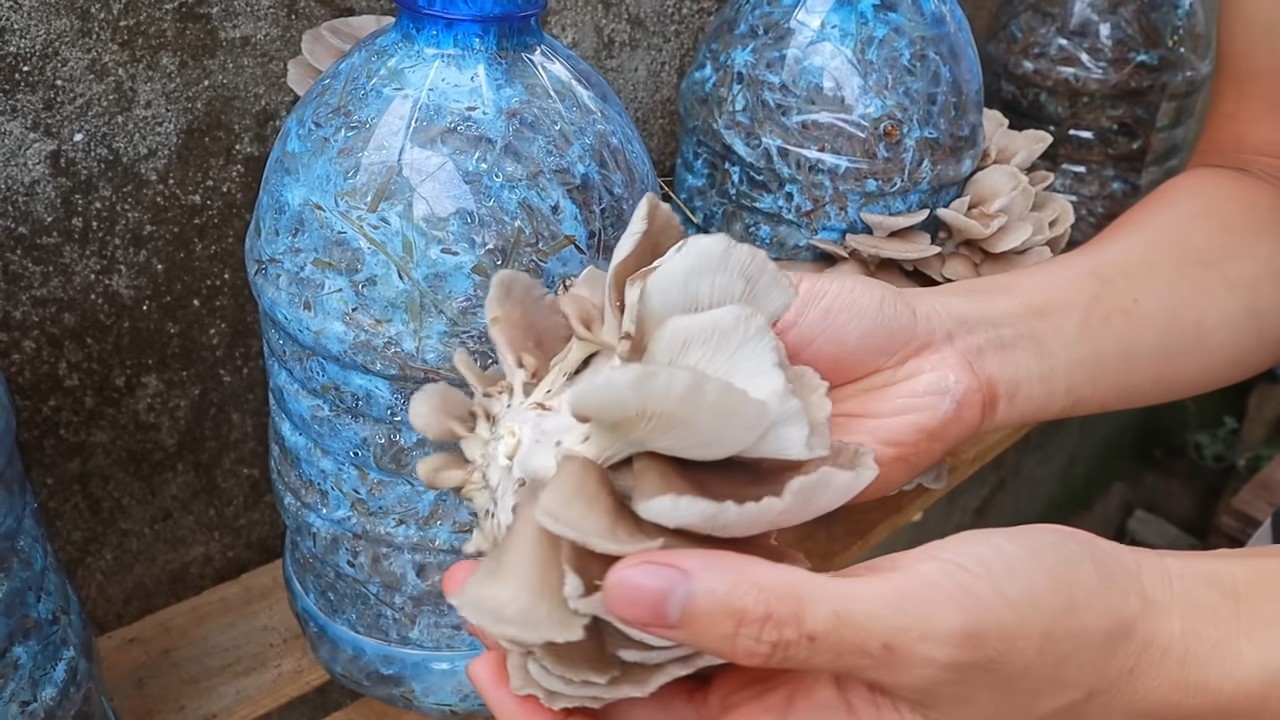
Mushroom Growing with Plastic Bottles: Who knew turning trash into treasure could be so delicious and rewarding? I’m excited to share a fantastic and eco-friendly DIY project that will not only reduce your plastic waste but also provide you with a fresh supply of gourmet mushrooms right at home!
For centuries, mushroom cultivation has been shrouded in mystery, often associated with ancient traditions and specialized knowledge. From the shiitake logs of East Asia to the truffle farms of Europe, growing fungi was once considered an art form. But guess what? You don’t need to be a mycological expert to enjoy the fruits (or rather, fungi) of your labor.
In today’s world, where sustainability is more important than ever, finding innovative ways to reuse materials is crucial. And that’s where this DIY trick comes in. Imagine transforming those empty plastic bottles, destined for the landfill, into mini mushroom farms! Not only are you contributing to a greener planet, but you’re also gaining access to fresh, organic mushrooms that are packed with nutrients and flavor. Plus, let’s be honest, there’s something incredibly satisfying about growing your own food. This method of Mushroom Growing with Plastic Bottles is perfect for beginners, apartment dwellers, or anyone looking for a fun and sustainable hobby. So, grab your bottles, and let’s get growing!
Pilzzucht im Eigenbau: Austernpilze in Plastikflaschen ziehen
Hallo liebe Pilzfreunde! Habt ihr euch jemals gefragt, wie ihr eure eigenen Pilze zu Hause züchten könnt? Es ist einfacher als ihr denkt, und mit diesem DIY-Projekt könnt ihr Austernpilze in recycelten Plastikflaschen anbauen. Das ist nicht nur nachhaltig, sondern auch eine tolle Möglichkeit, frische, köstliche Pilze direkt vor eurer Haustür zu haben. Lasst uns loslegen!
Was ihr braucht:
* Plastikflaschen: Am besten eignen sich 1,5- oder 2-Liter-Flaschen. Achtet darauf, dass sie sauber und leer sind.
* Austernpilzbrut: Diese bekommt ihr online oder in spezialisierten Pilzzucht-Shops. Es gibt verschiedene Sorten von Austernpilzen, wählt einfach eure Lieblingssorte aus!
* Substrat: Stroh (Weizenstroh ist ideal), Kaffeesatz oder Sägespäne (Hartholz) sind gute Optionen. Achtet darauf, dass das Substrat sauber und unbehandelt ist.
* Kalk: Um den pH-Wert des Substrats anzupassen.
* Großer Topf oder Eimer: Zum Pasteurisieren des Substrats.
* Plastiktüten oder Frischhaltefolie: Zum Abdecken des Substrats während der Pasteurisierung.
* Sprühflasche: Zum Befeuchten der Pilze während des Wachstums.
* Bohrer oder Messer: Zum Erstellen von Belüftungslöchern in den Flaschen.
* Handschuhe: Um Kontamination zu vermeiden.
* Optional: Klebeband, um die Löcher nach der Ernte wieder zu verschließen.
Vorbereitung des Substrats: Der Schlüssel zum Erfolg
Das Substrat ist die Nahrungsgrundlage für eure Pilze. Eine gute Vorbereitung ist entscheidend, um Kontaminationen zu vermeiden und ein optimales Wachstum zu gewährleisten.
Pasteurisierung des Strohs:
1. Stroh zerkleinern: Schneidet oder häckselt das Stroh in kleine Stücke (ca. 5-10 cm lang). Das erleichtert die spätere Besiedlung durch die Pilze.
2. Stroh einweichen: Gebt das zerkleinerte Stroh in einen großen Topf oder Eimer und füllt ihn mit Wasser. Lasst das Stroh mindestens 24 Stunden lang einweichen. Das Stroh sollte vollständig mit Wasser bedeckt sein.
3. Kalk hinzufügen: Fügt dem Wasser Kalk hinzu, um den pH-Wert zu erhöhen. Eine Faustregel ist etwa 1 Esslöffel Kalk pro Liter Wasser. Der Kalk hilft, unerwünschte Mikroorganismen abzutöten.
4. Pasteurisieren: Erhitzt das Wasser mit dem Stroh auf etwa 65-75°C. Diese Temperatur sollte für etwa 1-2 Stunden gehalten werden. Achtet darauf, dass das Wasser nicht kocht, da dies die Nährstoffe im Stroh zerstören kann. Ihr könnt ein Thermometer verwenden, um die Temperatur zu überwachen.
5. Abkühlen lassen: Lasst das Stroh nach der Pasteurisierung abkühlen, bis es handwarm ist. Das kann einige Stunden dauern.
6. Abtropfen lassen: Drückt das überschüssige Wasser aus dem Stroh. Es sollte feucht, aber nicht tropfnass sein.
Pasteurisierung von Kaffeesatz:
Kaffeesatz ist bereits pasteurisiert, wenn er durch die Kaffeemaschine gelaufen ist. Allerdings solltet ihr ihn trotzdem kurz erhitzen, um sicherzustellen, dass keine unerwünschten Mikroorganismen vorhanden sind.
1. Kaffeesatz sammeln: Sammelt euren Kaffeesatz über ein paar Tage. Bewahrt ihn im Kühlschrank auf, um Schimmelbildung zu vermeiden.
2. Erhitzen: Gebt den Kaffeesatz in einen Topf und erhitzt ihn kurz (ca. 10 Minuten) bei niedriger Hitze. Achtet darauf, dass er nicht anbrennt.
3. Abkühlen lassen: Lasst den Kaffeesatz abkühlen, bevor ihr ihn verwendet.
Pasteurisierung von Sägespänen:
1. Sägespäne einweichen: Gebt die Sägespäne in einen Eimer und füllt ihn mit Wasser. Lasst die Sägespäne mindestens 24 Stunden lang einweichen.
2. Pasteurisieren: Erhitzt die Sägespäne im Wasser auf etwa 65-75°C für 1-2 Stunden.
3. Abkühlen lassen: Lasst die Sägespäne abkühlen.
4. Abtropfen lassen: Drückt das überschüssige Wasser aus den Sägespänen.
Die Flaschen vorbereiten: Ein Zuhause für eure Pilze
Die Plastikflaschen dienen als Behälter für das Substrat und bieten den Pilzen einen geschützten Raum zum Wachsen.
1. Flaschen reinigen: Reinigt die Plastikflaschen gründlich mit warmem Wasser und Spülmittel. Spült sie gut aus, um alle Spülmittelreste zu entfernen.
2. Belüftungslöcher bohren: Bohrt oder schneidet mehrere kleine Löcher (ca. 5-10 mm Durchmesser) in die Flaschen. Diese Löcher dienen der Belüftung und ermöglichen es den Pilzen, zu atmen. Bohrt die Löcher rundherum in die Flasche, vor allem im oberen Bereich.
3. Optional: Ihr könnt die Flaschen auch mit dunkler Folie oder Farbe abdecken, um das Licht zu reduzieren. Austernpilze bevorzugen dunkle Umgebungen.
Das Substrat in die Flaschen füllen: Schicht für Schicht zum Erfolg
Jetzt kommt der spannende Teil: Das Befüllen der Flaschen mit dem Substrat und der Pilzbrut.
1. Schichtweise befüllen: Beginnt mit einer Schicht Substrat (ca. 5-10 cm dick) am Boden der Flasche.
2. Pilzbrut hinzufügen: Verteilt eine dünne Schicht Pilzbrut auf dem Substrat.
3. Wiederholt die Schichten: Fügt weitere Schichten Substrat und Pilzbrut hinzu, bis die Flasche fast voll ist. Lasst oben etwas Platz (ca. 5-10 cm).
4. Abschlussschicht: Die oberste Schicht sollte aus Substrat bestehen.
5. Leicht andrücken: Drückt das Substrat leicht an, um Lufteinschlüsse zu vermeiden.
Die Inkubationsphase: Geduld ist gefragt
In dieser Phase besiedelt die Pilzbrut das Substrat.
1. Flaschen platzieren: Stellt die befüllten Flaschen an einen dunklen, kühlen und feuchten Ort. Eine Temperatur von 20-25°C ist ideal.
2. Feuchtigkeit kontrollieren: Besprüht die Flaschen regelmäßig mit Wasser, um die Luftfeuchtigkeit hoch zu halten. Das Substrat sollte feucht, aber nicht nass sein.
3. Belüftung sicherstellen: Achtet darauf, dass die Flaschen ausreichend belüftet sind.
4. Warten: Die Inkubationsphase dauert in der Regel 2-3 Wochen. Während dieser Zeit wird das Substrat von einem weißen Myzel (Pilzgeflecht) durchzogen.
Die Fruchtungsphase: Endlich Pilze!
Sobald das Substrat vollständig von Myzel besiedelt ist, beginnt die Fruchtungsphase.
1. Licht erhöhen: Stellt die Flaschen an einen helleren Ort, aber vermeidet direkte Sonneneinstrahlung.
2. Feuchtigkeit erhöhen: Besprüht die Flaschen mehrmals täglich mit Wasser, um die Luftfeuchtigkeit hoch zu halten.
3. Belüftung sicherstellen: Sorgt für eine gute Belüftung, um Schimmelbildung zu vermeiden.
4. Ernte: Nach einigen Tagen oder Wochen bilden sich kleine Pilzkörper (Primordien) an den Belüftungslöchern. Diese wachsen schnell zu ausgewachsenen Austernpilzen heran. Erntet die Pilze, wenn sie ihre volle Größe erreicht haben, aber bevor sie Sporen abwerfen. Dreht die Pilze vorsichtig ab oder schneidet sie mit einem scharfen Messer ab.
Nach der Ernte: Was nun?
Nach der ersten Ernte könnt ihr die Flaschen weiterhin be

Conclusion
So, there you have it! Transforming humble plastic bottles into thriving mushroom farms is not just a clever upcycling project; it’s a gateway to fresh, delicious, and sustainable food right in your own home. We’ve walked you through the process, highlighting the simplicity and affordability of this method. But why is this DIY mushroom growing trick a must-try?
Firstly, it’s incredibly eco-friendly. You’re diverting plastic waste from landfills and giving it a new, productive purpose. Secondly, it’s a fantastic way to learn about the fascinating world of fungi and the intricate processes of decomposition and growth. Thirdly, and perhaps most importantly, you get to enjoy the unparalleled satisfaction of harvesting your own homegrown mushrooms, bursting with flavor and nutrients.
This method is particularly appealing because it’s so accessible. You don’t need a lot of space, expensive equipment, or specialized knowledge to get started. A few plastic bottles, some substrate, mushroom spawn, and a little patience are all you need to embark on this rewarding journey.
Variations and Suggestions:
Don’t be afraid to experiment! Once you’ve mastered the basic technique, you can explore different types of mushrooms. Oyster mushrooms are a great starting point due to their resilience and rapid growth, but you could also try growing shiitake, lion’s mane, or even wine cap mushrooms, depending on your climate and the availability of spawn.
Consider the type of plastic bottle you use. While most plastic bottles will work, thicker, more durable bottles will provide better insulation and support for the growing substrate. You can also experiment with different sizes of bottles to see which works best for your space and the type of mushroom you’re growing.
Think about the location of your mushroom farm. While a dark, humid environment is ideal, you can create a suitable microclimate even in less-than-perfect conditions. A shaded balcony, a basement, or even a spare closet can be transformed into a mushroom-growing haven. Just be sure to monitor the temperature and humidity levels and make adjustments as needed.
Another variation is to experiment with different substrates. While straw and coffee grounds are common choices, you can also use wood chips, cardboard, or even agricultural waste products. Each substrate will provide a different nutrient profile and may affect the growth and flavor of your mushrooms.
Finally, consider adding a layer of vermiculite or perlite to the top of your substrate to help retain moisture and prevent the growth of mold. This is especially helpful in drier climates.
We wholeheartedly encourage you to give this DIY mushroom growing trick a try. It’s a fun, educational, and rewarding experience that will connect you with nature and provide you with a sustainable source of delicious food.
Share Your Experience!
We’d love to hear about your mushroom-growing adventures. Share your photos, tips, and challenges in the comments section below. Let’s build a community of mushroom enthusiasts and learn from each other’s experiences. Happy growing!
Frequently Asked Questions (FAQ)
What type of mushrooms are best for growing in plastic bottles?
Oyster mushrooms are generally considered the easiest and most forgiving type of mushroom to grow for beginners. They are fast-growing, relatively resistant to contamination, and produce abundant yields. Other good options include shiitake, lion’s mane, and wine cap mushrooms, but these may require more specific growing conditions and experience. The best choice depends on your climate, the availability of spawn, and your level of experience.
What kind of substrate should I use?
A variety of substrates can be used for growing mushrooms in plastic bottles. Straw, coffee grounds, wood chips, cardboard, and agricultural waste products are all viable options. Straw is a popular choice due to its availability and affordability. Coffee grounds are a great way to recycle waste and provide a nutrient-rich environment for mushrooms. Wood chips are suitable for growing shiitake and other wood-loving mushrooms. The best substrate will depend on the type of mushroom you’re growing and the resources available to you. Make sure to pasteurize or sterilize your substrate before use to kill any competing organisms.
How do I pasteurize or sterilize the substrate?
Pasteurization involves heating the substrate to a temperature that kills most harmful microorganisms without completely sterilizing it. This can be done by soaking the substrate in hot water (around 160-180°F) for 1-2 hours. Sterilization involves heating the substrate to a higher temperature (around 250°F) under pressure to kill all microorganisms. This is typically done using a pressure cooker or autoclave. Sterilization is more effective at preventing contamination but can also kill beneficial microorganisms that can help with mushroom growth. For most home growers, pasteurization is sufficient.
How much light do mushrooms need?
Mushrooms don’t need a lot of light to grow. In fact, they prefer a dark environment. However, some light is necessary for pinning (the formation of baby mushrooms). Indirect sunlight or a low-intensity artificial light source is sufficient. Avoid direct sunlight, as it can dry out the substrate and damage the mushrooms.
How often should I water the mushrooms?
The frequency of watering will depend on the humidity levels in your growing environment. The substrate should be kept moist but not waterlogged. Mist the mushrooms and the surrounding area with water once or twice a day, or as needed to maintain humidity. Avoid overwatering, as this can lead to mold growth.
How long does it take for mushrooms to grow?
The time it takes for mushrooms to grow will vary depending on the type of mushroom, the substrate used, and the growing conditions. Oyster mushrooms typically take 1-2 weeks to colonize the substrate and another 1-2 weeks to fruit. Shiitake mushrooms can take several months to colonize the substrate and several weeks to fruit. Be patient and monitor the mushrooms regularly.
What if my mushrooms get moldy?
Mold is a common problem when growing mushrooms. If you see mold growing on your substrate or mushrooms, remove the affected area immediately. You can also try spraying the affected area with a diluted solution of hydrogen peroxide or vinegar. To prevent mold growth, ensure that your substrate is properly pasteurized or sterilized, maintain good ventilation, and avoid overwatering.
Can I reuse the substrate after harvesting mushrooms?
Yes, you can reuse the substrate after harvesting mushrooms, but the yield will likely be lower. The substrate will have been depleted of some of its nutrients, and there may be a higher risk of contamination. You can amend the substrate with fresh nutrients, such as coffee grounds or compost, to improve its fertility. Alternatively, you can compost the spent substrate and use it to enrich your garden soil.
Where can I buy mushroom spawn?
Mushroom spawn can be purchased from a variety of sources, including online retailers, garden centers, and specialty mushroom suppliers. Make sure to buy spawn from a reputable source to ensure that it is healthy and free from contamination.
Is growing mushrooms in plastic bottles safe?
Yes, growing mushrooms in plastic bottles is generally safe, as long as you follow proper hygiene practices. Wash your hands thoroughly before handling the substrate or mushrooms. Avoid using plastic bottles that have contained harmful chemicals. Ensure that your growing environment is well-ventilated to prevent the buildup of harmful gases. And of course, only consume mushrooms that you have positively identified as edible. When in doubt, throw it out!

Leave a Comment