

Low Maintenance Cowpea Garden: Imagine harvesting baskets overflowing with delicious, nutritious cowpeas without spending hours toiling in the sun! Sounds like a dream, right? Well, it doesn’t have to be! I’m here to share some amazing DIY tricks and hacks that will transform your gardening experience and help you cultivate a thriving, low maintenance cowpea garden, even if you’re a complete beginner.
Cowpeas, also known as black-eyed peas, have a rich history, dating back thousands of years to West Africa. They’ve been a staple food source for generations, prized for their resilience and ability to thrive in challenging conditions. In many cultures, they symbolize good luck and prosperity, often eaten on New Year’s Day for a bountiful year ahead.
But let’s be honest, not everyone has the time or energy for high-maintenance gardening. That’s where these DIY tricks come in! We all crave fresh, homegrown produce, but the thought of constant weeding, watering, and pest control can be daunting. This article is your guide to simplifying the process, saving you time and effort, and ensuring you enjoy a bountiful harvest of cowpeas with minimal fuss. Get ready to unlock the secrets to a thriving and easy-to-manage cowpea patch!
Dein pflegeleichter Kuherbse-Garten: So geht’s!
Hey Gartenfreunde! Ich zeige euch heute, wie ihr einen pflegeleichten Kuherbse-Garten anlegt, der euch mit leckeren Ernten belohnt, ohne euch dabei den letzten Nerv zu rauben. Kuherbsen sind nämlich echte Überlebenskünstler und kommen mit wenig Wasser und kargen Böden gut zurecht. Perfekt also für alle, die wenig Zeit haben oder in trockenen Regionen leben!
Was du für deinen Kuherbse-Garten brauchst:
* Kuherbse-Samen (am besten eine Sorte, die an deine Region angepasst ist)
* Einen sonnigen Standort (mindestens 6 Stunden Sonne pro Tag)
* Gut durchlässigen Boden (Sandboden ist ideal, aber auch andere Böden funktionieren mit ein paar Tricks)
* Kompost oder gut verrotteten Mist (für die Bodenverbesserung)
* Mulchmaterial (Stroh, Holzhackschnitzel, Laub)
* Rankhilfe (falls du eine rankende Sorte anbaust)
* Gießkanne oder Gartenschlauch
* Gartenwerkzeug (Spaten, Harke, evtl. Pflanzkelle)
Schritt-für-Schritt-Anleitung:
1. Standortwahl und Bodenvorbereitung
1. Finde den perfekten Platz: Kuherbsen lieben die Sonne! Such dir also einen Platz in deinem Garten, der mindestens 6 Stunden direkte Sonneneinstrahlung pro Tag bekommt. Je mehr Sonne, desto besser!
2. Boden checken: Kuherbsen sind nicht wählerisch, aber Staunässe mögen sie gar nicht. Wenn dein Boden sehr lehmig ist, solltest du ihn unbedingt verbessern.
3. Boden auflockern: Mit einem Spaten oder einer Grabegabel lockerst du den Boden tiefgründig auf. Das hilft den Wurzeln, sich gut auszubreiten.
4. Boden verbessern: Mische reichlich Kompost oder gut verrotteten Mist unter den Boden. Das versorgt die Kuherbsen mit Nährstoffen und verbessert die Bodenstruktur. Bei sehr sandigen Böden hilft das, Wasser besser zu speichern.
5. Boden ebnen: Mit einer Harke ebne ich den Boden ein, damit er schön glatt ist. So haben die Samen einen guten Kontakt zum Boden.
2. Aussaat der Kuherbsen
1. Der richtige Zeitpunkt: Kuherbsen sind frostempfindlich. Warte also, bis keine Frostgefahr mehr besteht, bevor du sie aussäst. Das ist meistens Mitte Mai bis Anfang Juni.
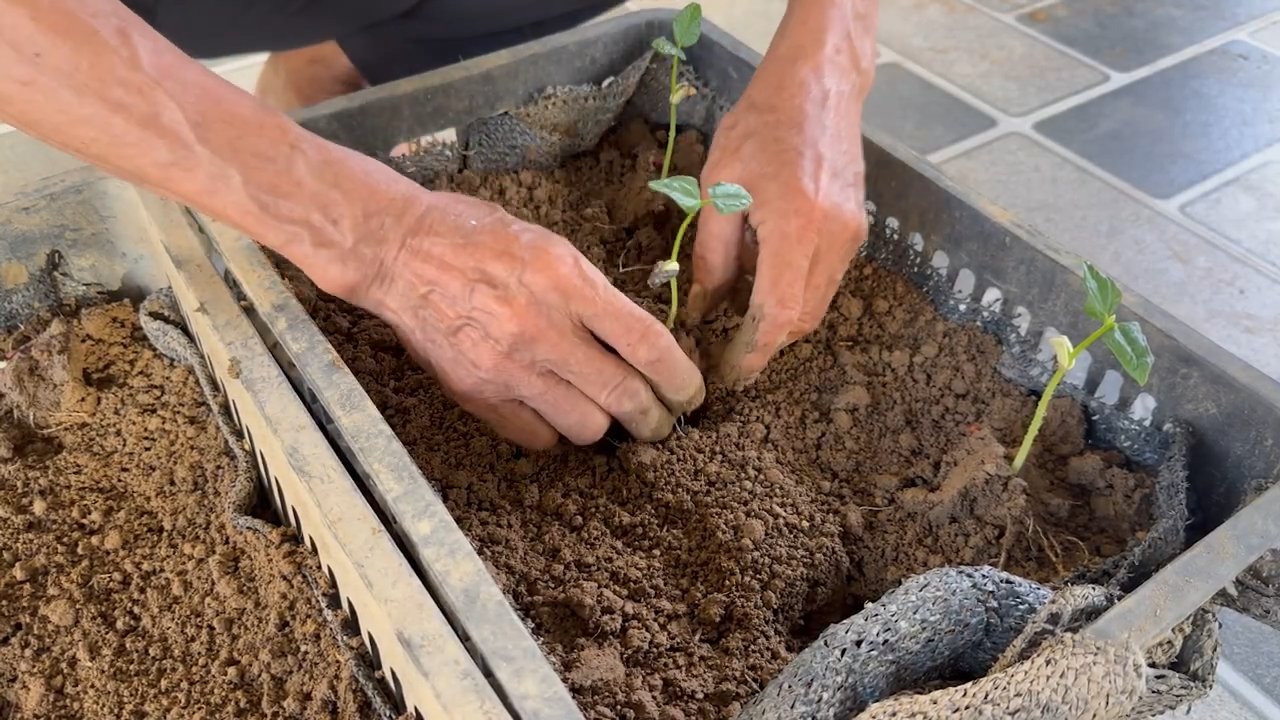
2. Aussaatmethode wählen: Du kannst die Samen direkt ins Beet säen oder sie in Töpfen vorziehen. Ich bevorzuge die Direktsaat, weil es weniger Aufwand ist.
3. Samen säen: Drücke mit dem Finger oder einem Stock kleine Löcher in den Boden (ca. 2-3 cm tief). Der Abstand zwischen den Löchern sollte etwa 10-15 cm betragen. Lege in jedes Loch 2-3 Samen.
4. Löcher schließen: Bedecke die Samen mit Erde und drücke sie leicht an.
5. Gießen: Gieße die Erde vorsichtig an, damit die Samen nicht weggeschwemmt werden.
3. Pflege deines Kuherbse-Gartens
1. Gießen: Kuherbsen sind trockenheitsverträglich, aber in längeren Trockenperioden solltest du sie trotzdem gießen. Achte darauf, dass der Boden nicht völlig austrocknet. Am besten gießt du früh morgens oder spät abends, damit das Wasser nicht so schnell verdunstet.
2. Mulchen: Eine Mulchschicht aus Stroh, Holzhackschnitzeln oder Laub hilft, die Feuchtigkeit im Boden zu halten und Unkraut zu unterdrücken. Außerdem schützt sie den Boden vor Erosion.
3. Unkraut jäten: Entferne regelmäßig Unkraut, damit die Kuherbsen nicht in Konkurrenz um Nährstoffe und Wasser geraten.
4. Düngen: Kuherbsen brauchen nicht viel Dünger. Wenn du den Boden gut vorbereitet hast, reicht es meistens aus, wenn du während der Blütezeit einmalig mit einem organischen Dünger (z.B. Brennnesseljauche) düngst.
5. Rankhilfe anbringen (falls nötig): Wenn du eine rankende Sorte anbaust, solltest du ihr eine Rankhilfe anbieten. Das kann ein Zaun, ein Spalier oder ein einfacher Stock sein. Die Kuherbsen klettern dann daran hoch und du sparst Platz im Garten.
4. Erntezeit!
1. Wann ernten?: Die Erntezeit beginnt je nach Sorte und Witterung etwa 60-90 Tage nach der Aussaat.
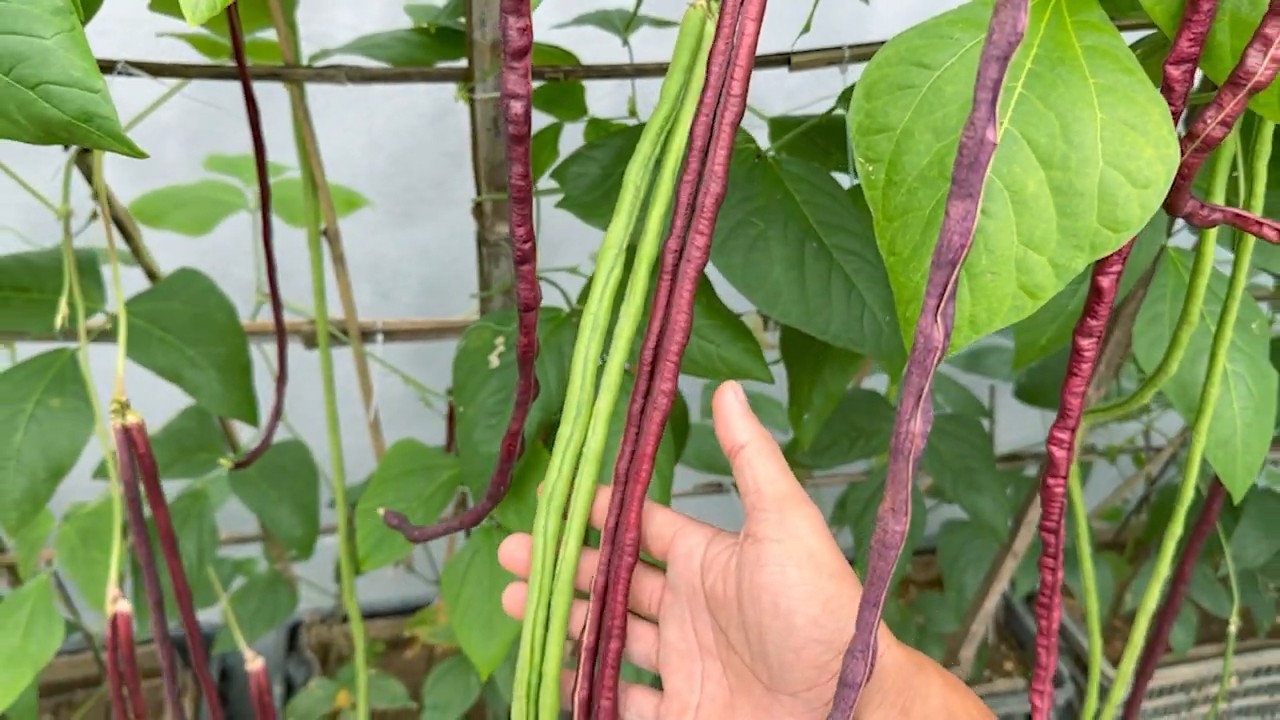
2. Wie ernten?: Du kannst die Kuherbsen als grüne Hülsen ernten, wenn sie noch jung und zart sind. Oder du lässt sie am Strauch trocknen und erntest die trockenen Samen.
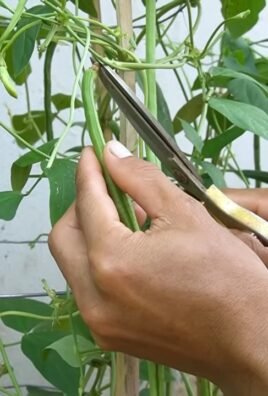
3. Grüne Hülsen ernten: Pflücke die grünen Hülsen, wenn sie prall gefüllt sind, aber noch nicht hart. Du kannst sie wie grüne Bohnen zubereiten.
4. Trockene Samen ernten: Lasse die Hülsen am Strauch trocknen, bis sie braun und trocken sind. Dann kannst du sie pflücken und die Samen herauslösen. Die trockenen Samen kannst du wie Linsen oder Bohnen zubereiten.
5. Regelmäßig ernten: Ernte regelmäßig, damit die Pflanzen weiterhin neue Hülsen bilden.
Zusätzliche Tipps für einen pflegeleichten Kuherbse-Garten:
* Wähle robuste Sorten: Es gibt viele verschiedene Kuherbse-Sorten. Informiere dich, welche Sorten in deiner Region gut wachsen und resistent gegen Krankheiten und Schädlinge sind.
* Fruchtfolge beachten: Baue Kuherbsen nicht jedes Jahr am selben Standort an. Wechsle die Kulturen ab, um Krankheiten und Schädlinge vorzubeugen.
* Schädlinge und Krankheiten im Auge behalten: Kuherbsen sind relativ robust, aber auch sie können von Schädlingen und Krankheiten befallen werden. Kontrolliere deine Pflanzen regelmäßig und greife bei Bedarf ein. Oft reichen schon einfache Maßnahmen wie das Absammeln von Schädlingen oder das Besprühen mit Brennnesseljauche.
* Selbst Samen gewinnen: Wenn du eine besonders schöne oder robuste Pflanze hast, kannst du von ihr Samen gewinnen und im nächsten Jahr wieder aussäen. So kannst du deine eigene, an deine Bedingungen angepasste Kuherbse-Sorte entwickeln.
* Mulch ist dein Freund: Ich kann es nicht oft genug sagen: Mulchen ist das A und O für einen pflegeleichten Garten! Es spart dir nicht nur Arbeit, sondern schützt auch deine Pflanzen und verbessert den Boden.
* Automatische Bewässerung: Wenn du wirklich wenig Zeit hast, kannst du über eine automatische Bewässerung nachdenken. Ein Tropfschlauchsystem ist ideal für Kuherbsen, da es das Wasser direkt an die Wurzeln bringt und die Blätter trocken hält. Das beugt Pilzkrankheiten vor.
* Beetabdeckung: Eine Beetabdeckung aus Vlies oder Folie kann helfen, den Boden schneller zu erwärmen und Unkraut zu unterdrücken. Das ist besonders in kühleren Regionen von Vorteil.
* Insektenhotel: Ein Insektenhotel in der Nähe deines Kuherbse-Gartens lockt nützliche Insekten an, die Schädlinge bekämpfen und die Bestäubung fördern.
* Kombinationsanbau: Pflanze Kuherbsen zusammen mit anderen Pflanzen, die sich gegenseitig unterstützen. Gute Partner sind zum Beispiel Mais, Sonnenblumen oder Kürbis.
Warum Kuherbsen so pflegeleicht sind:
* Trockenheitsverträglichkeit: Kuherbsen kommen mit wenig Wasser aus und sind daher ideal für trockene Regionen oder für Gärtner, die nicht so oft gießen können.
* Anpassungsfähigkeit: Kuherbsen wachsen auf verschiedenen Bodentypen und sind nicht besonders anspruchsvoll.
* Stickstofffixierung: Kuherbsen gehören zu den Leguminosen und können Stickstoff aus der Luft binden. Das bedeutet, dass sie den Boden mit Stickstoff anreichern und weniger Dünger benötigen.
* Schnelles Wachstum: Kuherbsen wachsen schnell und bilden schnell eine dichte Blattmasse, die Unkraut unterdrückt.
Ich hoffe, diese Anleitung hilft dir dabei, deinen
Conclusion
So, there you have it! Creating a low maintenance cowpea garden is not only achievable, but it’s also incredibly rewarding. We’ve walked through the key steps, from selecting the right variety and preparing your soil to implementing water-wise techniques and natural pest control. The beauty of this approach lies in its simplicity and sustainability. You’re not just growing delicious and nutritious cowpeas; you’re also fostering a healthier ecosystem in your backyard.
Why is this DIY trick a must-try? Because it empowers you to enjoy fresh, homegrown produce without the constant demands of traditional gardening. Imagine stepping outside and harvesting a bowlful of tender cowpeas, knowing that you nurtured them with minimal effort and maximum respect for the environment. This is the essence of low-maintenance gardening – a harmonious blend of nature and human ingenuity.
But don’t think you’re limited to just one way of doing things! Feel free to experiment with different companion plants to further deter pests and improve soil health. Consider adding marigolds or basil near your cowpeas to naturally repel unwanted insects. You can also explore different mulching materials, such as straw or wood chips, to find what works best for your climate and soil type. Another variation is to try succession planting, sowing new seeds every few weeks to ensure a continuous harvest throughout the growing season. If you’re short on space, consider growing bush-type cowpeas in containers on your patio or balcony. The possibilities are endless!
The key to success with a low maintenance cowpea garden is observation and adaptation. Pay attention to your plants, learn from your mistakes, and don’t be afraid to try new things. Gardening is a journey, not a destination, and the more you experiment, the more you’ll discover what works best for you.
We wholeheartedly encourage you to give this DIY trick a try. It’s a fantastic way to connect with nature, reduce your carbon footprint, and enjoy the delicious rewards of your labor. And most importantly, we want to hear about your experience! Share your tips, tricks, and triumphs in the comments below. Let’s build a community of low-maintenance gardeners who are passionate about growing their own food sustainably. Tell us what cowpea varieties you chose, what challenges you faced, and what solutions you discovered. Your insights could inspire others to embark on their own low-maintenance gardening adventures. Let’s cultivate a greener, healthier future, one cowpea at a time! Remember, achieving a thriving, low maintenance cowpea garden is within your reach.
Frequently Asked Questions (FAQ)
What exactly makes a cowpea garden “low maintenance”?
A low maintenance cowpea garden focuses on techniques that minimize the time and effort required for upkeep. This includes selecting drought-tolerant cowpea varieties, preparing the soil properly to reduce the need for frequent watering and fertilization, using mulch to suppress weeds and retain moisture, and implementing natural pest control methods to avoid the use of harmful chemicals. The goal is to create a self-sustaining ecosystem where the cowpeas can thrive with minimal intervention.
Which cowpea varieties are best for a low maintenance garden?
Look for cowpea varieties that are known for their drought tolerance, disease resistance, and ability to thrive in poor soil conditions. Some popular choices include ‘California Blackeye No. 5’, ‘Whippoorwill’, and ‘Pinkeye Purple Hull’. These varieties are generally more resilient and require less pampering than other, more demanding types. Research local varieties that are known to thrive in your specific climate and soil conditions for optimal results.
How often do I need to water my low maintenance cowpea garden?
The frequency of watering will depend on your climate, soil type, and the specific cowpea variety you’re growing. However, the key to low maintenance watering is to water deeply and infrequently. This encourages the roots to grow deeper into the soil, making the plants more drought-tolerant. A good rule of thumb is to water when the top inch of soil feels dry to the touch. Use a soaker hose or drip irrigation system to deliver water directly to the roots, minimizing water loss through evaporation. Mulching around the plants will also help to retain moisture in the soil.
What’s the best way to control weeds in a low maintenance cowpea garden?
Mulching is your best friend when it comes to weed control in a low maintenance garden. A thick layer of organic mulch, such as straw, wood chips, or shredded leaves, will suppress weed growth by blocking sunlight and preventing weed seeds from germinating. You can also use landscape fabric as a weed barrier, but make sure to choose a breathable fabric that allows water and air to reach the soil. Hand-pulling any weeds that do manage to pop up is also an effective way to keep your garden weed-free. Avoid using herbicides, as they can harm your cowpeas and disrupt the natural ecosystem in your garden.
How do I deal with pests in my low maintenance cowpea garden without using chemicals?
There are several natural pest control methods you can use to protect your cowpeas. Companion planting is a great way to deter pests. For example, planting marigolds or basil near your cowpeas can help to repel aphids and other unwanted insects. You can also use insecticidal soap or neem oil to control pests, but be sure to follow the instructions carefully and apply them only when necessary. Encourage beneficial insects, such as ladybugs and lacewings, to visit your garden by planting flowers that attract them. These beneficial insects will prey on harmful pests, helping to keep your cowpea plants healthy. Regularly inspect your plants for signs of pests and address any problems early on to prevent infestations from becoming severe.
Do I need to fertilize my low maintenance cowpea garden?
Cowpeas are legumes, which means they have the ability to fix nitrogen from the air and convert it into a form that plants can use. This reduces the need for nitrogen fertilizer. However, you may still want to amend your soil with compost or other organic matter to improve its fertility and drainage. A soil test can help you determine if your soil is lacking in any essential nutrients. If necessary, you can use a slow-release organic fertilizer to provide your cowpeas with the nutrients they need to thrive. Avoid using synthetic fertilizers, as they can harm the soil and disrupt the natural ecosystem in your garden.
How do I know when my cowpeas are ready to harvest?
The timing of your harvest will depend on the specific cowpea variety you’re growing and whether you’re harvesting them for fresh shelling or dried beans. For fresh shelling, harvest the pods when they are plump and the beans inside are fully developed but still tender. For dried beans, allow the pods to dry completely on the plant before harvesting. The pods should be brittle and the beans inside should be hard and dry.
Can I grow cowpeas in containers?
Yes, you can grow cowpeas in containers, especially bush-type varieties. Choose a large container with good drainage and fill it with a well-draining potting mix. Make sure the container receives at least six hours of sunlight per day. Water regularly, especially during hot, dry weather. You may also need to fertilize your container-grown cowpeas more frequently than those grown in the ground.
What are some common problems that can affect cowpea gardens, and how can I prevent them?
Some common problems include aphids, bean beetles, and fungal diseases. To prevent these problems, choose disease-resistant cowpea varieties, practice good sanitation in your garden, and avoid overwatering. Companion planting and natural pest control methods can also help to keep your cowpeas healthy. Regularly inspect your plants for signs of problems and address them early on to prevent them from becoming severe.
How can I improve the soil in my garden for growing cowpeas?
Improving soil health is crucial for a low maintenance garden. Amend your soil with compost or other organic matter to improve its fertility, drainage, and water-holding capacity. Cover cropping is another great way to improve soil health. Plant a cover crop, such as rye or oats, in the fall and then till it into the soil in the spring. This will add organic matter to the soil and improve its structure. Avoid tilling the soil excessively, as this can disrupt the soil’s natural ecosystem.
Leave a Comment