

Grow Potatoes Easily, even if you think you don’t have a green thumb! Have you ever dreamt of harvesting your own homegrown potatoes, bursting with flavor and freshness, right from your backyard? Imagine the satisfaction of serving a meal made with potatoes you nurtured from tiny seed potatoes to hearty, delicious spuds. This isn’t just a pipe dream; it’s an achievable reality with a few simple tricks and DIY techniques.
The humble potato has a rich history, dating back thousands of years to the Andes Mountains of South America, where it was a staple food for the Inca civilization. Over time, it spread across the globe, becoming a vital crop in countless cultures. Today, growing your own potatoes connects you to this long and fascinating history, allowing you to participate in a tradition that has nourished generations.
But why should you bother to grow potatoes easily at home? Well, store-bought potatoes often lack the vibrant taste and nutritional value of homegrown varieties. Plus, you have complete control over the growing process, ensuring that your potatoes are free from harmful pesticides and chemicals. And let’s be honest, there’s nothing quite like the feeling of digging into the earth and unearthing your own treasure trove of potatoes! In this article, I’m going to share some of my favorite DIY tricks and hacks that will make growing potatoes at home easier than you ever thought possible. Get ready to roll up your sleeves and embark on a rewarding gardening adventure!
Kartoffeln einfach selbst anbauen: Dein DIY-Guide für eine reiche Ernte
Hey Gartenfreunde! Habt ihr Lust, eure eigenen Kartoffeln anzubauen? Es ist einfacher als ihr denkt und das Gefühl, die selbst geernteten Knollen auf dem Teller zu haben, ist einfach unbezahlbar. Ich zeige euch, wie ihr mit einfachen Mitteln und ein bisschen Geduld eine reiche Kartoffelernte erzielen könnt. Los geht’s!
Was du brauchst: Die Materialliste
Bevor wir loslegen, hier eine Liste mit allem, was du für dein Kartoffelprojekt benötigst:
* Saatkartoffeln: Wähle eine Sorte, die dir schmeckt und für dein Klima geeignet ist. Frühkartoffeln sind ideal für ungeduldige Gärtner, da sie schneller reifen.
* Ein Pflanzgefäß oder Gartenbeet: Ein großer Topf (mindestens 30 Liter) oder ein Stück Gartenland.
* Gute Erde: Am besten eine Mischung aus Gartenerde, Kompost und etwas Sand. Das sorgt für eine gute Drainage.
* Kompost oder organischer Dünger: Für eine extra Portion Nährstoffe.
* Gießkanne oder Schlauch: Zum regelmäßigen Bewässern.
* Eine Schaufel oder Gartenkelle: Zum Pflanzen und Anhäufeln.
* Mulchmaterial (optional): Stroh, Heu oder Rasenschnitt, um die Feuchtigkeit im Boden zu halten und Unkraut zu unterdrücken.
* Ein alter Jutesack oder Kartoffelsack (optional): Für den Anbau im Sack, eine tolle Alternative für kleine Gärten oder Balkone.
Die Vorbereitung: Der Grundstein für eine erfolgreiche Ernte
Eine gute Vorbereitung ist das A und O für eine erfolgreiche Kartoffelernte. Hier sind die Schritte, die du im Vorfeld erledigen solltest:
1. Saatkartoffeln vorkeimen: Lege die Saatkartoffeln etwa 4-6 Wochen vor dem geplanten Pflanztermin an einen hellen, kühlen Ort (ca. 10-15°C). Das Vorkeimen fördert die Bildung von kräftigen Trieben und beschleunigt das Wachstum. Du kannst sie in Eierkartons oder flachen Kisten nebeneinander legen.
2. Den Standort vorbereiten: Kartoffeln lieben die Sonne! Wähle einen sonnigen Standort für dein Pflanzgefäß oder Gartenbeet. Lockere die Erde gut auf und entferne Unkraut und Steine.
3. Die Erde vorbereiten: Mische die Gartenerde mit Kompost und etwas Sand. Das sorgt für eine gute Drainage und versorgt die Kartoffeln mit wichtigen Nährstoffen. Wenn du im Topf anbaust, achte darauf, dass der Topf Abzugslöcher hat, damit überschüssiges Wasser ablaufen kann.
Die Pflanzung: Ab in die Erde!
Jetzt kommt der spannende Teil: das Pflanzen der Kartoffeln!
1. Pflanzlöcher graben: Grabe Pflanzlöcher mit einem Abstand von etwa 30-40 cm zueinander und einer Tiefe von etwa 10-15 cm. Wenn du mehrere Reihen pflanzt, lasse zwischen den Reihen etwa 60-70 cm Platz.
2. Saatkartoffeln einsetzen: Lege in jedes Pflanzloch eine Saatkartoffel mit den Trieben nach oben.
3. Mit Erde bedecken: Bedecke die Saatkartoffeln mit Erde und drücke sie leicht an.
4. Angießen: Gieße die Erde vorsichtig an, damit sie gut durchfeuchtet ist.
Die Pflege: Gießen, Anhäufeln, Düngen
Nach der Pflanzung ist es wichtig, die Kartoffeln gut zu pflegen, damit sie optimal wachsen und gedeihen.
1. Regelmäßiges Gießen: Kartoffeln brauchen ausreichend Wasser, besonders während der Knollenbildung. Gieße regelmäßig, aber vermeide Staunässe. Die Erde sollte immer leicht feucht sein.
2. Anhäufeln: Sobald die Kartoffelpflanzen etwa 20-30 cm hoch sind, solltest du sie anhäufeln. Das bedeutet, dass du Erde um die Stängel herum anhäufst, sodass nur noch die oberen Blätter herausschauen. Das Anhäufeln fördert die Bildung von weiteren Knollen und schützt sie vor Sonnenlicht, das sie grün werden lässt. Wiederhole das Anhäufeln alle paar Wochen, bis die Pflanzen etwa 50-60 cm hoch sind.
3. Düngen: Kartoffeln sind Starkzehrer und brauchen viele Nährstoffe. Dünge sie regelmäßig mit Kompost oder organischem Dünger. Achte darauf, dass der Dünger reich an Kalium ist, da Kalium die Knollenbildung fördert.
4. Unkraut entfernen: Halte das Beet oder den Topf unkrautfrei, damit die Kartoffeln nicht um Nährstoffe und Wasser konkurrieren müssen.
5. Schutz vor Schädlingen und Krankheiten: Achte auf Schädlinge wie Kartoffelkäfer oder Blattläuse. Bei Bedarf kannst du biologische Schädlingsbekämpfungsmittel einsetzen. Auch Kartoffelkrankheiten wie die Kraut- und Knollenfäule können auftreten. Achte auf Anzeichen wie braune Flecken auf den Blättern und entferne befallene Pflanzen sofort.
Der Anbau im Sack: Eine platzsparende Alternative
Wenn du wenig Platz hast, ist der Anbau im Sack eine tolle Alternative. So geht’s:
1. Den Sack vorbereiten: Rolle den Jutesack oder Kartoffelsack nach unten, sodass ein stabiler Rand entsteht.
2. Erde einfüllen: Fülle den Sack mit einer Schicht Erde (ca. 20 cm).
3. Saatkartoffeln einsetzen: Lege 2-3 Saatkartoffeln auf die Erde.
4. Mit Erde bedecken: Bedecke die Saatkartoffeln mit einer weiteren Schicht Erde (ca. 10 cm).
5. Gießen: Gieße die Erde vorsichtig an.
6. Anhäufeln: Sobald die Pflanzen wachsen, fülle immer wieder Erde nach, sodass nur noch die oberen Blätter herausschauen. Rolle den Sack dabei immer weiter nach oben.
7. Pflege: Gieße und dünge die Kartoffeln im Sack regelmäßig.
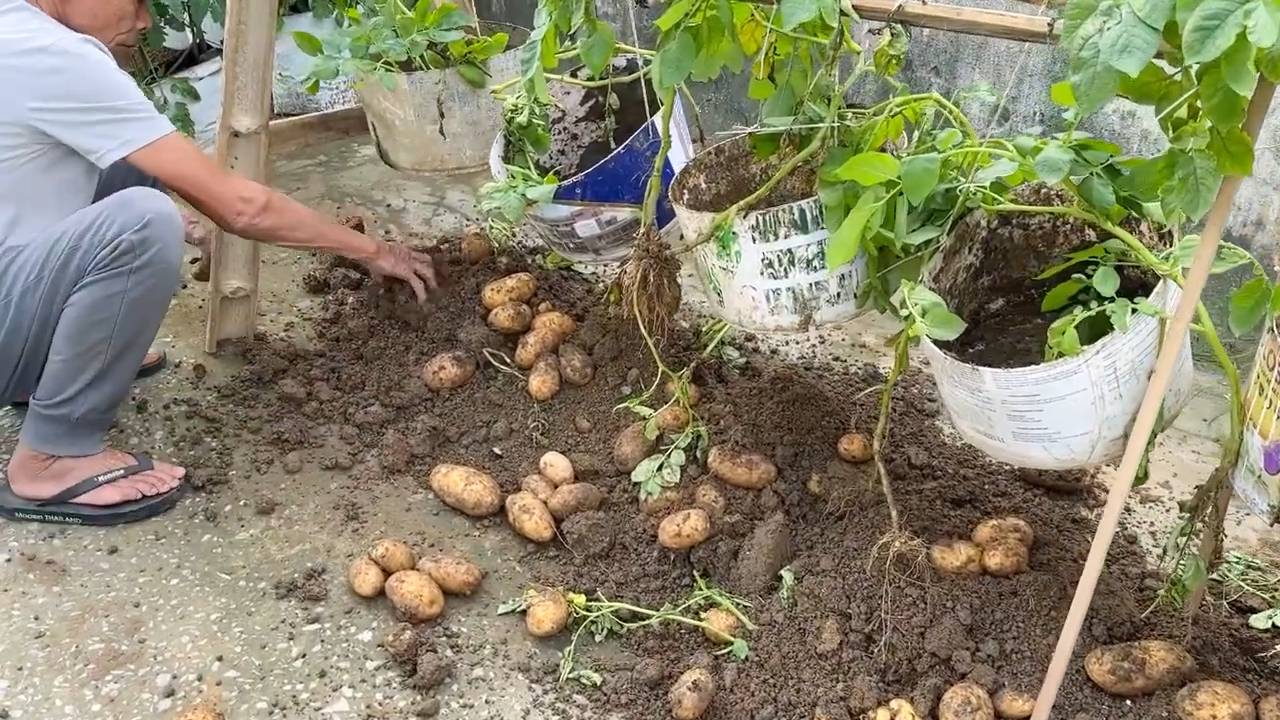
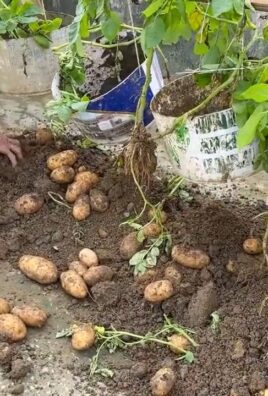
Die Ernte: Der Lohn der Mühe
Nach etwa 8-12 Wochen (je nach Sorte) ist es endlich soweit: die Ernte!
1. Erntezeitpunkt bestimmen: Frühkartoffeln können geerntet werden, sobald die Blüten blühen. Spätkartoffeln sollten geerntet werden, wenn das Laub welk und gelb wird.
2. Ernten: Grabe die Kartoffeln vorsichtig mit einer Grabegabel oder Schaufel aus. Achte darauf, die Knollen nicht zu beschädigen.
3. Trocknen: Lasse die Kartoffeln nach der Ernte einige Stunden oder Tage an einem trockenen, luftigen Ort trocknen. Das härtet die Schale und macht sie haltbarer.
4. Lagern: Lagere die Kartoffeln an einem kühlen, dunklen und trockenen Ort. Ideal ist ein Keller oder eine Speisekammer.
Zusätzliche Tipps für eine erfolgreiche Kartoffelernte
* Fruchtfolge beachten: Baue Kartoffeln nicht jedes Jahr am selben Standort an. Wechsle die Kulturen, um Krankheiten und Schädlingen vorzubeugen.
* Sortenvielfalt: Probiere verschiedene Kartoffelsorten aus, um herauszufinden, welche am besten in deinem Garten oder auf deinem Balkon gedeihen.
* Beobachten: Beobachte deine Kartoffelpflanzen regelmäßig, um Probleme frühzeitig zu erkennen und zu beheben.
* Nicht aufgeben: Auch wenn es beim ersten Mal nicht perfekt klappt, lass dich nicht entmutigen. Mit etwas Übung wirst du bald zum Kartoffelprofi!
Ich hoffe, dieser Guide hilft dir dabei, deine eigenen Kartoffeln erfolgreich anzubauen. Viel Spaß beim Gärtnern und eine reiche Ernte!

Conclusion
So, there you have it! Growing your own potatoes doesn’t have to be a daunting task relegated to sprawling farms. With this simple, effective DIY trick, you can unlock the satisfaction of harvesting your own fresh, flavorful potatoes, even if you’re working with limited space or a less-than-green thumb. This method truly simplifies the process, making it accessible to everyone, from seasoned gardeners to complete beginners.
Why is this a must-try? Because it’s efficient, cost-effective, and incredibly rewarding. Imagine the taste of those freshly dug potatoes, bursting with earthy goodness, knowing you nurtured them from seed to table. Store-bought potatoes simply can’t compare to the flavor and satisfaction you’ll get from your homegrown crop. Plus, you have complete control over the growing process, ensuring your potatoes are free from unwanted chemicals and pesticides.
But the beauty of this DIY potato growing method lies in its adaptability. Feel free to experiment with different potato varieties to discover your favorites. Russets are fantastic for baking and frying, Yukon Golds offer a creamy texture perfect for mashed potatoes, and red potatoes hold their shape well in salads and stews. You can also adjust the size of your container to suit your available space. A smaller container is ideal for a patio or balcony, while a larger container can yield a more substantial harvest.
Consider adding companion plants to your potato container to further enhance your growing experience. Marigolds can help deter pests, while basil can improve the flavor of your potatoes. Remember to provide adequate sunlight and water, and watch your potato plants thrive.
Don’t be afraid to get your hands dirty and embrace the learning process. Gardening is all about experimentation and discovery. This DIY potato growing trick is a fantastic starting point, but the possibilities are endless.
We wholeheartedly encourage you to give this method a try. You’ll be amazed at how easy and rewarding it is to grow your own delicious potatoes. And once you’ve harvested your first crop, we’d love to hear about your experience! Share your photos, tips, and variations in the comments below. Let’s create a community of potato-growing enthusiasts and inspire others to embrace the joy of homegrown food. This DIY method to grow potatoes easily is a game changer!
Frequently Asked Questions (FAQ)
What kind of container should I use for growing potatoes?
The ideal container should be large enough to accommodate the growing potato plants and allow for proper root development. A container that is at least 20 inches in diameter and 18 inches deep is generally recommended. You can use plastic pots, grow bags, wooden crates, or even repurposed containers like old trash cans (with drainage holes drilled in the bottom). The most important factor is ensuring adequate drainage to prevent the potatoes from rotting. Fabric grow bags are particularly beneficial as they allow for air pruning, which encourages healthier root growth.
What type of soil is best for growing potatoes?
Potatoes thrive in well-draining, slightly acidic soil. A mix of equal parts potting soil, compost, and peat moss or coco coir is a good starting point. Avoid using heavy clay soil, as it can become waterlogged and hinder potato growth. The soil should be loose and airy to allow the potatoes to expand easily. Adding some perlite or vermiculite to the soil mix can further improve drainage and aeration.
How often should I water my potato plants?
Water your potato plants regularly, especially during dry periods. The soil should be kept consistently moist but not waterlogged. Check the soil moisture by sticking your finger about an inch deep into the soil. If it feels dry, it’s time to water. Avoid overwatering, as this can lead to root rot and other fungal diseases. During hot weather, you may need to water your plants daily.
How much sunlight do potato plants need?
Potato plants need at least six hours of direct sunlight per day to thrive. Choose a location that receives plenty of sunlight throughout the day. If you live in a particularly hot climate, some afternoon shade may be beneficial to prevent the plants from overheating. If you’re growing potatoes indoors, you’ll need to supplement with grow lights to provide adequate light.
When is the best time to plant potatoes?
The best time to plant potatoes is in early spring, after the last frost. The soil temperature should be at least 45 degrees Fahrenheit. You can start chitting (sprouting) your seed potatoes a few weeks before planting to give them a head start. To chit potatoes, place them in a cool, bright location for a few weeks until they develop short, green sprouts.
How do I “hill” my potato plants?
Hilling is the process of adding more soil around the base of the potato plants as they grow. This encourages the plants to produce more potatoes along the buried stems. When the potato plants are about 6 inches tall, add a few inches of soil around the base of the stems, leaving the top leaves exposed. Repeat this process every few weeks as the plants continue to grow.
How do I know when my potatoes are ready to harvest?
Potatoes are typically ready to harvest about 70-100 days after planting, depending on the variety. The foliage will start to turn yellow and die back when the potatoes are mature. You can gently dig around the base of the plant to check the size of the potatoes. If they are the desired size, you can harvest the entire plant.
Can I grow potatoes in a container indoors?
Yes, you can grow potatoes in a container indoors, but you’ll need to provide adequate light and ventilation. Place the container in a sunny location or supplement with grow lights. Ensure the container has good drainage and use a well-draining potting mix. Monitor the soil moisture and water regularly.
What are some common pests and diseases that affect potato plants?
Common pests that affect potato plants include aphids, potato beetles, and flea beetles. Diseases include early blight, late blight, and potato scab. You can prevent these problems by using disease-resistant potato varieties, practicing crop rotation, and controlling pests with organic insecticides or by handpicking them off the plants.
Can I use store-bought potatoes as seed potatoes?
While you can technically use store-bought potatoes as seed potatoes, it’s generally not recommended. Store-bought potatoes may be treated with chemicals to prevent sprouting, and they may also carry diseases. It’s best to use certified seed potatoes from a reputable source to ensure healthy and productive plants.
What are some different varieties of potatoes I can grow in a container?
There are many different varieties of potatoes that you can grow in a container, including Russet Burbank, Yukon Gold, Red Pontiac, and fingerling potatoes. Choose a variety that is well-suited to your climate and growing conditions. Some varieties are more resistant to diseases than others, so do your research before selecting your seed potatoes.
How do I store my harvested potatoes?
Store your harvested potatoes in a cool, dark, and dry place. A temperature of around 40-50 degrees Fahrenheit is ideal. Avoid storing potatoes in the refrigerator, as this can cause them to develop a sweet taste. Store potatoes in a well-ventilated container, such as a burlap sack or a wire basket. Check the potatoes regularly for signs of spoilage and discard any that are soft or rotten. Properly stored potatoes can last for several months.

Leave a Comment