

Growing Purple Basil Containers: Unleash the vibrant beauty and aromatic delight of purple basil right on your patio! Have you ever dreamed of stepping outside your door and snipping fresh, flavorful basil for your favorite dishes? Well, dream no more! This DIY guide is your passport to a thriving purple basil container garden, even if you think you have a “brown thumb.”
Basil, in general, boasts a rich history, dating back thousands of years. Revered in ancient cultures for its medicinal properties and culinary uses, it’s no wonder basil has become a staple in gardens worldwide. But purple basil? It adds a touch of drama and sophistication to the classic herb, making it a true showstopper.
Why should you embark on this growing purple basil containers adventure? Because fresh herbs elevate any meal, and having them readily available is a game-changer. Plus, store-bought herbs often lack the intense flavor and freshness of homegrown varieties. More importantly, this DIY project is incredibly rewarding. There’s nothing quite like nurturing a plant from seed (or seedling!) to harvest and enjoying the fruits (or, in this case, leaves!) of your labor. I’m here to guide you through every step, ensuring you have a flourishing purple basil container garden that will be the envy of all your neighbors. Let’s get started!
Lila Basilikum im Topf ziehen: Dein DIY-Leitfaden für eine farbenfrohe Ernte
Ich liebe es, frische Kräuter in meiner Küche zu haben, und lila Basilikum ist nicht nur super lecker, sondern auch ein echter Hingucker! Es ist viel einfacher, als du vielleicht denkst, lila Basilikum in Töpfen zu ziehen. Hier zeige ich dir, wie du das ganz einfach selbst machen kannst.
Was du brauchst:
* Samen oder Jungpflanzen von lila Basilikum: Du kannst entweder mit Samen starten oder dir direkt Jungpflanzen im Gartencenter besorgen. Ich persönlich finde es spannend, mit Samen anzufangen, aber Jungpflanzen sind natürlich schneller.
* Töpfe: Wähle Töpfe mit guter Drainage. Ich empfehle Töpfe mit mindestens 15 cm Durchmesser, damit die Pflanzen genug Platz zum Wachsen haben.
* Hochwertige Blumenerde: Verwende am besten eine spezielle Kräutererde oder mische Blumenerde mit etwas Kompost. Das sorgt für die nötigen Nährstoffe.
* Gießkanne oder Sprühflasche: Zum Bewässern deiner Pflanzen.
* Optional: Flüssigdünger für Kräuter, Pikierstab (wenn du mit Samen startest), kleine Schaufel oder Kelle.
Die Vorbereitung: Der Grundstein für deinen lila Basilikum-Garten
Bevor wir loslegen, ist es wichtig, alles vorzubereiten. Das spart Zeit und sorgt dafür, dass du reibungslos arbeiten kannst.
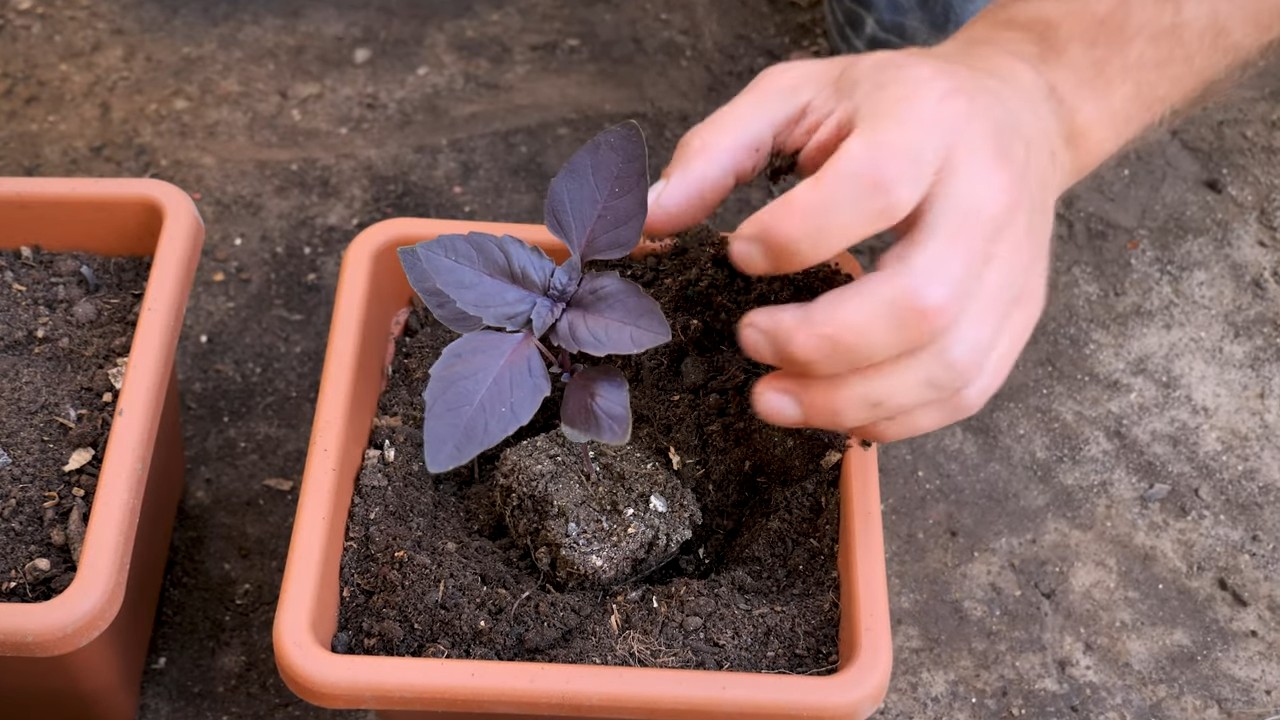
1. Töpfe vorbereiten: Stelle sicher, dass deine Töpfe sauber sind und über ausreichend Drainagelöcher verfügen. Lege eventuell eine Schicht Tonscherben oder Kies auf den Boden des Topfes, um die Drainage zu verbessern. Das verhindert Staunässe, die Basilikum gar nicht mag.
2. Erde vorbereiten: Fülle die Töpfe mit der vorbereiteten Blumenerde. Lass dabei etwa 2-3 cm Platz bis zum Rand des Topfes. Drücke die Erde leicht an, aber nicht zu fest.
3. Standort wählen: Lila Basilikum liebt die Sonne! Wähle einen sonnigen Standort für deine Töpfe. Ideal sind mindestens 6 Stunden Sonne pro Tag. Ein Südfenster oder ein sonniger Balkon sind perfekt.
Aussaat oder Einpflanzen: Der Start für dein lila Basilikum
Jetzt kommt der spannende Teil: Entweder säst du die Samen aus oder pflanzt die Jungpflanzen ein.
Aussaat von lila Basilikum (wenn du mit Samen startest):
1. Samen aussäen: Verteile die Samen gleichmäßig auf der Oberfläche der Erde. Drücke sie leicht an, aber bedecke sie nicht komplett mit Erde. Lila Basilikum ist ein Lichtkeimer, das heißt, die Samen brauchen Licht zum Keimen.
2. Bewässern: Befeuchte die Erde vorsichtig mit einer Sprühflasche. Achte darauf, dass die Erde feucht, aber nicht nass ist.
3. Warm halten: Stelle die Töpfe an einen warmen Ort (ca. 20-25°C). Du kannst die Töpfe auch mit Frischhaltefolie abdecken, um die Luftfeuchtigkeit zu erhöhen. Vergiss aber nicht, die Folie regelmäßig zu lüften, um Schimmelbildung zu vermeiden.
4. Geduld haben: Die Keimung dauert in der Regel 1-2 Wochen. Halte die Erde während dieser Zeit feucht.
5. Pikieren (wenn nötig): Sobald die Sämlinge groß genug sind (ca. 5-7 cm hoch), kannst du sie pikieren. Das bedeutet, dass du die kleinen Pflänzchen vorsichtig vereinzelst und in separate Töpfe umpflanzt. Verwende dafür einen Pikierstab oder einen Bleistift, um die Sämlinge vorsichtig aus der Erde zu heben.
Einpflanzen von lila Basilikum (wenn du Jungpflanzen hast):
1. Pflanzen vorbereiten: Nimm die Jungpflanzen vorsichtig aus ihren Anzuchttöpfen. Lockere die Wurzeln etwas auf, damit sie sich besser im neuen Topf ausbreiten können.
2. Pflanzlöcher graben: Grabe in jedem Topf ein kleines Loch, das groß genug ist, um die Wurzelballen der Jungpflanzen aufzunehmen.
3. Einsetzen: Setze die Jungpflanzen in die Löcher ein und fülle die Löcher mit Erde auf. Drücke die Erde leicht an.
4. Bewässern: Gieße die Pflanzen gründlich an.
Pflege: Damit dein lila Basilikum prächtig gedeiht
Die richtige Pflege ist entscheidend, damit dein lila Basilikum gesund und kräftig wächst.
1. Bewässerung: Gieße deine Basilikumpflanzen regelmäßig, aber vermeide Staunässe. Die Erde sollte immer leicht feucht sein. An heißen Tagen musst du möglicherweise täglich gießen. Am besten testest du mit dem Finger, ob die Erde trocken ist.
2. Düngung: Dünge deine Basilikumpflanzen alle 2-3 Wochen mit einem Flüssigdünger für Kräuter. Das sorgt für eine reiche Ernte und kräftige Farben.
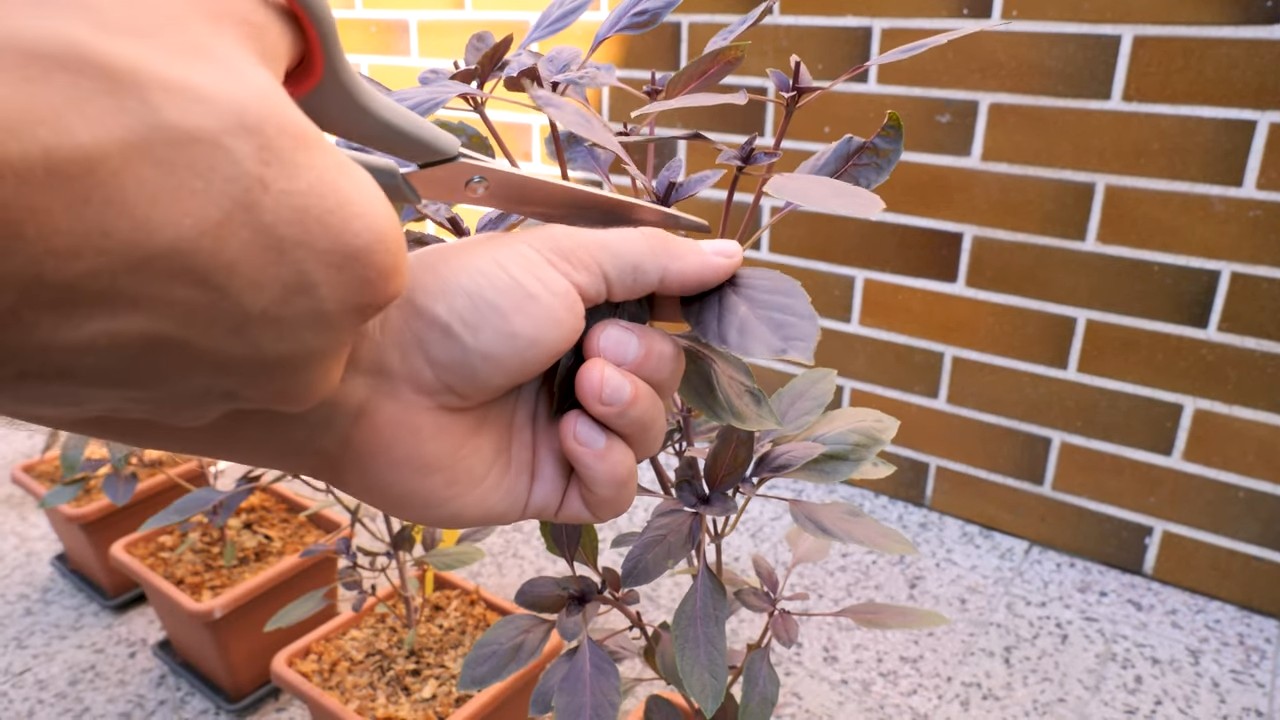
3. Schnitt: Schneide regelmäßig die Triebspitzen ab. Das fördert das Wachstum und verhindert, dass die Pflanzen blühen. Wenn Basilikum blüht, verliert es an Aroma. Schneide die Triebe direkt über einem Blattpaar ab.
4. Schädlinge: Achte auf Schädlinge wie Blattläuse oder Spinnmilben. Bei Befall kannst du die Pflanzen mit einem natürlichen Insektizid behandeln oder die Schädlinge einfach abwischen. Ich verwende gerne eine Mischung aus Wasser und etwas Schmierseife.
5. Überwintern: Lila Basilikum ist nicht winterhart. Wenn du deine Pflanzen überwintern möchtest, musst du sie ins Haus holen und an einen hellen, kühlen Ort stellen. Gieße sie sparsam und dünge sie nicht.
Ernte: Der Lohn deiner Mühe
Nach ein paar Wochen kannst du mit der Ernte beginnen.
1. Erntezeitpunkt: Ernte die Blätter am besten am Morgen, wenn sie am aromatischsten sind.
2. Erntetechnik: Schneide die Blätter mit einer Schere oder einem Messer ab. Du kannst einzelne Blätter oder ganze Triebe ernten.
3. Verwendung: Lila Basilikum ist vielseitig einsetzbar. Es schmeckt hervorragend in Salaten, Saucen, Pesto oder als Dekoration für Gerichte. Du kannst die Blätter auch trocknen oder einfrieren, um sie länger haltbar zu machen.
Häufige Probleme und Lösungen:
* Gelbe Blätter: Gelbe Blätter können ein Zeichen für Überwässerung oder Nährstoffmangel sein. Überprüfe die Bewässerung und dünge die Pflanzen gegebenenfalls.
* Schlaffe Blätter: Schlaffe Blätter können ein Zeichen für Wassermangel oder zu viel Sonne sein. Gieße die Pflanzen und stelle sie gegebenenfalls an einen schattigeren Ort.
* Blattläuse: Blattläuse sind kleine, grüne oder schwarze Insekten, die sich an den Blättern und Stängeln ansiedeln. Du kannst sie mit einem natürlichen Insektizid oder einer Mischung aus Wasser und Schmierseife bekämpfen.
* Pilzkrankheiten: Pilzkrankheiten können durch zu hohe Luftfeuchtigkeit oder Staunässe entstehen. Sorge für eine gute Belüftung und vermeide Staunässe.
Zusätzliche Tipps:
* Sortenwahl: Es gibt verschiedene Sorten von lila Basilikum, z.B. ‘Dark Opal’, ‘Purple Ruffles’ oder ‘Red Rubin’. Probiere verschiedene Sorten aus, um deinen Favoriten zu finden.
* Begleitpflanzen: Basilikum verträgt sich gut mit Tomaten, Paprika und Auberginen. Pflanze diese Gemüsearten in der Nähe deines Basilikums, um Schädlinge fernzuhalten und das Wachstum zu fördern.
* Kreative Ideen: Verwende lila Basilikum nicht nur in der Küche, sondern auch als Dekoration. Die farbenfrohen Blätter sind ein echter Hingucker in Blumensträußen oder als Tischdekoration.
Ich hoffe, dieser Leitfaden hilft dir dabei, deinen eigenen lila Basilikum-Garten zu starten. Viel Spaß beim Gärtnern und Genießen!
Conclusion
So, there you have it! Growing purple basil in containers isn’t just a gardening project; it’s an invitation to elevate your culinary creations and beautify your living space. We’ve walked through the simple steps, from selecting the right container and soil to nurturing your vibrant purple basil plants. The deep, rich color and unique flavor profile of this herb make it a standout addition to any garden or kitchen.
But why is this DIY trick a must-try? Beyond the aesthetic appeal, growing your own purple basil offers several compelling advantages. Firstly, you have complete control over the growing environment, ensuring your basil is free from harmful pesticides and chemicals. This translates to a healthier and more flavorful herb for your dishes. Secondly, it’s incredibly cost-effective. A single packet of seeds or a small starter plant can yield a bountiful harvest that will last you throughout the growing season, far surpassing the cost of repeatedly buying fresh basil from the grocery store. Thirdly, it’s incredibly rewarding! There’s a unique satisfaction in nurturing a plant from seed to harvest, knowing you’ve played a direct role in bringing fresh, flavorful ingredients to your table.
Variations and Suggestions
Don’t be afraid to experiment! Once you’ve mastered the basics of growing purple basil in containers, you can explore different varieties and growing techniques. Try growing several different types of basil together in a large container for a diverse herb garden. Consider companion planting with other herbs or vegetables that thrive in similar conditions, such as tomatoes or peppers. You can also experiment with different container materials, such as terracotta pots or self-watering containers, to see what works best for your environment.
For those who want to take their purple basil cultivation to the next level, consider propagating new plants from cuttings. This is a simple and effective way to expand your basil collection without having to purchase new seeds or plants. Simply take a cutting from a healthy stem, remove the lower leaves, and place it in water until roots develop. Once the roots are established, you can transplant the cutting into a new container.
Another exciting variation is to explore different culinary uses for your purple basil. While it’s delicious in pesto, salads, and sauces, don’t limit yourself to these traditional applications. Try using it to infuse oils or vinegars, create unique cocktails, or even as a garnish for desserts. The possibilities are endless!
Share Your Experience!
We wholeheartedly encourage you to give this DIY trick a try. Growing purple basil in containers is a fun, rewarding, and accessible project for gardeners of all skill levels. Whether you’re a seasoned green thumb or a complete beginner, you’ll be amazed at how easy it is to cultivate your own supply of this flavorful and beautiful herb.
Once you’ve embarked on your purple basil growing journey, we’d love to hear about your experience! Share your photos, tips, and recipes with us in the comments below. Let’s create a community of purple basil enthusiasts and inspire others to discover the joys of growing their own herbs. What are you waiting for? Grab a container, some soil, and some purple basil seeds, and get growing! You won’t regret it.
Frequently Asked Questions (FAQ)
Q: What is the best type of container for growing purple basil?
A: The best type of container for growing purple basil is one that is at least 12 inches in diameter and 12 inches deep. This will provide ample space for the roots to grow and allow the plant to thrive. The container should also have drainage holes to prevent waterlogging, which can lead to root rot. Terracotta pots, plastic containers, and even repurposed buckets can all be suitable options, as long as they meet these criteria. Consider the material’s ability to retain moisture; terracotta dries out faster than plastic.
Q: What kind of soil should I use for growing purple basil in containers?
A: Purple basil thrives in well-draining soil that is rich in organic matter. A good potting mix specifically formulated for containers is ideal. Avoid using garden soil, as it can be too heavy and compact, hindering drainage and root growth. You can also amend your potting mix with compost or other organic materials to improve its fertility and water-holding capacity. A slightly acidic to neutral pH (around 6.0 to 7.0) is optimal.
Q: How much sunlight does purple basil need?
A: Purple basil requires at least 6-8 hours of direct sunlight per day to thrive. Choose a location for your container that receives plenty of sunlight, such as a sunny patio, balcony, or windowsill. If you don’t have access to enough natural sunlight, you can supplement with grow lights. Insufficient sunlight can result in leggy growth and reduced flavor.
Q: How often should I water my purple basil plants?
A: Water your purple basil plants regularly, keeping the soil consistently moist but not waterlogged. The frequency of watering will depend on factors such as the weather, the size of the container, and the type of soil. Check the soil moisture by sticking your finger about an inch into the soil. If it feels dry, it’s time to water. Avoid overwatering, as this can lead to root rot. During hot, dry weather, you may need to water your plants daily.
Q: How often should I fertilize my purple basil plants?
A: Purple basil benefits from regular fertilization, especially during the growing season. Use a balanced liquid fertilizer diluted to half strength every 2-3 weeks. Alternatively, you can use a slow-release fertilizer at the time of planting. Avoid over-fertilizing, as this can lead to excessive foliage growth at the expense of flavor.
Q: How do I harvest purple basil?
A: Harvest purple basil by pinching or cutting off the leaves as needed. Start harvesting when the plants are about 6-8 inches tall. Pinch off the top leaves to encourage bushier growth. Avoid removing more than one-third of the plant’s foliage at a time. Regular harvesting will also help to prevent the plant from flowering, which can reduce the flavor of the leaves.
Q: How do I prevent pests and diseases from affecting my purple basil plants?
A: To prevent pests and diseases, start with healthy plants and provide them with optimal growing conditions. Inspect your plants regularly for signs of pests or diseases. Common pests that can affect purple basil include aphids, spider mites, and whiteflies. These can be controlled with insecticidal soap or neem oil. Diseases such as fungal leaf spots can be prevented by ensuring good air circulation and avoiding overwatering. Remove any infected leaves promptly.
Q: Can I grow purple basil indoors?
A: Yes, you can grow purple basil indoors, but it requires sufficient light. Place your container near a sunny window that receives at least 6-8 hours of direct sunlight per day. If you don’t have enough natural light, you can supplement with grow lights. Ensure good air circulation and avoid overwatering.
Q: How do I store harvested purple basil?
A: Freshly harvested purple basil is best used immediately. However, you can store it in the refrigerator for a few days. Wrap the leaves in a damp paper towel and place them in a plastic bag. You can also freeze purple basil leaves for longer storage. Blanch the leaves in boiling water for a few seconds, then plunge them into ice water. Drain well and freeze in a single layer on a baking sheet. Once frozen, transfer the leaves to a freezer bag. Alternatively, you can make purple basil pesto and freeze it in ice cube trays for easy portioning.
Q: My purple basil plant is flowering. What should I do?
A: When purple basil starts to flower, it signals the end of its vegetative growth phase, and the leaves may become less flavorful. To prolong the harvest, pinch off the flower buds as soon as you see them. This will encourage the plant to produce more leaves. If the plant has already flowered extensively, you can still use the leaves, but they may have a slightly bitter taste.

Leave a Comment