

Growing grapevines from store grapes might sound like something out of a fairytale, but believe it or not, it’s a totally achievable DIY project that can bring the magic of winemaking (or just delicious table grapes!) right to your backyard. Forget those expensive nursery vines – we’re going rogue and turning ordinary supermarket grapes into thriving plants!
Grapevines have a rich history, deeply intertwined with civilizations for millennia. From ancient Egypt, where grapes were depicted in hieroglyphics, to the Roman Empire, where vineyards flourished across the landscape, grapes have symbolized abundance, celebration, and the art of winemaking. Imagine carrying on that legacy, even in a small way, by cultivating your own grapevine from a simple store-bought grape.
But why would you want to embark on this adventure? Well, for starters, it’s incredibly rewarding to nurture a plant from seed (or in this case, from a grape seed!) and watch it grow. Plus, it’s a fantastic way to save money and experiment with different grape varieties. Let’s be honest, who doesn’t love a good DIY project that combines gardening, a touch of science, and the promise of delicious fruit? Growing grapevines from store grapes is a fun and educational experience for the whole family. So, grab your gardening gloves, and let’s get started on this exciting journey!
Weinreben aus Supermarkt-Trauben ziehen: Ein DIY-Abenteuer für Geduldige
Hallo Weinliebhaber und Gartenfreunde! Habt ihr euch jemals gefragt, ob man aus den Trauben, die man im Supermarkt kauft, tatsächlich Weinreben ziehen kann? Die Antwort ist: Ja, es ist möglich! Es ist zwar ein bisschen knifflig und erfordert Geduld, aber es ist ein spannendes DIY-Projekt, das euch mit etwas Glück mit euren eigenen Weinreben belohnen kann. Ich zeige euch, wie ich es angegangen bin.
Was ihr für dieses Projekt benötigt:
* Supermarkt-Trauben: Wählt kernhaltige Trauben aus. Achten Sie auf gesunde, pralle Früchte ohne Anzeichen von Fäulnis. Dunkle Trauben (z.B. rote oder blaue) haben oft eine höhere Erfolgschance als helle.
* Scharfes Messer oder Skalpell: Zum vorsichtigen Heraustrennen der Kerne.
* Kleine Behälter: Zum Beispiel kleine Töpfe, Anzuchtschalen oder Joghurtbecher.
* Anzuchterde: Eine lockere, nährstoffarme Erde ist ideal.
* Feuchtigkeitsspeicherndes Substrat: Vermiculit oder Perlit helfen, die Feuchtigkeit zu halten.
* Sprühflasche: Zum Befeuchten der Erde.
* Plastiktüten oder Mini-Gewächshaus: Um eine hohe Luftfeuchtigkeit zu gewährleisten.
* Geduld: Das Wichtigste! Es kann Wochen oder sogar Monate dauern, bis die Kerne keimen.
Schritt-für-Schritt-Anleitung:
1. Die Kerne vorbereiten
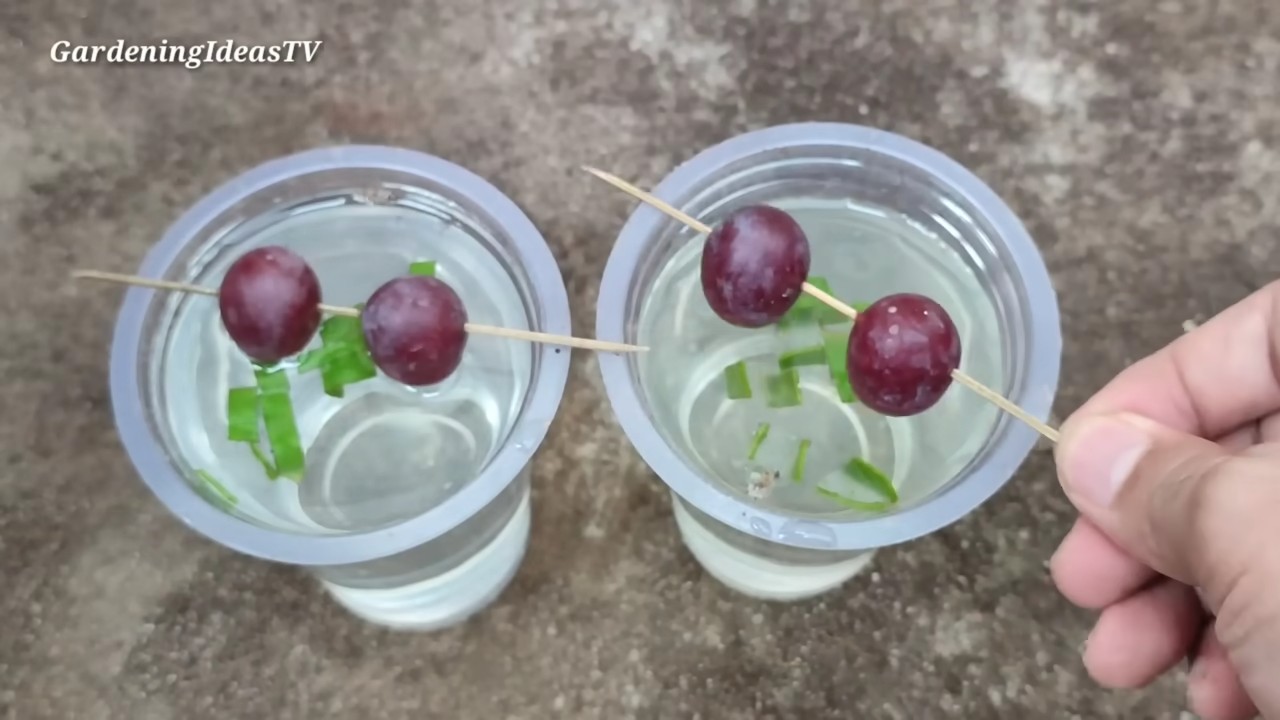
1. Trauben auswählen: Sucht im Supermarkt nach Trauben, die euch optisch ansprechen und die Kerne haben. Am besten nehmt ihr verschiedene Sorten, um die Chancen zu erhöhen. Achten Sie darauf, dass die Trauben frisch und prall sind.
2. Kerne extrahieren: Schneidet die Trauben vorsichtig auf und entfernt die Kerne. Achtet darauf, die Kerne nicht zu beschädigen. Ein scharfes Messer oder ein Skalpell ist hier sehr hilfreich.
3. Reinigen: Spült die Kerne unter fließendem Wasser ab, um Fruchtfleischreste zu entfernen. Fruchtfleisch kann Schimmelbildung begünstigen.
4. Trocknen: Legt die Kerne auf ein Papiertuch und lasst sie einige Tage trocknen. Das Trocknen hilft, die Keimruhe zu brechen. Dreht die Kerne regelmäßig, damit sie von allen Seiten trocknen.
2. Stratifizierung (Kältebehandlung)
Die Stratifizierung ist ein wichtiger Schritt, um die Keimruhe der Traubenkerne zu brechen. Sie simuliert den Winter und signalisiert den Kernen, dass es Zeit zum Keimen ist.
1. Vorbereitung: Legt die getrockneten Kerne in einen kleinen Behälter, zum Beispiel eine Tupperdose oder einen Gefrierbeutel.
2. Feuchtigkeit: Befeuchtet ein Papiertuch leicht und legt es über die Kerne. Das Tuch sollte feucht, aber nicht nass sein.
3. Kälte: Verschließt den Behälter und legt ihn für 6-8 Wochen in den Kühlschrank. Die Temperatur sollte zwischen 1°C und 5°C liegen.
4. Kontrolle: Überprüft die Kerne regelmäßig auf Schimmelbildung. Wenn ihr Schimmel entdeckt, entfernt die betroffenen Kerne und wechselt das Papiertuch.
3. Aussaat
Nach der Stratifizierung sind die Kerne bereit für die Aussaat.
1. Vorbereitung der Töpfe: Füllt die kleinen Töpfe oder Anzuchtschalen mit Anzuchterde. Mischt etwas Vermiculit oder Perlit unter die Erde, um die Drainage zu verbessern und die Feuchtigkeit zu speichern.
2. Aussaat: Legt 2-3 Kerne pro Topf auf die Erde und bedeckt sie mit einer dünnen Schicht Erde (ca. 0,5 cm).
3. Bewässerung: Befeuchtet die Erde vorsichtig mit einer Sprühflasche. Die Erde sollte feucht, aber nicht nass sein.
4. Abdeckung: Stellt die Töpfe in Plastiktüten oder ein Mini-Gewächshaus, um eine hohe Luftfeuchtigkeit zu gewährleisten.
5. Standort: Stellt die Töpfe an einen warmen, hellen Ort, aber nicht in die direkte Sonne. Eine Temperatur von 20-25°C ist ideal.
4. Pflege
Die Pflege der Keimlinge ist entscheidend für ihren Erfolg.
1. Feuchtigkeit: Haltet die Erde feucht, aber nicht nass. Besprüht die Erde regelmäßig mit einer Sprühflasche.
2. Belüftung: Lüftet die Töpfe regelmäßig, um Schimmelbildung zu vermeiden. Nehmt die Plastiktüten oder das Mini-Gewächshaus für einige Stunden am Tag ab.
3. Licht: Sobald die Keimlinge aus der Erde kommen, benötigen sie ausreichend Licht. Stellt sie an einen hellen Ort, aber vermeidet direkte Sonneneinstrahlung, die die zarten Blätter verbrennen könnte.
4. Vereinzeln: Wenn mehrere Keimlinge in einem Topf wachsen, vereinzeln Sie sie, sobald sie groß genug sind, um sie zu handhaben. Wählt den stärksten Keimling aus und entfernt die anderen vorsichtig.
5. Düngen: Beginnt nach einigen Wochen mit dem Düngen der Keimlinge mit einem milden Flüssigdünger. Achtet darauf, den Dünger stark zu verdünnen, um die zarten Wurzeln nicht zu verbrennen.
5. Umpflanzen
Sobald die Keimlinge groß genug sind (ca. 10-15 cm), können sie in größere Töpfe umgepflanzt werden.
1. Vorbereitung: Füllt größere Töpfe mit einer Mischung aus Anzuchterde und Gartenerde.
2. Umpflanzen: Nehmt die Keimlinge vorsichtig aus den kleinen Töpfen und pflanzt sie in die größeren Töpfe um. Achtet darauf, die Wurzeln nicht zu beschädigen.
3. Bewässerung: Gießt die Keimlinge nach dem Umpflanzen gründlich.
4. Standort: Stellt die Töpfe an einen hellen, sonnigen Ort.
6. Auspflanzen (optional)
Wenn ihr die Weinreben im Garten auspflanzen möchtet, solltet ihr dies erst im Frühjahr nach dem letzten Frost tun.
1. Vorbereitung: Wählt einen sonnigen Standort mit gut durchlässigem Boden.
2. Pflanzloch: Grabt ein ausreichend großes Pflanzloch.
3. Auspflanzen: Nehmt die Weinreben vorsichtig aus den Töpfen und pflanzt sie in die Pflanzlöcher.
4. Bewässerung: Gießt die Weinreben nach dem Auspflanzen gründlich.
5. Stütze: Gebt den Weinreben eine Stütze, an der sie hochwachsen können.
Wichtige Tipps und Tricks:
* Geduld ist der Schlüssel: Es kann Wochen oder sogar Monate dauern, bis die Kerne keimen. Gebt nicht auf!
* Hygiene: Achtet auf saubere Arbeitsgeräte und Behälter, um Schimmelbildung zu vermeiden.
* Nicht alle Kerne keimen: Seid nicht enttäuscht, wenn nicht alle Kerne keimen. Die Erfolgsquote ist oft gering.
* Sortenechtheit: Beachtet, dass die aus den Kernen gezogenen Weinreben nicht unbedingt die gleichen Eigenschaften wie die Mutterpflanze haben. Es kann zu genetischen Veränderungen kommen.
* Klima: Informiert euch über die Klimabedingungen in eurer Region und wählt Traubensorten, die für euer Klima geeignet sind.
* Veredelung: Um sicherzustellen, dass ihr eine bestimmte Traubensorte erhaltet, könnt ihr die jungen Weinreben auf eine bewährte Unterlage veredeln.
Häufige Probleme und Lösungen:
* Schimmelbildung: Wenn Schimmel auftritt, entfernt die betroffenen Kerne oder Keimlinge und sorgt für eine bessere Belüftung.
* Keine Keimung: Wenn die Kerne nach mehreren Wochen

Conclusion
So, there you have it! Growing grapevines from store-bought grapes might seem like a long shot, and it certainly requires patience and dedication, but the potential reward of harvesting your own delicious grapes makes it an incredibly worthwhile endeavor. Think of the satisfaction of enjoying homemade wine, fresh grape juice, or simply snacking on grapes you nurtured from a humble seed.
This DIY trick isn’t just about saving money; it’s about connecting with nature, learning about the life cycle of plants, and experiencing the joy of cultivating something from scratch. It’s a project that can be enjoyed by individuals, families, or even as a classroom activity. The process itself is a learning experience, teaching valuable lessons about germination, soil composition, and plant care.
Why is this a must-try? Because it opens up a world of possibilities. Imagine tailoring your grape selection to your specific taste preferences. Can’t find your favorite variety at the local nursery? No problem! Simply source some grapes from the store and embark on your own propagation journey.
Variations and Suggestions:
* Experiment with different grape varieties: Don’t limit yourself to just one type of grape. Try different colors, flavors, and seedless versus seeded varieties to see which ones thrive best in your environment.
* Grafting: Once your seedlings are established, consider grafting them onto hardier rootstock for improved disease resistance and vigor. This is a more advanced technique, but it can significantly increase your chances of success.
* Vertical Gardening: If you have limited space, train your grapevines to grow vertically on a trellis or fence. This not only saves space but also adds a beautiful aesthetic element to your garden.
* Indoor Growing: While grapevines generally prefer outdoor conditions, you can attempt to grow them indoors in a large container with adequate sunlight and proper ventilation.
* Seed Scarification: To improve germination rates, gently scarify the grape seeds before planting. This involves lightly scratching the seed coat to allow water to penetrate more easily. You can do this by rubbing the seeds with sandpaper or using a sharp knife. Be careful not to damage the seed itself.
We strongly encourage you to give this DIY trick a try. It’s a rewarding experience that can bring you closer to nature and provide you with a bountiful harvest of delicious grapes. Don’t be discouraged if your first attempt isn’t successful. Gardening is all about learning and adapting.
Most importantly, we want to hear about your experiences! Share your successes, your failures, and any tips or tricks you discover along the way. Post photos of your grape seedlings, your thriving vines, and your eventual grape harvests on social media using relevant hashtags. Let’s create a community of grape-growing enthusiasts and learn from each other. Your insights could be invaluable to other aspiring gardeners. So, grab some grapes, get your hands dirty, and embark on this exciting adventure of growing grapevines from store grapes!
Frequently Asked Questions (FAQ)
Can I really grow grapevines from store-bought grapes?
Yes, it is possible to grow grapevines from store-bought grapes, but it’s important to understand that it’s not guaranteed. The success rate can vary depending on several factors, including the grape variety, the viability of the seeds, and your growing conditions. Many commercially grown grapes are hybrids, meaning the seeds may not produce plants that are true to the parent variety. However, with patience and proper care, you can definitely increase your chances of success.
What types of store-bought grapes are best for growing?
Seedless grapes will not work for propagation as they lack viable seeds. Look for grapes that are not treated with chemicals that inhibit germination. Organic grapes are often a better choice. Varieties with larger seeds tend to be easier to germinate. Experiment with different varieties to see which ones thrive in your local climate.
How long does it take for grape seeds to germinate?
Grape seed germination can be a slow process. It can take anywhere from a few weeks to several months for the seeds to germinate. Patience is key! Make sure to keep the soil consistently moist but not waterlogged. Providing a warm environment can also help speed up the germination process.
What kind of soil should I use for planting grape seeds?
Use a well-draining potting mix that is specifically formulated for seed starting. Avoid using garden soil, as it can be too heavy and may contain pathogens that can harm the seedlings. A mix of peat moss, perlite, and vermiculite is a good option.
How much sunlight do grape seedlings need?
Grape seedlings need plenty of sunlight to thrive. Aim for at least 6-8 hours of direct sunlight per day. If you are growing them indoors, you may need to supplement with artificial grow lights.
How often should I water grape seedlings?
Water grape seedlings regularly to keep the soil consistently moist but not waterlogged. Avoid letting the soil dry out completely, as this can stress the seedlings. Check the soil moisture level daily and water when the top inch of soil feels dry to the touch.
When should I transplant my grape seedlings?
Once your grape seedlings have developed several sets of true leaves and are large enough to handle, you can transplant them into larger pots or directly into the ground. Choose a sunny location with well-draining soil.
How do I care for my grapevines after transplanting?
After transplanting, water your grapevines regularly and fertilize them with a balanced fertilizer. Prune them regularly to encourage healthy growth and fruit production. Provide support for the vines to climb on, such as a trellis or fence.
What are some common problems that affect grapevines?
Grapevines can be susceptible to various pests and diseases, including aphids, spider mites, powdery mildew, and black rot. Monitor your vines regularly for signs of infestation or disease and take appropriate action to control them.
How long does it take for grapevines to produce fruit?
It typically takes 2-3 years for grapevines to start producing fruit. However, the exact time frame can vary depending on the variety, growing conditions, and care provided. Be patient and continue to care for your vines, and you will eventually be rewarded with a bountiful harvest of delicious grapes.
Can I grow grapevines in containers?
Yes, you can grow grapevines in containers, but you will need to choose a large container that is at least 20 gallons in size. Make sure the container has drainage holes to prevent waterlogging. Use a well-draining potting mix and provide regular watering and fertilization. Container-grown grapevines may require more frequent pruning than those grown in the ground.
What if my grape seeds don’t germinate?
Don’t be discouraged if your grape seeds don’t germinate. Germination rates can vary, and it’s not uncommon for some seeds to fail to sprout. Try again with a fresh batch of seeds and adjust your growing conditions as needed. You can also try scarifying the seeds before planting to improve germination rates.
Leave a Comment