

Plastic Bottle Spinach Growing: Ever dreamed of harvesting fresh, vibrant spinach right outside your kitchen door, even if you’re short on space or gardening experience? I know I have! Forget those expensive grocery store greens – we’re diving into a super simple, budget-friendly DIY project that will have you enjoying homegrown spinach in no time.
Growing your own food, especially leafy greens like spinach, has a rich history. From ancient Roman gardens to the victory gardens of World War II, people have always found ways to cultivate their own sustenance. There’s something incredibly satisfying about nurturing a plant from seed to table, and this method makes it accessible to everyone.
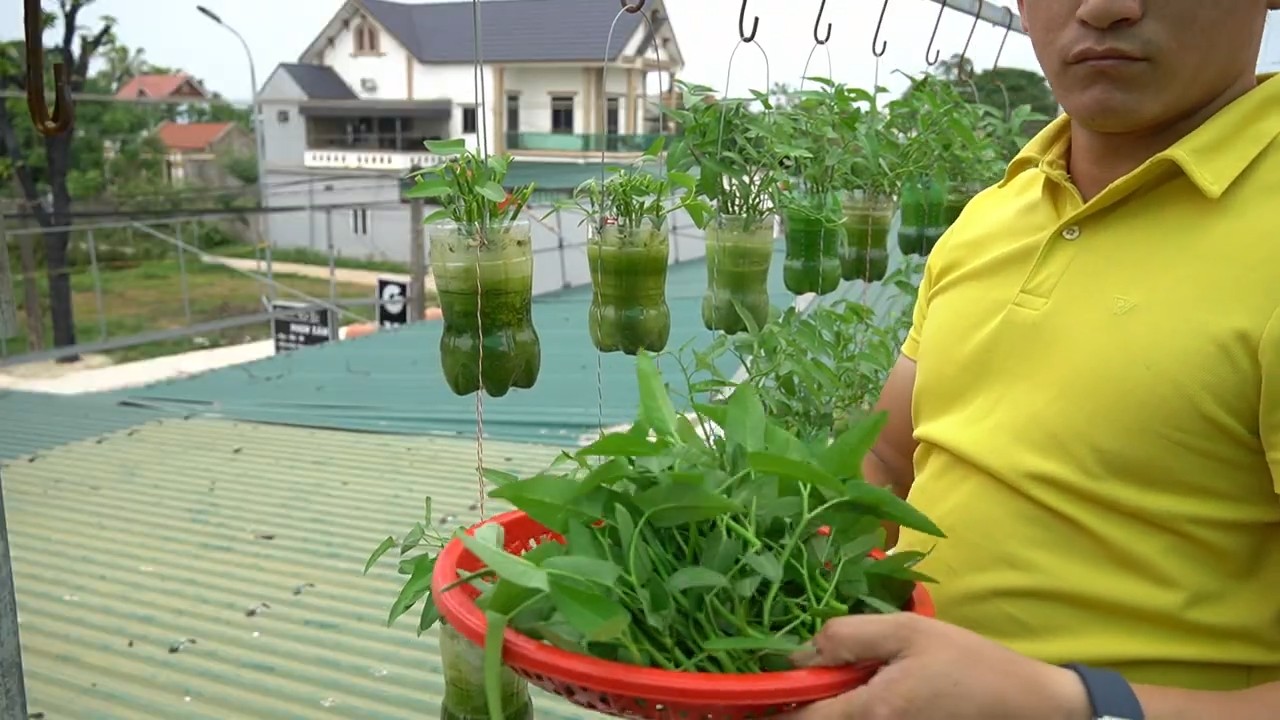
But why plastic bottle spinach growing? Well, let’s face it, not everyone has a sprawling backyard. Apartment dwellers, balcony gardeners, and even those with limited mobility can benefit from this ingenious upcycling hack. It’s a fantastic way to reduce waste, save money, and enjoy the unparalleled taste of freshly picked spinach. Plus, it’s a fun and educational project for the whole family! So, grab those empty plastic bottles, and let’s get started on this exciting gardening adventure. I promise, you’ll be amazed at how easy and rewarding it is!
Spinat Anbauen in Plastikflaschen: Ein DIY-Gartenprojekt für Jedermann
Hallo Gartenfreunde! Habt ihr Lust, frischen Spinat direkt vor eurer Haustür zu ernten, auch wenn ihr keinen großen Garten habt? Dann seid ihr hier genau richtig! Ich zeige euch, wie ihr aus einfachen Plastikflaschen einen kleinen, aber feinen Spinatgarten zaubern könnt. Das ist nicht nur super nachhaltig, weil wir Plastikmüll recyceln, sondern auch kinderleicht und macht richtig Spaß!
Was ihr für euren Mini-Spinatgarten braucht:
* Plastikflaschen: Am besten eignen sich große PET-Flaschen (z.B. von Wasser oder Saft). Je mehr, desto mehr Spinat!
* Ein scharfes Messer oder eine Schere: Zum Zuschneiden der Flaschen.
* Erde: Hochwertige Pflanzerde ist wichtig für gesundes Spinatwachstum.
* Spinatsamen: Sucht euch eine Sorte aus, die euch schmeckt und für den Anbau im Topf geeignet ist.
* Kies oder Blähton: Für eine gute Drainage.
* Gießkanne oder Sprühflasche: Zum Bewässern.
* Optional: Eine Sprühflasche mit Wasser zum Befeuchten der Samen.
* Optional: Ein Marker oder Stift zum Beschriften der Flaschen.
* Optional: Handschuhe, um eure Hände sauber zu halten.
Die Vorbereitung der Plastikflaschen
1. Reinigung: Zuerst müsst ihr die Plastikflaschen gründlich reinigen. Entfernt alle Etiketten und spült sie mit warmem Wasser und Spülmittel aus. Achtet darauf, dass keine Spülmittelreste zurückbleiben.
2. Zuschneiden: Jetzt kommt der spannende Teil! Es gibt verschiedene Möglichkeiten, die Flaschen zuzuschneiden, je nachdem, wie ihr euren Spinatgarten gestalten wollt. Ich zeige euch zwei Varianten:
* Variante 1: Horizontaler Anbau: Schneidet die Flasche horizontal in der Mitte durch. Ihr erhaltet zwei Hälften, die ihr jeweils als Pflanzgefäß nutzen könnt. Achtet darauf, dass ihr am Boden der unteren Hälfte Löcher für die Drainage bohrt oder schneidet.
* Variante 2: Vertikaler Anbau (Turm): Schneidet ein rechteckiges Fenster in die Seite der Flasche. Dieses Fenster dient als Pflanzöffnung. Ihr könnt mehrere Flaschen übereinander stapeln, um einen kleinen Spinatturm zu bauen. Auch hier sind Drainagelöcher wichtig!
3. Drainagelöcher: Egal für welche Variante ihr euch entscheidet, Drainagelöcher sind unerlässlich! Sie verhindern Staunässe, die zu Wurzelfäule führen kann. Bohrt oder schneidet mehrere kleine Löcher in den Boden der Flaschen.
4. Optional: Beschriften: Wenn ihr verschiedene Spinatsorten anpflanzen wollt, könnt ihr die Flaschen mit einem Marker beschriften. So behaltet ihr den Überblick.
Das Befüllen der Flaschen und Aussäen der Spinatsamen
1. Drainageschicht: Füllt zuerst eine Schicht Kies oder Blähton in die Flaschen. Diese Schicht sorgt für eine gute Drainage und verhindert, dass die Erde die Drainagelöcher verstopft.
2. Erde einfüllen: Füllt die Flaschen nun mit Pflanzerde. Lasst etwa 2-3 cm Platz bis zum Rand. Drückt die Erde leicht an.
3. Aussaat: Verteilt die Spinatsamen gleichmäßig auf der Erde. Achtet darauf, dass die Samen nicht zu dicht beieinander liegen. Eine Faustregel ist, etwa 1-2 cm Abstand zwischen den Samen zu lassen.
4. Samen bedecken: Bedeckt die Samen mit einer dünnen Schicht Erde (ca. 0,5 cm). Drückt die Erde leicht an.
5. Bewässern: Gießt die Erde vorsichtig mit einer Gießkanne oder Sprühflasche an. Die Erde sollte gut durchfeuchtet sein, aber nicht durchnässt.
6. Optional: Befeuchten: Um die Keimung zu beschleunigen, könnt ihr die Erde zusätzlich mit einer Sprühflasche befeuchten.
Die Pflege eures Spinatgartens
1. Standort: Stellt eure bepflanzten Flaschen an einen hellen Standort, aber nicht in die pralle Mittagssonne. Spinat mag es gerne halbschattig.
2. Bewässerung: Achtet darauf, dass die Erde immer leicht feucht ist. Gießt regelmäßig, aber vermeidet Staunässe. Die Häufigkeit des Gießens hängt von der Temperatur und der Luftfeuchtigkeit ab.
3. Düngen: Spinat ist ein Starkzehrer und benötigt ausreichend Nährstoffe. Düngt eure Pflanzen regelmäßig mit einem organischen Flüssigdünger. Befolgt dabei die Anweisungen auf der Verpackung.
4. Unkraut entfernen: Entfernt regelmäßig Unkraut, das in den Flaschen wächst. Unkraut konkurriert mit dem Spinat um Nährstoffe und Wasser.
5. Schutz vor Schädlingen: Kontrolliert eure Pflanzen regelmäßig auf Schädlinge wie Blattläuse oder Schnecken. Bei Bedarf könnt ihr natürliche Schädlingsbekämpfungsmittel einsetzen.
6. Ernte: Nach etwa 4-6 Wochen könnt ihr euren ersten Spinat ernten. Schneidet die äußeren Blätter ab, damit die inneren Blätter weiterwachsen können.
Zusätzliche Tipps und Tricks
* Sortenwahl: Wählt Spinatsorten, die für den Anbau im Topf geeignet sind. Es gibt spezielle Sorten, die kompakter wachsen und weniger Platz benötigen.
* Fruchtfolge: Baut Spinat nicht jedes Jahr am selben Standort an. Eine Fruchtfolge hilft, Krankheiten und Schädlinge zu vermeiden.
* Überwinterung: Spinat ist relativ frosthart und kann in milden Wintern draußen überwintern. Schützt die Pflanzen bei starkem Frost mit einem Vlies.
* Kreative Gestaltung: Bemalt die Plastikflaschen mit bunten Farben oder Mustern, um euren Spinatgarten noch individueller zu gestalten.
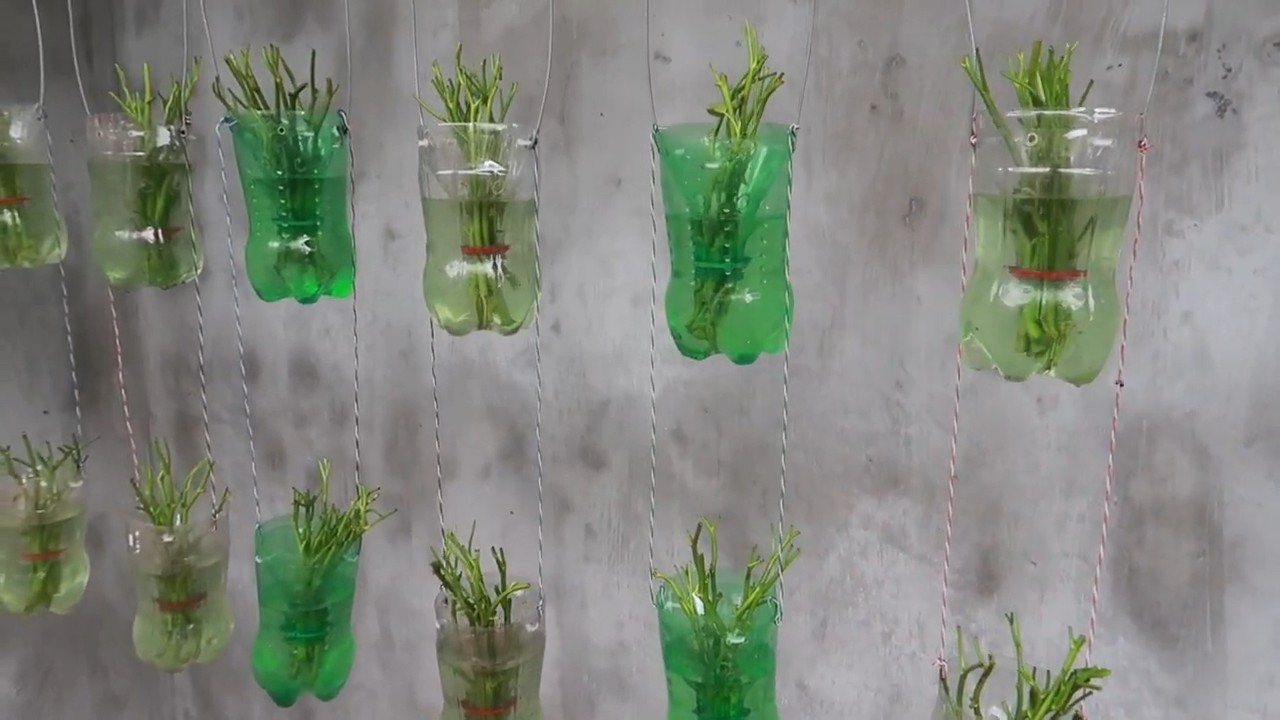
* Vertikaler Garten: Wenn ihr wenig Platz habt, könnt ihr einen vertikalen Garten aus den Plastikflaschen bauen. Befestigt die Flaschen an einer Wand oder einem Zaun.
* Upcycling: Nutzt auch andere Plastikbehälter wie Joghurtbecher oder Eisdosen für den Anbau von Spinat.
* Kinder einbeziehen: Das Anpflanzen von Spinat in Plastikflaschen ist eine tolle Aktivität für Kinder. Sie lernen dabei etwas über Pflanzen und Nachhaltigkeit.
Häufige Probleme und Lösungen
* Gelbe Blätter: Gelbe Blätter können ein Zeichen für Nährstoffmangel sein. Düngt die Pflanzen mit einem Flüssigdünger.
* Schimmel: Schimmel kann durch Staunässe entstehen. Sorgt für eine gute Drainage und gießt weniger.
* Blattläuse: Blattläuse können mit einem Wasserstrahl abgespült oder mit einem natürlichen Schädlingsbekämpfungsmittel bekämpft werden.
* Schnecken: Schnecken können mit Schneckenkorn oder Schneckenzäunen ferngehalten werden.
Ich hoffe, diese Anleitung hilft euch dabei, euren eigenen kleinen Spinatgarten in Plastikflaschen anzulegen. Es ist ein tolles Projekt, um Plastikmüll zu recyceln, frisches Gemüse anzubauen und die Natur zu genießen. Viel Spaß beim Gärtnern! Und vergesst nicht: Geduld ist der Schlüssel zum Erfolg!
Conclusion
So, there you have it! Transforming a humble plastic bottle into a thriving spinach garden is not just a fun project; it’s a sustainable, space-saving, and incredibly rewarding way to enjoy fresh, homegrown greens. We’ve walked you through the simple steps, highlighting the benefits of this innovative approach to urban gardening. But why is this DIY trick a must-try?
Firstly, it’s about accessibility. Whether you live in a sprawling suburban home or a compact city apartment, this method democratizes gardening. No sprawling backyard is required; a sunny windowsill or balcony will do. Secondly, it’s about sustainability. Reusing plastic bottles reduces waste and gives these materials a new lease on life. You’re actively participating in a circular economy, minimizing your environmental footprint while maximizing your access to nutritious food. Thirdly, it’s about control. You have complete control over the growing environment, from the soil composition to the watering schedule, ensuring your spinach is free from harmful pesticides and herbicides. You know exactly what you’re eating, and that peace of mind is priceless.
But the beauty of this project lies in its adaptability. Feel free to experiment with different types of plastic bottles. Larger bottles can accommodate more spinach plants, while smaller bottles are perfect for starting seeds or growing baby spinach. Consider painting the bottles to add a splash of color to your growing space or to help regulate soil temperature. You can also explore different soil mixtures to find what works best for your local climate and spinach variety.
Variations to consider:
* Vertical Garden Wall: Create a stunning vertical garden by hanging multiple bottle planters on a wall or fence. This is a fantastic way to maximize space and add a touch of greenery to any outdoor area.
* Hydroponic System: Adapt the bottle planter into a simple hydroponic system by using nutrient-rich water instead of soil. This can accelerate growth and reduce the risk of soilborne diseases.
* Companion Planting: Plant herbs like basil or chives alongside your spinach to deter pests and enhance flavor.
This DIY plastic bottle spinach growing method is more than just a gardening hack; it’s a gateway to a more sustainable and self-sufficient lifestyle. It’s a chance to connect with nature, learn new skills, and enjoy the satisfaction of harvesting your own food. So, grab a plastic bottle, some soil, and spinach seeds, and embark on this exciting gardening adventure. We are confident that you will be amazed by the results.
We wholeheartedly encourage you to try this DIY trick and share your experience with us! Post photos of your bottle gardens on social media using #BottleSpinach and tag us so we can see your creations. Let’s build a community of eco-conscious gardeners, one plastic bottle at a time. We can’t wait to see your thriving spinach gardens!
Frequently Asked Questions (FAQ)
What type of plastic bottle is best for growing spinach?
Ideally, you should use food-grade plastic bottles, such as those that previously contained water, juice, or soda. These are generally made from PET (polyethylene terephthalate) or HDPE (high-density polyethylene), which are considered safe for growing food. Avoid using bottles that contained harsh chemicals or cleaning products, as these may contaminate the soil and spinach. Thoroughly wash and rinse the bottles before using them.
How much sunlight does the spinach need when grown in a plastic bottle?
Spinach thrives in partial to full sunlight, requiring at least 4-6 hours of direct sunlight per day. If you’re growing your spinach indoors, place the bottle near a sunny window or use a grow light to supplement natural light. Insufficient sunlight can lead to leggy growth and reduced yields. Rotate the bottle regularly to ensure even light exposure on all sides of the plant.
What type of soil should I use for growing spinach in a plastic bottle?
Use a well-draining potting mix that is rich in organic matter. A mixture of compost, peat moss, and perlite is ideal. Avoid using garden soil, as it can be too heavy and may contain pests or diseases. The soil should retain moisture but not become waterlogged. You can also add slow-release fertilizer to the soil to provide essential nutrients for healthy growth.
How often should I water the spinach in a plastic bottle?
Water the spinach regularly, keeping the soil consistently moist but not soggy. Check the soil moisture level daily by inserting your finger into the soil. If the top inch feels dry, it’s time to water. Avoid overwatering, as this can lead to root rot. The frequency of watering will depend on the climate, humidity, and the size of the bottle. In hotter weather, you may need to water more frequently.
How do I prevent pests and diseases from affecting my spinach?
Regularly inspect your spinach plants for signs of pests or diseases. Common pests include aphids, spider mites, and slugs. You can control these pests by handpicking them off the plants, using insecticidal soap, or introducing beneficial insects like ladybugs. To prevent diseases, ensure good air circulation around the plants and avoid overwatering. If you notice any signs of disease, remove the affected leaves immediately.
How long does it take for spinach to grow in a plastic bottle?
Spinach typically takes 4-6 weeks to mature from seed to harvest. You can start harvesting the outer leaves when they are about 4-6 inches long. Continue harvesting the leaves as needed, allowing the inner leaves to continue growing. Regular harvesting encourages continued production.
Can I grow other vegetables in plastic bottles using the same method?
Yes, you can grow a variety of other vegetables in plastic bottles using the same method. Some good options include lettuce, herbs (such as basil, mint, and parsley), strawberries, and even small varieties of tomatoes or peppers. The key is to choose plants that are well-suited to container gardening and have relatively shallow root systems.
How do I prepare the plastic bottle for planting?
First, thoroughly clean the plastic bottle with soap and water to remove any residue. Then, cut the bottle in half horizontally. You can either use the bottom half as a planter and discard the top half, or invert the top half into the bottom half to create a self-watering system. Make sure to drill drainage holes in the bottom of the bottle to prevent waterlogging.
What are the benefits of growing spinach in a plastic bottle?
Growing spinach in a plastic bottle offers several benefits, including:
* Space-saving: Ideal for small spaces like balconies or patios.
* Sustainable: Reuses plastic bottles, reducing waste.
* Cost-effective: Requires minimal materials and resources.
* Easy to manage: Allows for better control over soil and watering.
* Accessible: Makes gardening accessible to everyone, regardless of location or experience.
How do I harvest the spinach from the plastic bottle?
Harvest the spinach by gently snipping off the outer leaves with scissors or pruning shears. Avoid pulling the entire plant out of the soil. Harvest regularly to encourage continued growth and production. The more you harvest, the more the plant will produce.
Can I reuse the soil from the plastic bottle for future plantings?
It’s generally recommended to replace the soil after each growing season. Over time, the soil can become depleted of nutrients and may harbor pests or diseases. If you choose to reuse the soil, amend it with fresh compost and fertilizer to replenish the nutrients.
What if my spinach plants are not growing well?
If your spinach plants are not growing well, consider the following factors:
* Sunlight: Ensure they are receiving enough sunlight.
* Watering: Adjust your watering schedule to keep the soil consistently moist but not soggy.
* Nutrients: Fertilize the plants with a balanced fertilizer.
* Pests and diseases: Inspect the plants for signs of pests or diseases and take appropriate action.
* Soil: Make sure the soil is well-draining and rich in organic matter.
By addressing these factors, you can improve the health and growth of your spinach plants.

Leave a Comment