

Balcony Cabbage Growing Tips: Dreaming of fresh, homegrown cabbage but short on space? You’re not alone! Many urban dwellers crave the satisfaction of cultivating their own food, and thankfully, you don’t need acres of land to do it. This DIY guide unlocks the secrets to successfully growing vibrant, delicious cabbage right on your balcony.
Cabbage, a staple in cuisines worldwide, boasts a rich history dating back thousands of years. From ancient Rome, where it was prized for its medicinal properties, to its prominent role in Eastern European dishes like sauerkraut and borscht, cabbage has nourished communities for generations. But who knew you could bring this historical veggie to your own urban oasis?
Let’s face it, store-bought cabbage can sometimes lack that fresh, vibrant flavor. Plus, knowing exactly where your food comes from and how it’s grown is incredibly rewarding. That’s where these balcony cabbage growing tips come in! I’m going to share my favorite hacks and simple techniques to help you overcome common challenges like limited sunlight, small spaces, and pest control. Imagine stepping onto your balcony and harvesting crisp, flavorful cabbage leaves for your next salad or stir-fry. It’s easier than you think, and I’m here to guide you every step of the way!
Balkonkohl: Dein eigener kleiner Gemüsegarten auf dem Balkon
Hey Gartenfreunde! Habt ihr auch Lust, frisches, knackiges Gemüse direkt vor der Haustür zu ernten? Dann seid ihr hier genau richtig! Ich zeige euch, wie ihr ganz einfach Kohl auf eurem Balkon anbauen könnt. Keine Angst, es ist einfacher als ihr denkt und macht super viel Spaß!
Warum Kohl auf dem Balkon?
Kohl ist nicht nur super gesund, sondern auch unglaublich vielseitig in der Küche. Ob als Rohkost, gekocht, gedünstet oder fermentiert – die Möglichkeiten sind endlos. Und das Beste: Selbst auf kleinstem Raum könnt ihr eine ordentliche Ernte erzielen. Außerdem ist es einfach toll zu sehen, wie die kleinen Pflänzchen wachsen und gedeihen.
Welche Kohlsorten eignen sich für den Balkon?
Nicht jeder Kohl ist gleich gut für den Balkon geeignet. Einige Sorten werden einfach zu groß. Hier sind meine Favoriten für den Balkonkohl-Anbau:
* Zwerg-Rosenkohl: Diese kleinen Rosenkohl-Pflanzen sind perfekt für den Balkon. Sie tragen viele kleine Röschen und brauchen nicht so viel Platz.
* Mini-Kopfkohl: Auch hier ist der Name Programm. Diese Kopfkohlsorten bleiben klein und kompakt.
* Palmkohl (Cavolo Nero): Dieser italienische Kohl sieht nicht nur toll aus, sondern ist auch sehr robust und pflegeleicht.
* Chinakohl: Auch Chinakohl kann gut im Topf wachsen, achtet aber auf ausreichend Platz.
* Blumenkohl (kleinwüchsige Sorten): Es gibt spezielle Blumenkohlsorten, die für den Anbau im Topf gezüchtet wurden.
* Grünkohl: Grünkohl ist super robust und verträgt auch kältere Temperaturen. Ideal für den Anbau im Herbst und Winter.
Was du für deinen Balkonkohl brauchst
Bevor wir loslegen, hier eine Liste mit allem, was du brauchst:
* Saatgut oder Jungpflanzen: Entscheide dich für eine oder mehrere der oben genannten Kohlsorten. Jungpflanzen sind einfacher, aber Saatgut ist günstiger.
* Pflanzgefäße: Wähle ausreichend große Töpfe oder Kübel. Mindestens 20 Liter Volumen pro Pflanze sind ideal.
* Gute Pflanzerde: Verwende am besten spezielle Gemüseerde oder mische Blumenerde mit Kompost.
* Dünger: Kohl ist ein Starkzehrer und braucht regelmäßig Dünger. Ich empfehle organischen Dünger wie Hornspäne oder Kompost.
* Gießkanne oder Gartenschlauch: Zum regelmäßigen Gießen.
* Schere oder Messer: Zum Ernten.
* Eventuell: Schneckenschutz: Kohl ist leider sehr beliebt bei Schnecken.
Schritt-für-Schritt-Anleitung: So pflanzt du deinen Balkonkohl
Jetzt geht’s ans Eingemachte! Hier ist eine detaillierte Anleitung, wie du deinen Balkonkohl erfolgreich anbaust:
1. Vorbereitung der Pflanzgefäße
* Reinigung: Reinige die Töpfe gründlich, falls du sie schon einmal benutzt hast.
* Drainage: Lege eine Schicht Tonscherben oder Kies auf den Boden der Töpfe, um Staunässe zu vermeiden.
* Erde einfüllen: Fülle die Töpfe mit Pflanzerde. Lass oben einen Rand von etwa 5 cm frei.
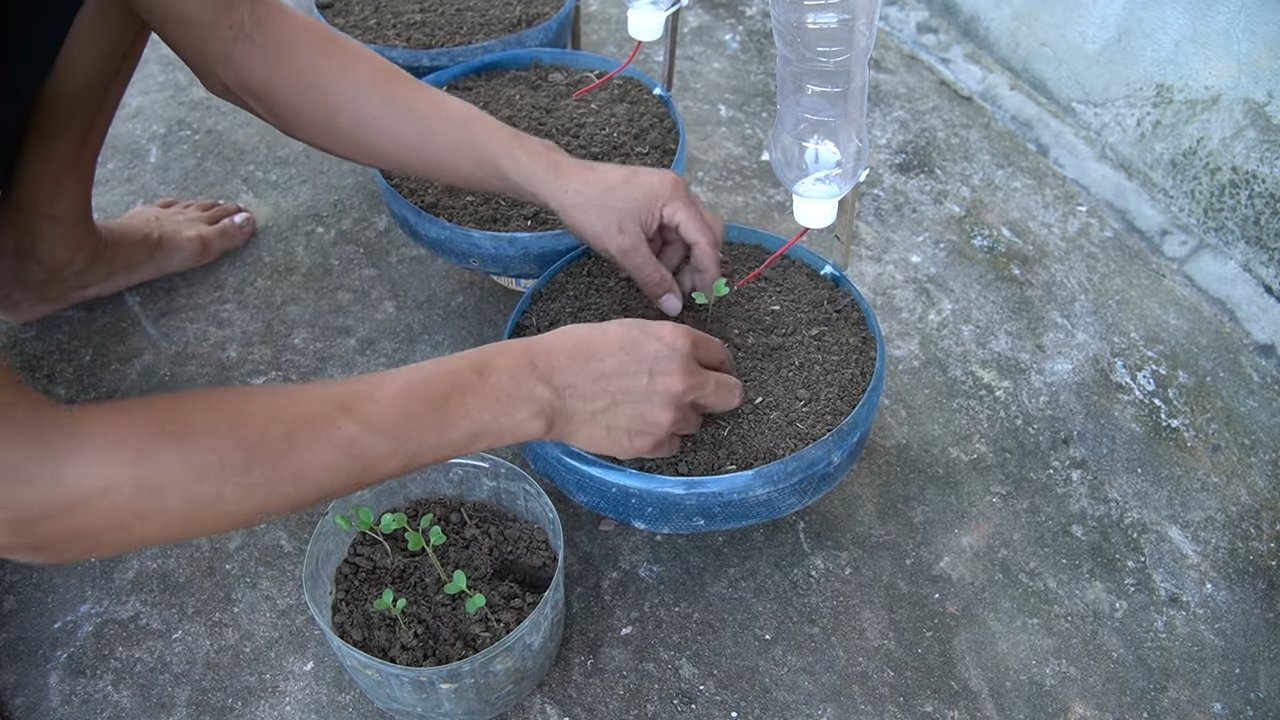
2. Aussaat oder Einpflanzen
* Aussaat (wenn du Saatgut verwendest):
* Befeuchte die Erde leicht.
* Säe die Samen gemäß den Anweisungen auf der Saatgutpackung aus. In der Regel sind das nur wenige Millimeter tief.
* Bedecke die Samen leicht mit Erde.
* Gieße vorsichtig an.
* Stelle die Töpfe an einen hellen und warmen Ort.
* Halte die Erde feucht, aber nicht nass.
* Sobald die Keimlinge groß genug sind (etwa 5-10 cm), kannst du sie in größere Töpfe pikieren (umsetzen).
* Einpflanzen (wenn du Jungpflanzen verwendest):
* Grabe ein Loch in die Erde, das groß genug für den Wurzelballen der Jungpflanze ist.
* Nimm die Jungpflanze vorsichtig aus dem Anzuchttopf.
* Setze die Jungpflanze in das Loch.
* Fülle das Loch mit Erde auf und drücke sie leicht an.
* Gieße die Pflanze gründlich an.
3. Standortwahl
* Sonnig: Kohl braucht viel Sonne, mindestens 6 Stunden pro Tag. Wähle einen sonnigen Standort auf deinem Balkon.
* Windgeschützt: Ein windgeschützter Standort ist ideal, da starker Wind die Pflanzen beschädigen kann.
4. Pflege
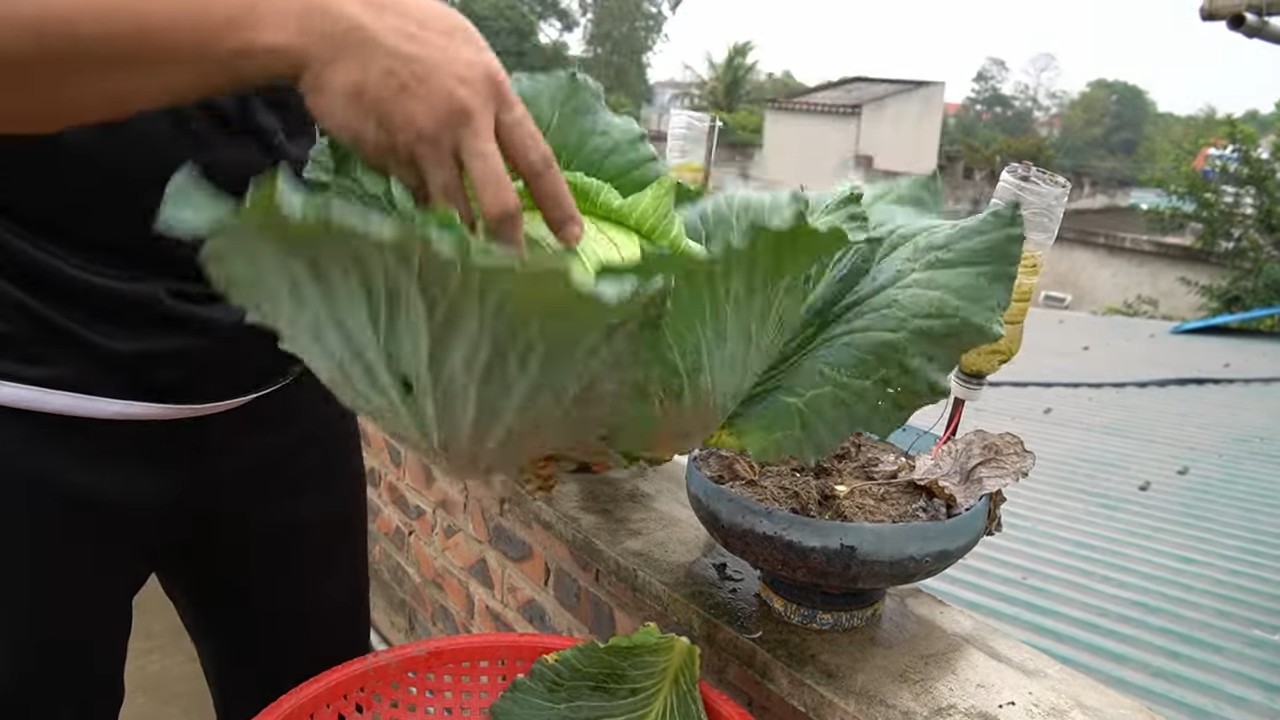
* Gießen: Gieße deinen Balkonkohl regelmäßig, besonders an heißen Tagen. Die Erde sollte immer leicht feucht sein, aber nicht nass. Vermeide Staunässe.
* Düngen: Kohl ist ein Starkzehrer und braucht regelmäßig Dünger. Beginne etwa 2-3 Wochen nach dem Einpflanzen mit dem Düngen. Verwende organischen Dünger wie Hornspäne oder Kompost. Dünge alle 2-3 Wochen.
* Schneckenkontrolle: Kohl ist leider sehr beliebt bei Schnecken. Kontrolliere deine Pflanzen regelmäßig und sammle Schnecken ab. Du kannst auch Schneckenkorn oder Schneckenzäune verwenden.
* Krankheiten und Schädlinge: Achte auf Anzeichen von Krankheiten oder Schädlingen. Bei Bedarf kannst du biologische Pflanzenschutzmittel verwenden.
* Ausgeizen (optional): Bei einigen Kohlsorten, wie z.B. Rosenkohl, kann es sinnvoll sein, die Seitentriebe auszugeizen, um die Bildung der Röschen zu fördern.
5. Ernte
* Zeitpunkt: Der Zeitpunkt der Ernte hängt von der Kohlsorte ab. Rosenkohl ist erntereif, wenn die Röschen fest und geschlossen sind. Kopfkohl ist erntereif, wenn der Kopf fest ist. Grünkohl kann geerntet werden, sobald die Blätter groß genug sind.
* Methode: Schneide die Röschen, Köpfe oder Blätter mit einem scharfen Messer ab.
Zusätzliche Tipps für den erfolgreichen Balkonkohl-Anbau
* Fruchtfolge beachten: Baue Kohl nicht jedes Jahr am selben Standort an, um Krankheiten und Schädlingen vorzubeugen.
* Mischkultur: Pflanze Kohl zusammen mit anderen Pflanzen, die ihn vor Schädlingen schützen oder sein Wachstum fördern. Gute Nachbarn sind z.B. Ringelblumen, Kapuzinerkresse oder Salbei.
* Mulchen: Bedecke die Erde mit einer Schicht Mulch (z.B. Stroh oder Rasenschnitt), um die Feuchtigkeit zu halten und Unkraut zu unterdrücken.
* Regelmäßige Kontrolle: Kontrolliere deine Pflanzen regelmäßig auf Schädlinge und Krankheiten. Je früher du Probleme erkennst, desto besser kannst du sie bekämpfen.
* Nicht aufgeben: Auch wenn mal etwas schiefgeht, lass dich nicht entmutigen! Der Balkonkohl-Anbau ist ein Lernprozess. Mit etwas Übung wirst du bald eine reiche Ernte einfahren.
Häufige Probleme und Lösungen
* Gelbe Blätter: Können ein Zeichen für Nährstoffmangel sein. Dünge deine Pflanzen mit einem geeigneten Dünger.
* Schneckenbefall: Kontrolliere deine Pflanzen regelmäßig und sammle Schnecken ab. Du kannst auch Schneckenkorn oder Schneckenzäune verwenden.
* Kohlweißling: Die Raupen des Kohlweißlings können großen Schaden anrichten. Schütze deine Pflanzen mit einem Netz oder sammle die Raupen ab.
* Kohlhernie: Eine Pilzkrankheit, die die Wurzeln befällt. Vermeide den Anbau von Kohl auf befallenen Böden.
Fazit
Mit etwas Geduld und Pflege kannst du auch auf deinem Balkon frischen, knackigen Kohl ernten. Es ist ein tolles Gefühl, sein eigenes Gemüse anzubauen und zu wissen, wo es herkommt. Also, worauf wartest du noch? Leg los und verwandle deinen Balkon in einen kleinen Gemüsegarten! Viel Spaß beim Gärt
Conclusion
So, there you have it! Growing cabbage on your balcony isn’t just a whimsical dream; it’s a tangible reality within your reach. We’ve explored the essential steps, from selecting the right varieties to warding off common pests, all tailored for the unique environment of a balcony garden. But why should you actually embark on this leafy adventure?
Firstly, consider the unparalleled freshness. Imagine stepping onto your balcony and harvesting crisp, vibrant cabbage leaves just moments before adding them to your salad or stir-fry. The flavor difference between homegrown and store-bought is simply remarkable. You’ll be amazed at the depth and sweetness that comes from nurturing your own produce.
Secondly, think about the sustainability aspect. By growing your own cabbage, you’re reducing your carbon footprint by minimizing transportation and packaging. You’re also gaining control over the growing process, ensuring that your cabbage is free from harmful pesticides and chemicals. It’s a small step towards a healthier planet and a healthier you.
Thirdly, let’s not forget the sheer joy and satisfaction of nurturing a plant from seed to harvest. There’s something incredibly rewarding about watching a tiny seedling transform into a robust, leafy cabbage head. It’s a connection to nature that can be deeply grounding and therapeutic, especially in the midst of a busy urban life.
But the beauty of balcony cabbage growing lies in its adaptability. Feel free to experiment with different varieties. Red cabbage adds a splash of color to your garden and a slightly peppery flavor to your dishes. Savoy cabbage, with its crinkled leaves, offers a delicate texture and a mild taste. For a more compact option, consider growing bok choy, a close relative of cabbage that thrives in containers.
You can also play around with companion planting. Marigolds, with their bright blooms, not only add visual appeal but also deter common cabbage pests like cabbage moths. Dill and rosemary can also help to repel unwanted insects while attracting beneficial pollinators.
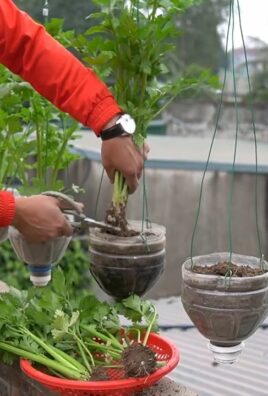
Don’t be afraid to get creative with your container choices. While standard pots work perfectly well, you can also repurpose old buckets, baskets, or even grow bags. Just make sure that your chosen container has adequate drainage to prevent waterlogging.
And remember, success in balcony cabbage growing is all about observation and adaptation. Pay close attention to your plants, noting any changes in their appearance or growth patterns. Adjust your watering and fertilizing schedule as needed, and don’t hesitate to seek advice from fellow gardeners or online resources.
Ultimately, growing cabbage on your balcony is a journey of discovery. It’s a chance to connect with nature, cultivate your own food, and add a touch of green to your urban landscape. So, grab some seeds, prepare your containers, and get ready to embark on this exciting adventure. We are confident that you will find that **balcony cabbage growing** is a rewarding and delicious experience.
We encourage you to try these tips and share your experiences with us! Let us know what varieties you’ve grown, what challenges you’ve faced, and what successes you’ve celebrated. Your insights can help other balcony gardeners learn and grow, creating a vibrant community of urban farmers. Share your photos and stories on our social media channels using #BalconyCabbage and let’s inspire others to embrace the joy of homegrown goodness. Happy gardening!
Frequently Asked Questions (FAQ)
1. What are the best cabbage varieties for balcony growing?
The best cabbage varieties for balcony growing are those that are compact and relatively quick to mature. Some excellent choices include:
* **Dwarf Morden:** This variety is specifically bred for small spaces and produces small, tight heads.
* **Golden Acre:** A classic early-maturing variety that’s known for its sweet flavor and compact size.
* **Red Express:** A beautiful red cabbage that matures quickly and adds a pop of color to your balcony garden.
* **Savoy Cabbage:** While some savoy varieties can get quite large, there are smaller cultivars available that are suitable for containers. Look for varieties labeled as “dwarf” or “compact.”
* **Bok Choy:** Technically a Chinese cabbage, bok choy is a great option for balconies as it grows upright and doesn’t require a large head to form.
When selecting your varieties, be sure to read the seed packet or plant label carefully to determine the plant’s mature size and growing requirements.
2. How much sunlight does cabbage need on a balcony?
Cabbage needs at least 6 hours of direct sunlight per day to thrive. If your balcony doesn’t receive that much sunlight, you may need to supplement with grow lights. Place your cabbage plants in the sunniest spot on your balcony, ideally facing south or west. If you notice that your plants are becoming leggy or their leaves are pale, it’s a sign that they’re not getting enough light.
3. What size container is best for growing cabbage?
A container that is at least 12 inches in diameter and 12 inches deep is recommended for growing cabbage. This will provide enough space for the roots to develop properly. You can use plastic pots, terracotta pots, or even repurposed containers like buckets or grow bags. Just make sure that your chosen container has adequate drainage holes to prevent waterlogging.
4. What type of soil should I use for growing cabbage in containers?
Use a well-draining potting mix that is rich in organic matter. You can purchase a pre-made potting mix or create your own by combining equal parts of compost, peat moss (or coconut coir), and perlite or vermiculite. Avoid using garden soil, as it can be too heavy and compact for container gardening.
5. How often should I water my cabbage plants?
Water your cabbage plants regularly, especially during hot, dry weather. The soil should be kept consistently moist but not waterlogged. Check the soil moisture by sticking your finger about an inch into the soil. If it feels dry, it’s time to water. Water deeply, allowing the water to drain out of the bottom of the container.
6. What kind of fertilizer should I use for cabbage?
Cabbage is a heavy feeder, so it’s important to fertilize regularly. Use a balanced fertilizer that is high in nitrogen, phosphorus, and potassium. You can use a liquid fertilizer or a slow-release granular fertilizer. Follow the instructions on the fertilizer label for application rates. Fertilize your cabbage plants every 2-3 weeks during the growing season.
7. How do I protect my cabbage plants from pests?
Cabbage plants are susceptible to a variety of pests, including cabbage moths, cabbage loopers, aphids, and flea beetles. To protect your plants, you can use row covers to prevent pests from reaching them. You can also handpick pests off of your plants or use insecticidal soap or neem oil to control infestations. Companion planting with marigolds, dill, or rosemary can also help to deter pests.
8. How long does it take for cabbage to mature?
The time it takes for cabbage to mature depends on the variety and growing conditions. Generally, early-maturing varieties will be ready to harvest in 60-70 days, while later-maturing varieties can take 80-100 days. Check the seed packet or plant label for specific information on the maturity time of your chosen variety.
9. How do I know when my cabbage is ready to harvest?
Your cabbage is ready to harvest when the head is firm and tightly packed. The size of the head will vary depending on the variety. To harvest, use a sharp knife to cut the head off of the plant at the base. Leave the roots in the ground, as they may produce smaller side shoots that you can harvest later.
10. Can I grow cabbage in the winter on my balcony?
In many regions, yes! Cabbage is a cool-season crop and can tolerate light frosts. If you live in an area with mild winters, you can grow cabbage on your balcony throughout the winter months. However, if you experience severe frosts or freezing temperatures, you may need to protect your plants with row covers or move them indoors.


Leave a Comment