

Growing peanuts in plastic bottles? Sounds crazy, right? But trust me, it’s not only possible, it’s incredibly rewarding! I’m going to show you how to transform those discarded plastic bottles into mini peanut farms, bringing the joy of homegrown goodness right to your windowsill or balcony.
For centuries, peanuts have been a staple food in many cultures, from South America where they originated, to Asia and Africa. They’re packed with protein, healthy fats, and essential nutrients. While traditionally grown in large fields, the beauty of this DIY project is that it democratizes peanut cultivation. You don’t need acres of land to enjoy the satisfaction of harvesting your own peanuts.
Why should you try growing peanuts in plastic bottles? Well, for starters, it’s a fantastic way to recycle and reduce waste. Plus, it’s a fun and educational project for the whole family. Imagine the look on your kids’ faces when they see those little peanut plants sprouting from a repurposed bottle! More importantly, in a world where access to fresh, healthy food can be a challenge, this simple hack empowers you to grow your own nutritious snacks, regardless of space constraints. So, let’s ditch the store-bought peanuts and get our hands dirty (or, in this case, bottle-y!) with this easy and effective DIY guide.
Erdnüsse im Plastikflaschen-Garten: Dein DIY-Guide für den Anbau zu Hause
Hey Gartenfreunde! Habt ihr schon mal darüber nachgedacht, Erdnüsse in Plastikflaschen anzubauen? Klingt verrückt, oder? Aber es ist ein super spannendes Projekt, das nicht nur Spaß macht, sondern auch eine tolle Möglichkeit ist, nachhaltig zu gärtnern und zu sehen, wo unsere Lebensmittel herkommen. Ich zeige euch, wie ihr das ganz einfach selbst machen könnt!
Was du brauchst: Die Zutaten für deinen Erdnuss-Erfolg
Bevor wir loslegen, hier eine Liste mit allem, was du für dein Erdnuss-Anbau-Abenteuer brauchst:
* Plastikflaschen: Am besten eignen sich 1,5-Liter- oder 2-Liter-Flaschen. Je größer, desto besser, da Erdnüsse Platz zum Wachsen brauchen. Denk dran, sie gründlich zu reinigen!
* Erdnüsse: Rohe, ungesalzene Erdnüsse sind ein Muss. Du findest sie in den meisten Supermärkten oder Bioläden. Achte darauf, dass sie nicht geröstet sind, sonst keimen sie nicht.
* Erde: Eine gute, lockere Blumenerde ist ideal. Du kannst auch deine eigene Mischung aus Kompost, Gartenerde und Sand herstellen. Das sorgt für eine gute Drainage.
* Messer oder Schere: Zum Schneiden der Plastikflaschen. Sei vorsichtig!
* Bohrer oder Nagel: Um Löcher für die Drainage in den Boden der Flaschen zu machen.
* Wasser: Zum Gießen, natürlich!
* Optional: Etiketten und ein Stift, um deine Flaschen zu beschriften. So behältst du den Überblick.
Schritt-für-Schritt-Anleitung: So pflanzt du deine Erdnüsse
Jetzt geht’s ans Eingemachte! Folge diesen Schritten, um deine Erdnüsse erfolgreich in Plastikflaschen anzubauen:
1. Flaschen vorbereiten:
* Zuerst musst du die Plastikflaschen vorbereiten. Schneide den oberen Teil der Flasche ab, etwa ein Drittel von oben. Du kannst den abgeschnittenen Teil aufbewahren, um ihn später als Mini-Gewächshaus zu verwenden.
* Bohre oder steche mit einem Nagel mehrere Löcher in den Boden der Flasche. Diese Löcher sind wichtig für die Drainage, damit das Wasser ablaufen kann und die Wurzeln nicht faulen.
2. Erde einfüllen:
* Fülle die Flasche mit Erde. Lass etwa 2-3 cm Platz bis zum Rand. Die Erde sollte locker und gut durchfeuchtet sein.
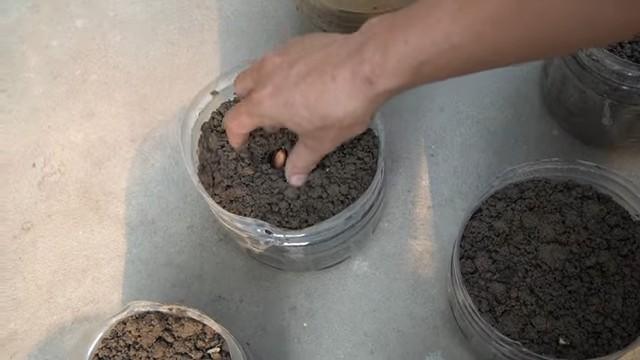
3. Erdnüsse pflanzen:
* Nimm deine rohen Erdnüsse und drücke sie etwa 2-3 cm tief in die Erde. Du kannst 2-3 Erdnüsse pro Flasche pflanzen, um die Chancen auf eine erfolgreiche Keimung zu erhöhen. Achte darauf, dass die Erdnüsse genügend Platz haben.
4. Gießen:
* Gieße die Erde vorsichtig an, bis sie gut durchfeuchtet ist. Vermeide Staunässe, da dies die Wurzeln schädigen kann.
5. Standort wählen:
* Stelle die bepflanzten Flaschen an einen warmen und sonnigen Ort. Erdnüsse lieben die Sonne! Ein Südfenster oder ein sonniger Balkon sind ideal.
6. Pflege:
* Halte die Erde feucht, aber nicht nass. Gieße regelmäßig, besonders an heißen Tagen.
* Wenn du den abgeschnittenen Teil der Flasche aufbewahrt hast, kannst du ihn jetzt als Mini-Gewächshaus über die bepflanzte Flasche stülpen. Das hilft, die Feuchtigkeit zu halten und die Keimung zu beschleunigen. Denk aber daran, ihn regelmäßig zu lüften, um Schimmelbildung zu vermeiden.
* Sobald die Erdnusspflanzen größer werden, brauchen sie möglicherweise Unterstützung. Du kannst kleine Stäbe oder Bambusstäbe verwenden, um sie zu stützen.
Die Wachstumsphasen: Von der Keimung bis zur Ernte
Der Anbau von Erdnüssen ist ein spannender Prozess, bei dem du die verschiedenen Wachstumsphasen beobachten kannst.
Keimung
* Nach etwa 7-10 Tagen sollten die ersten Keimlinge aus der Erde sprießen. Das ist ein aufregender Moment!
Wachstum
* Die Erdnusspflanzen wachsen relativ schnell und entwickeln grüne Blätter. Achte darauf, dass sie genügend Licht und Wasser bekommen.
Blüte
* Nach einigen Wochen bilden die Erdnusspflanzen kleine, gelbe Blüten. Diese Blüten sind selbstbestäubend.
Fruchtbildung
* Nach der Blüte biegen sich die Stiele der Blüten nach unten und bohren sich in die Erde. Hier bilden sich die Erdnüsse unter der Erde. Das ist ein faszinierender Prozess!
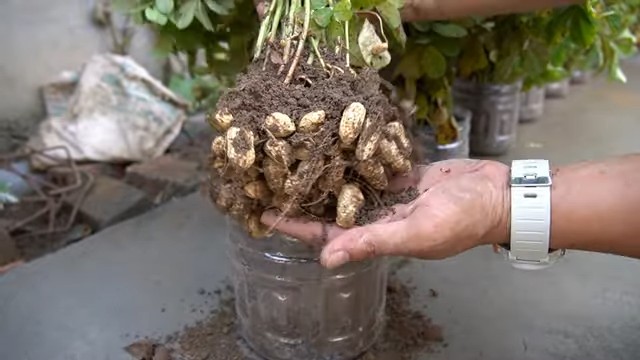
Ernte
* Die Erntezeit ist gekommen, wenn die Blätter der Erdnusspflanzen gelb werden und absterben. Das dauert in der Regel etwa 4-5 Monate. Ziehe die Pflanzen vorsichtig aus der Erde und schüttle die Erde ab.
Tipps und Tricks für eine erfolgreiche Erdnussernte
Hier sind noch ein paar Tipps, die dir helfen, deine Erdnussernte zu maximieren:
* Gute Drainage: Achte unbedingt auf eine gute Drainage, um Staunässe zu vermeiden.
* Regelmäßiges Gießen: Halte die Erde feucht, aber nicht nass.
* Sonnenlicht: Erdnüsse brauchen viel Sonnenlicht, mindestens 6 Stunden pro Tag.
* Düngen: Du kannst die Erdnusspflanzen während der Wachstumsphase mit einem organischen Dünger düngen.
* Schädlinge: Achte auf Schädlinge wie Blattläuse oder Spinnmilben. Bei Bedarf kannst du natürliche Schädlingsbekämpfungsmittel verwenden.
* Geduld: Erdnüsse brauchen Zeit zum Wachsen. Sei geduldig und lass sie in Ruhe wachsen.
Nach der Ernte: Erdnüsse trocknen und lagern
Nach der Ernte musst du die Erdnüsse trocknen, bevor du sie lagern kannst.
1. Reinigen: Entferne die Erde von den Erdnüssen.
2. Trocknen: Lege die Erdnüsse an einen trockenen und luftigen Ort, z.B. auf ein Tablett oder ein Gitter. Lass sie dort etwa 2-3 Wochen trocknen.
3. Lagern: Bewahre die getrockneten Erdnüsse in einem luftdichten Behälter an einem kühlen und trockenen Ort auf. So bleiben sie mehrere Monate haltbar.
Warum Erdnüsse in Plastikflaschen anbauen? Die Vorteile auf einen Blick
* Nachhaltigkeit: Du recycelst Plastikflaschen und gibst ihnen ein zweites Leben.
* Platzsparend: Ideal für kleine Balkone oder Terrassen.
* Lehrreich: Du lernst, wo deine Lebensmittel herkommen und wie sie wachsen.
* Spaß: Es macht einfach Spaß, den Erdnüssen beim Wachsen zuzusehen!
* Eigene Ernte: Du kannst deine eigenen, frischen Erdnüsse ernten und genießen.
Fazit: Dein eigenes Erdnuss-Paradies in Plastikflaschen
Ich hoffe, diese Anleitung hat dich inspiriert, deine eigenen Erdnüsse in Plastikflaschen anzubauen. Es ist ein einfaches, nachhaltiges und lohnendes Projekt, das dir viel Freude bereiten wird. Also, worauf wartest du noch? Schnapp dir ein paar Plastikflaschen, Erdnüsse und Erde und leg los! Viel Spaß beim Gärtnern!
Conclusion
So, there you have it! Growing peanuts in plastic bottles is not just a quirky gardening experiment; it’s a surprisingly effective and rewarding way to cultivate your own fresh, delicious peanuts, even if you’re short on space or live in an apartment. This method offers a unique opportunity to witness the entire peanut life cycle up close, from the initial sprouting to the eventual formation of those delightful underground treasures.
Why is this DIY trick a must-try? Because it democratizes peanut cultivation. No longer is growing peanuts restricted to those with sprawling gardens and ideal soil conditions. Plastic bottle gardening brings the joy of harvesting your own food to anyone with a sunny windowsill or balcony. It’s also an incredibly educational experience, especially for children, teaching them about plant biology, sustainability, and the origins of their food. Plus, let’s be honest, it’s just plain fun! There’s something incredibly satisfying about transforming discarded plastic bottles into miniature peanut farms.
But the benefits don’t stop there. Growing peanuts in containers allows for greater control over the growing environment. You can easily adjust the soil composition, watering schedule, and sun exposure to optimize peanut production. This is particularly beneficial in regions with less-than-ideal peanut-growing climates.
Looking for variations? Absolutely! Consider experimenting with different peanut varieties. Virginia peanuts, known for their large size, might require slightly larger bottles. Spanish peanuts, with their smaller kernels, could thrive in more compact containers. You can also explore different soil mixtures. While a well-draining potting mix is generally recommended, adding compost or other organic matter can further enrich the soil and boost peanut yields. Another variation is to try different types of plastic containers. While plastic bottles are readily available and environmentally friendly, you could also use other recycled containers, such as plastic buckets or tubs, as long as they have adequate drainage holes.
Don’t be afraid to get creative with your peanut bottle garden! You can even decorate the bottles with paint or markers to add a personal touch. Imagine a colorful row of peanut plants adorning your balcony, a testament to your ingenuity and green thumb.
We wholeheartedly encourage you to give this DIY peanut-growing trick a try. It’s a simple, affordable, and incredibly rewarding project that will connect you with nature and provide you with a delicious harvest. Remember to document your progress, take pictures, and share your experiences with us and the wider gardening community. We’re eager to hear about your successes, challenges, and any innovative techniques you develop along the way. Let’s spread the joy of homegrown peanuts, one plastic bottle at a time! Embrace the opportunity to grow your own peanuts and discover the satisfaction of nurturing a plant from seed to harvest.
Frequently Asked Questions (FAQ)
What kind of peanuts should I use to start?
Raw, unsalted peanuts are the best choice for planting. Roasted or salted peanuts will not germinate. You can find raw peanuts at most health food stores or online retailers. Look for peanuts specifically labeled for planting, as these are more likely to have a high germination rate. Avoid peanuts that have been treated with fungicides or other chemicals, as these can inhibit growth.
What size plastic bottle is best?
A 2-liter plastic bottle is a good starting point, but larger bottles (3-liter or even gallon-sized) will provide more room for the peanut plants to develop a healthy root system and produce more peanuts. The key is to ensure the bottle is deep enough to accommodate the peanut’s root growth. Consider the variety of peanut you’re planting; larger varieties may benefit from larger containers.
How often should I water my peanut plants in plastic bottles?
Watering frequency depends on several factors, including the weather, the size of the bottle, and the type of soil you’re using. Generally, you should water your peanut plants when the top inch of soil feels dry to the touch. Avoid overwatering, as this can lead to root rot. Ensure the bottle has adequate drainage holes to prevent water from accumulating at the bottom. During hot, dry weather, you may need to water daily, while during cooler, wetter periods, you may only need to water every few days.
How much sunlight do peanut plants need?
Peanut plants thrive in full sun, requiring at least 6-8 hours of direct sunlight per day. Place your plastic bottle peanut garden in a sunny location, such as a south-facing window or balcony. If you don’t have access to enough natural sunlight, you can supplement with grow lights. Insufficient sunlight can lead to weak, leggy growth and reduced peanut production.
What kind of soil should I use?
A well-draining potting mix is essential for growing peanuts in plastic bottles. Avoid using heavy clay soil, as it can become waterlogged and inhibit root growth. You can amend your potting mix with compost or other organic matter to improve drainage and fertility. A slightly acidic soil pH (around 6.0-6.5) is ideal for peanut growth.
How long does it take to grow peanuts in plastic bottles?
Peanuts typically take 120-150 days to mature, from planting to harvest. The exact time will depend on the variety of peanut, the growing conditions, and the climate. Be patient and monitor your plants closely. You’ll know it’s time to harvest when the leaves begin to turn yellow and the pods feel full and firm.
How do I harvest the peanuts?
Carefully cut open the plastic bottle and gently remove the soil and peanut plants. Shake off any excess soil and then carefully pull the peanuts from the roots. Wash the peanuts thoroughly and allow them to dry completely before storing them.
Can I reuse the plastic bottles?
Yes, you can reuse the plastic bottles for multiple growing seasons, as long as they are clean and in good condition. Wash the bottles thoroughly with soap and water before reusing them. Inspect the bottles for any cracks or damage and replace them if necessary.
What are some common problems I might encounter?
Some common problems when growing peanuts include pests (such as aphids and spider mites), diseases (such as leaf spot), and nutrient deficiencies. Monitor your plants regularly for any signs of problems and take appropriate action. You can use organic pest control methods, such as insecticidal soap or neem oil, to control pests. Ensure your plants are receiving adequate nutrients by fertilizing them regularly with a balanced fertilizer.
Can I grow peanuts indoors year-round?
Yes, you can grow peanuts indoors year-round, provided you have adequate light and temperature control. Use grow lights to supplement natural sunlight and maintain a consistent temperature of around 70-80°F (21-27°C). Be sure to provide adequate ventilation to prevent fungal diseases.
Leave a Comment