

Grow Bean Sprouts Easily, even if you think you have a black thumb! Have you ever craved a fresh, crunchy addition to your salad or stir-fry, but dreaded the thought of running to the store? What if I told you that you could have a constant supply of these nutritious little powerhouses right in your own kitchen, with minimal effort and almost zero cost? This DIY guide will unlock the secrets to effortlessly growing bean sprouts, transforming your kitchen into a mini-farm!
Sprouting beans isn’t just a modern health trend; it’s a practice with roots stretching back centuries. In many Asian cultures, bean sprouts have been a staple food, valued not only for their delicious flavor and versatility but also for their concentrated nutrients. Think of it as a way our ancestors ensured access to vital vitamins and minerals, especially during lean times.
But why should you bother learning to grow bean sprouts easily? Well, store-bought sprouts can be expensive and sometimes lack that vibrant freshness. Plus, there’s the satisfaction of knowing exactly where your food comes from and that it’s free from unwanted additives. This DIY project is perfect for beginners, apartment dwellers, or anyone looking to add a healthy and sustainable element to their diet. So, let’s get sprouting!
Bohnensprossen einfach selbst ziehen: Eine Schritt-für-Schritt-Anleitung
Hallo liebe DIY-Freunde! Ich liebe frische Sprossen, besonders Bohnensprossen. Sie sind knackig, gesund und peppen jedes Gericht auf. Und das Beste: Man kann sie super einfach zu Hause ziehen! Ich zeige euch, wie es geht – ganz ohne komplizierte Geräte. Versprochen, es ist einfacher als ihr denkt!
Was du brauchst:
* Bohnen: Am besten eignen sich Mungbohnen, aber auch Adzukibohnen oder Linsen funktionieren prima. Achtet darauf, dass sie unbehandelt und keimfähig sind. Bio-Qualität ist natürlich top!
* Ein Keimglas oder ein anderes Gefäß: Ein Einmachglas mit einem Gitterdeckel (oder einem Stück Gaze, das ihr mit einem Gummiband befestigt) ist ideal. Ihr könnt aber auch ein Sieb oder einen Keimturm verwenden.
* Wasser: Am besten gefiltertes Wasser oder abgekochtes, abgekühltes Wasser.
* Ein dunkler Ort: Sprossen keimen am besten im Dunkeln. Ein Schrank oder eine Schublade sind perfekt.
* Geduld: Ja, das ist auch wichtig! Es dauert ein paar Tage, bis eure Sprossen erntereif sind.
Schritt-für-Schritt-Anleitung:
1. Bohnen vorbereiten:
* Zuerst messe ich die Menge an Bohnen ab, die ich keimen möchte. Ich nehme meistens so 2-3 Esslöffel Mungbohnen für ein normales Einmachglas.
* Dann spüle ich die Bohnen gründlich unter fließendem Wasser ab. So werden Staub und eventuelle Verunreinigungen entfernt.
* Jetzt kommen die Bohnen in das Keimglas oder das Gefäß eurer Wahl.
* Ich fülle das Glas mit reichlich Wasser, sodass die Bohnen gut bedeckt sind. Sie quellen nämlich noch auf!
* Die Bohnen lasse ich jetzt für 8-12 Stunden (oder über Nacht) im Wasser einweichen. Das ist wichtig, damit sie später gut keimen können.
2. Keimgefäß vorbereiten:
* Während die Bohnen einweichen, bereite ich mein Keimglas vor. Ich achte darauf, dass es sauber ist.
* Wenn ihr ein Einmachglas mit Gaze verwendet, befestigt die Gaze gut mit einem Gummiband. Sie sollte fest sitzen, damit keine Bohnen durchfallen.
* Wenn ihr einen Keimturm verwendet, reinigt die einzelnen Etagen gründlich.
3. Keimprozess starten:
* Nach dem Einweichen gieße ich das Wasser ab und spüle die Bohnen noch einmal gründlich durch.
* Jetzt kommen die eingeweichten Bohnen in das Keimglas oder den Keimturm.
* Ich stelle das Glas schräg in eine Schüssel oder einen Abtropfständer, damit überschüssiges Wasser ablaufen kann. Das ist wichtig, damit die Sprossen nicht faulen.
* Den Keimturm stelle ich einfach auf eine Untertasse.
* Jetzt kommt das Glas oder der Keimturm an einen dunklen Ort.
4. Regelmäßig spülen:
* Das Wichtigste beim Sprossen ziehen ist das regelmäßige Spülen! Ich spüle die Sprossen mindestens zweimal täglich (morgens und abends) mit frischem Wasser.
* Dazu nehme ich das Glas oder den Keimturm aus dem Schrank, spüle die Sprossen gründlich durch und stelle sie wieder schräg zurück.
* Achtet darauf, dass das Wasser gut abläuft.
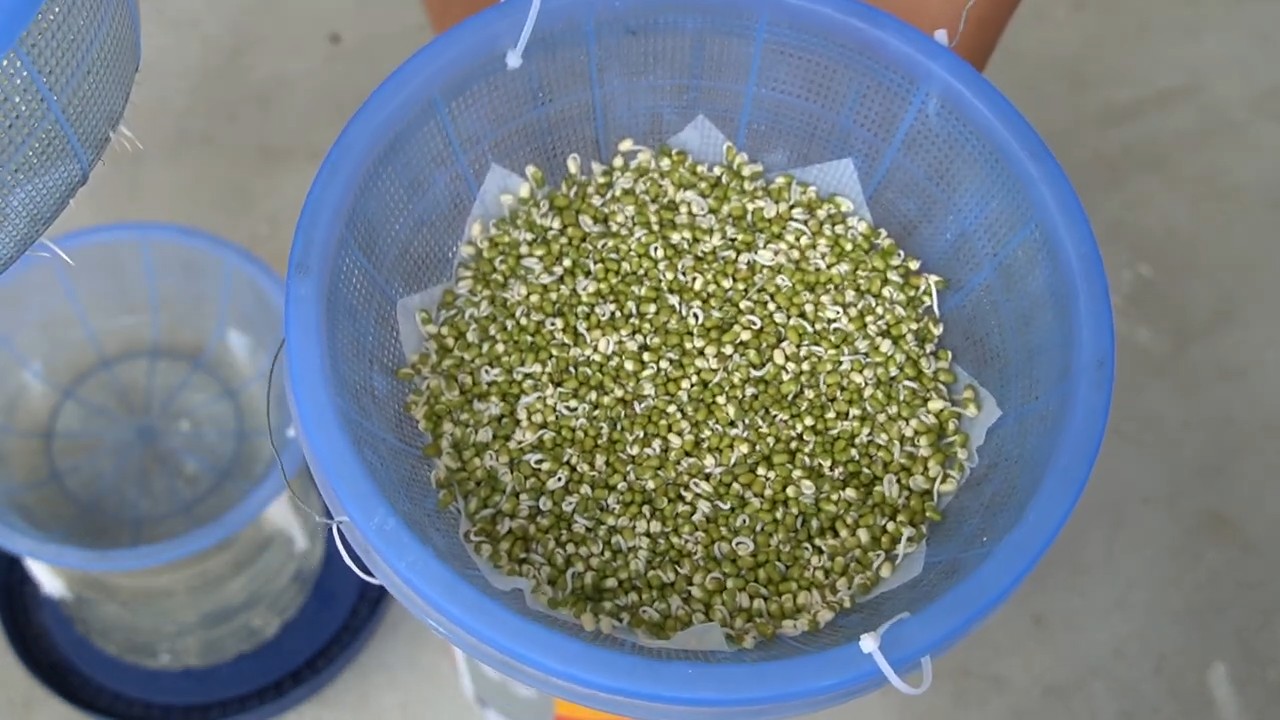
5. Geduld haben:
* Nach ein paar Tagen (meistens 3-5 Tage) beginnen die Bohnen zu keimen. Ihr werdet kleine weiße Sprossen sehen.
* Je nach Temperatur und Luftfeuchtigkeit kann der Keimprozess etwas länger oder kürzer dauern.
* Lasst euch nicht entmutigen, wenn es am Anfang nicht gleich klappt. Übung macht den Meister!
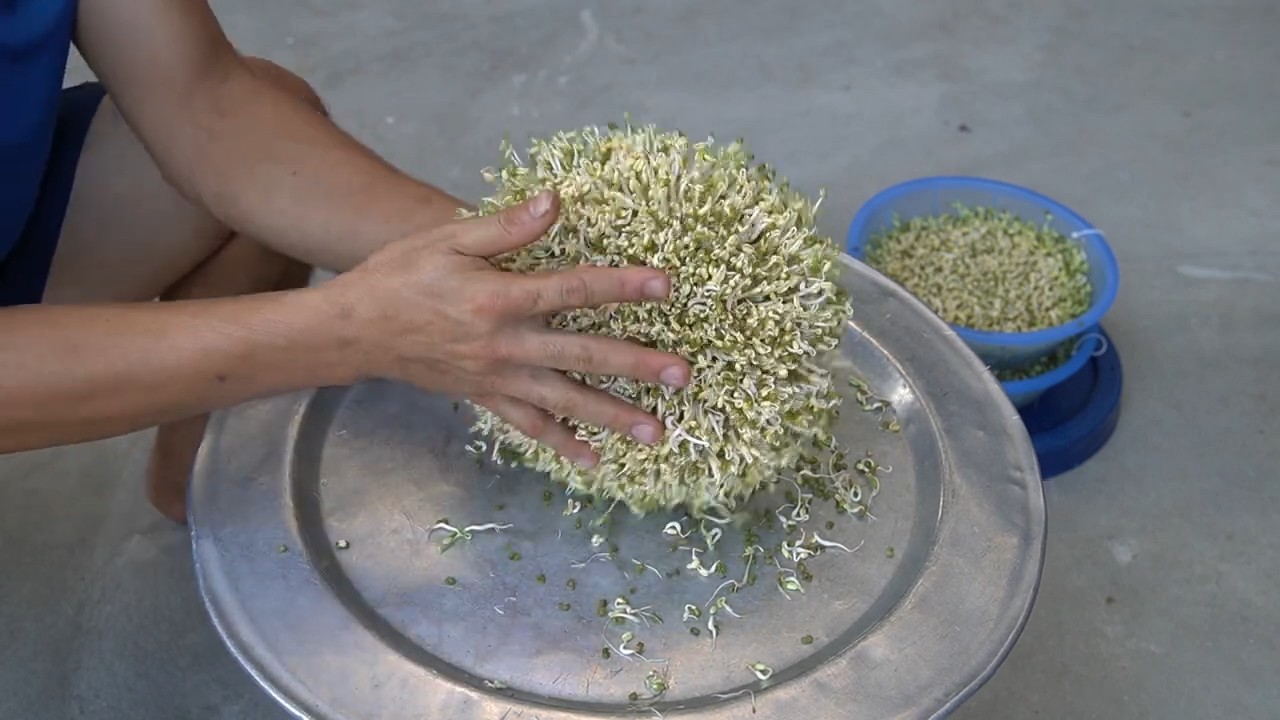
6. Ernten und genießen:
* Wenn die Sprossen die gewünschte Länge erreicht haben (ich mag sie am liebsten, wenn sie ca. 2-3 cm lang sind), sind sie erntereif.
* Ich spüle die Sprossen noch einmal gründlich ab und entferne eventuelle Schalenreste.
* Die Sprossen sind jetzt fertig zum Verzehr!
Tipps und Tricks für perfekte Bohnensprossen:
* Hygiene ist wichtig: Achtet darauf, dass alle Gefäße und Utensilien sauber sind, um Schimmelbildung zu vermeiden.
* Die richtige Temperatur: Die ideale Temperatur zum Sprossen ziehen liegt zwischen 18 und 22 Grad Celsius.
* Nicht zu viele Bohnen: Verwendet nicht zu viele Bohnen auf einmal, da sie beim Keimen stark aufgehen.
* Abwechslung: Probiert verschiedene Bohnensorten aus, um euren Lieblingsgeschmack zu finden.
* Lagerung: Die fertigen Sprossen könnt ihr im Kühlschrank in einem luftdichten Behälter für einige Tage aufbewahren.
Was tun, wenn etwas schief geht?
* Schimmelbildung: Wenn ihr Schimmel entdeckt, solltet ihr die Sprossen sofort entsorgen. Achtet beim nächsten Mal auf bessere Hygiene und regelmäßiges Spülen.
* Faule Sprossen: Wenn die Sprossen faulig riechen, sind sie wahrscheinlich zu feucht geworden. Achtet darauf, dass das Wasser gut abläuft.
* Keine Keimung: Wenn die Bohnen nach ein paar Tagen noch nicht keimen, kann es sein, dass sie nicht keimfähig sind. Versucht es mit einer anderen Charge Bohnen.
Verwendungsmöglichkeiten für Bohnensprossen:
Bohnensprossen sind unglaublich vielseitig und können in vielen Gerichten verwendet werden. Hier sind ein paar meiner Lieblingsideen:
* Salate: Bohnensprossen geben Salaten eine knackige Textur und einen frischen Geschmack.
* Suppen: In asiatischen Suppen sind Bohnensprossen ein Muss!
* Wok-Gerichte: Bohnensprossen passen perfekt zu gebratenem Gemüse und Fleisch.
* Frühlingsrollen: Als Füllung für Frühlingsrollen sind Bohnensprossen einfach unschlagbar.
* Sandwiches: Auch auf Sandwiches machen sich Bohnensprossen gut.
* Pur: Ich esse sie auch gerne einfach pur als Snack.
Warum Bohnensprossen so gesund sind:
Bohnensprossen sind nicht nur lecker, sondern auch sehr gesund. Sie sind reich an Vitaminen, Mineralstoffen und Enzymen. Außerdem sind sie leicht verdaulich und enthalten wenig Kalorien. Hier sind einige der gesundheitlichen Vorteile von Bohnensprossen:
* Reich an Vitaminen: Bohnensprossen enthalten unter anderem Vitamin C, Vitamin K und B-Vitamine.
* Reich an Mineralstoffen: Sie sind eine gute Quelle für Eisen, Kalium und Magnesium.
* Reich an Enzymen: Enzyme fördern die Verdauung und unterstützen den Stoffwechsel.
* Antioxidantien: Bohnensprossen enthalten Antioxidantien, die freie Radikale bekämpfen und die Zellen schützen.
* Ballaststoffe: Ballaststoffe fördern die Verdauung und sorgen für ein langanhaltendes Sättigungsgefühl.
Fazit:
Bohnensprossen selbst zu ziehen ist wirklich kinderleicht und macht Spaß! Probiert es einfach mal aus und lasst euch von dem frischen Geschmack und den gesundheitlichen Vorteilen überzeugen. Ich bin sicher, ihr werdet begeistert sein! Und wenn ihr Fragen habt, könnt ihr mir gerne einen Kommentar hinterlassen. Viel Spaß beim Sprossen ziehen!
Conclusion
So, there you have it! Growing your own bean sprouts at home is not only incredibly easy, but it’s also a rewarding and cost-effective way to add a burst of freshness and nutrition to your meals. Forget those limp, pre-packaged sprouts from the grocery store. With just a few simple supplies and a little patience, you can cultivate vibrant, crunchy bean sprouts bursting with flavor, right in your own kitchen.
This DIY trick is a must-try for several reasons. First and foremost, you have complete control over the process. You know exactly what you’re eating, free from any unwanted additives or preservatives. Secondly, the taste is simply superior. Homegrown bean sprouts are noticeably fresher and more flavorful than their store-bought counterparts. Finally, it’s an incredibly sustainable and budget-friendly option. You’ll be reducing your reliance on plastic packaging and saving money in the long run.
But the fun doesn’t stop there! Feel free to experiment with different types of beans. Mung beans are the classic choice, but you can also try adzuki beans, lentils, or even chickpeas for a unique twist. Consider adding a touch of spice to your sprouting water for an extra kick. A pinch of chili flakes or a dash of turmeric can infuse your sprouts with subtle flavor nuances. You can also adjust the sprouting time to achieve your desired level of crunchiness. Some prefer their sprouts shorter and more delicate, while others enjoy a longer, more robust sprout.
Don’t be afraid to get creative and tailor the process to your own preferences. The beauty of this DIY project lies in its simplicity and adaptability.
We wholeheartedly encourage you to give this DIY trick a try. It’s a fun, educational, and delicious way to connect with your food and add a healthy boost to your diet. Once you’ve experienced the satisfaction of growing your own bean sprouts, you’ll never go back to store-bought again.
And most importantly, we want to hear about your experience! Share your photos, tips, and variations in the comments below. Let us know what worked for you, what challenges you encountered, and any creative twists you added to the process. Your feedback will not only help other readers but also inspire us to continue sharing valuable and accessible DIY food projects. Let’s build a community of home sprouters and spread the joy of fresh, homegrown goodness! So, grab your beans, your jar, and get sprouting! You’ll be amazed at how easy it is to grow bean sprouts and the delicious rewards they offer.
Frequently Asked Questions (FAQ)
What types of beans are best for sprouting?
Mung beans are the most commonly used and arguably the easiest to sprout. They consistently produce high-quality, flavorful sprouts. However, you can also experiment with other types of beans and legumes, such as adzuki beans, lentils, chickpeas, and even soybeans. Keep in mind that different beans may require slightly different sprouting times and techniques. For example, some beans may need to be soaked for a longer period, while others may be more prone to mold growth. Always research the specific requirements of the bean you’re using to ensure optimal results. Avoid using dried beans that are old or damaged, as they may not sprout properly.
How long does it take to grow bean sprouts?
The sprouting time typically ranges from 3 to 5 days, depending on the type of bean, the temperature, and the humidity. Mung beans usually sprout within 3 to 4 days. You’ll know they’re ready when the sprouts are about 1-2 inches long and have a crisp, crunchy texture. It’s important to monitor the sprouts closely and rinse them regularly to prevent them from drying out or becoming moldy. If the sprouts are growing too slowly, try moving them to a slightly warmer location. If they’re growing too quickly, move them to a cooler spot.
How often should I rinse the bean sprouts?
Rinsing the bean sprouts is crucial for preventing mold growth and keeping them hydrated. You should rinse them at least twice a day, preferably in the morning and evening. Use cool, clean water and gently swirl the sprouts around in the jar to remove any debris or excess moisture. Make sure to drain the water thoroughly after rinsing to prevent the sprouts from becoming waterlogged. In warmer climates, you may need to rinse them more frequently to keep them fresh.
How do I prevent mold growth on my bean sprouts?
Mold growth is a common concern when sprouting beans, but it can be easily prevented with proper hygiene and ventilation. First, make sure to use clean equipment, including the jar, lid, and rinsing water. Sterilizing the jar before starting the sprouting process can also help. Second, rinse the sprouts regularly and thoroughly to remove any debris or excess moisture. Third, ensure adequate ventilation by using a mesh lid or cheesecloth to cover the jar. This will allow air to circulate and prevent the sprouts from becoming too humid. Finally, avoid overcrowding the jar with too many beans, as this can increase the risk of mold growth. If you do notice any signs of mold, discard the affected sprouts immediately.
How should I store my homegrown bean sprouts?
Once your bean sprouts have reached your desired length and texture, it’s time to harvest and store them. Rinse them thoroughly one last time and drain them well. Then, transfer them to a clean, airtight container lined with a paper towel. The paper towel will help absorb any excess moisture and keep the sprouts fresh. Store the container in the refrigerator for up to a week. Check the sprouts regularly and discard any that show signs of spoilage.
Can I eat the bean sprout roots?
Yes, the roots of bean sprouts are perfectly edible and nutritious. They have a slightly nutty flavor and a crunchy texture. Some people prefer to trim the roots before eating the sprouts, but this is purely a matter of personal preference. If you do choose to trim the roots, make sure to do so just before eating the sprouts to prevent them from drying out.
Are there any health benefits to eating bean sprouts?
Yes, bean sprouts are packed with nutrients and offer a variety of health benefits. They are a good source of vitamins, minerals, and antioxidants. They are also low in calories and high in fiber, making them a healthy addition to any diet. Bean sprouts are known to boost the immune system, improve digestion, and promote heart health.
What are some ways to use bean sprouts in my cooking?
Bean sprouts are incredibly versatile and can be used in a wide variety of dishes. They can be added to salads, sandwiches, stir-fries, soups, and spring rolls. They can also be eaten raw as a snack or used as a garnish. When cooking with bean sprouts, it’s important to avoid overcooking them, as they can become mushy. Add them towards the end of the cooking process to retain their crispness and flavor.
Can children help with the bean sprouting process?
Absolutely! Growing bean sprouts is a fun and educational activity for children of all ages. It’s a great way to teach them about plant growth, nutrition, and healthy eating habits. Children can help with rinsing the sprouts, monitoring their growth, and even harvesting them. Just make sure to supervise them closely and explain the importance of hygiene and safety.
What if my bean sprouts don’t sprout?
If your bean sprouts don’t sprout, there could be several reasons why. First, make sure that the beans you’re using are fresh and viable. Old or damaged beans may not sprout properly. Second, check the temperature of the sprouting environment. Bean sprouts thrive in a warm, humid environment. If the temperature is too cold, they may not sprout. Third, ensure that the beans are being rinsed regularly and thoroughly. Insufficient rinsing can lead to mold growth and prevent sprouting. Finally, make sure that the beans are not overcrowded in the jar. Overcrowding can restrict air circulation and inhibit sprouting. If you’ve addressed all of these factors and your beans still aren’t sprouting, try using a different batch of beans or adjusting the sprouting conditions.
Leave a Comment