

Cleaning shortcuts – who doesn’t crave them? Let’s be honest, spending hours scrubbing and polishing isn’t exactly anyone’s idea of a good time. For generations, people have sought clever ways to streamline their cleaning routines, passing down tips and tricks like treasured family heirlooms. Think about it: Grandma’s secret lemon juice solution for stubborn stains or that old wives’ tale about using vinegar to banish odors – these aren’t just random ideas; they’re the culmination of years of trial and error, a collective wisdom honed over time.
But in today’s fast-paced world, we need cleaning shortcuts more than ever. Juggling work, family, and social commitments leaves little room for extensive cleaning sprees. That’s where this DIY guide comes in! I’m going to share some of my favorite, tried-and-true cleaning hacks that will save you time, money, and a whole lot of elbow grease. From tackling tough grime with everyday household items to organizing your cleaning supplies for maximum efficiency, these tips will transform your cleaning routine from a dreaded chore into a manageable task. Get ready to reclaim your weekends and enjoy a sparkling clean home without sacrificing your precious free time!
DIY Cleaning Shortcuts: Making Your Life Easier!
Okay, let’s be honest, cleaning isn’t exactly anyone’s favorite pastime. But a clean home is a happy home, right? So, I’ve compiled some of my absolute favorite DIY cleaning shortcuts that will save you time, money, and a whole lot of elbow grease. Get ready to transform your cleaning routine!
Cleaning Your Microwave Like a Pro
This is one of those tasks we all dread, but it doesn’t have to be a nightmare! This method uses the power of steam to loosen up all that splattered food.
What You’ll Need:
* 1 cup of water
* 1/4 cup of white vinegar (or lemon juice)
* Microwave-safe bowl
* Sponge or cloth
Step-by-Step Instructions:
1. Mix it up: In your microwave-safe bowl, combine the water and vinegar (or lemon juice). The vinegar helps to break down grease and grime, while the lemon juice adds a fresh scent.
2. Microwave Magic: Place the bowl in the microwave and heat on high for 5-7 minutes. You want the mixture to boil and create steam.
3. Let it Steam: Leave the microwave door closed for another 2-3 minutes after it stops. This allows the steam to really work its magic, loosening all the stuck-on food particles.
4. Wipe it Down: Carefully remove the bowl (it will be hot!). Use a sponge or cloth to easily wipe away the loosened grime. You’ll be amazed at how easily it comes off!
5. Final Touches: For any stubborn spots, you can dip your sponge in the remaining liquid in the bowl and scrub gently.
Reviving Your Showerhead with Vinegar
Hard water deposits can really clog up your showerhead, reducing water pressure and making your shower less enjoyable. This simple trick will have your showerhead sparkling and performing like new!
What You’ll Need:
* White vinegar
* Plastic bag (sandwich bag or larger, depending on your showerhead size)
* Rubber band or twist tie
Step-by-Step Instructions:
1. Vinegar Bath: Fill the plastic bag with enough white vinegar to completely submerge the showerhead.
2. Secure the Bag: Carefully attach the bag to the showerhead, using the rubber band or twist tie to secure it in place. Make sure the showerhead is fully immersed in the vinegar.
3. Soak Overnight: Let the showerhead soak in the vinegar overnight (or for at least a few hours). This allows the vinegar to dissolve the mineral deposits.
4. Remove and Rinse: Remove the bag and discard the vinegar. Turn on the shower and let the water run for a few minutes to flush out any remaining vinegar and loosened debris.
5. Shine On: If you still see any stubborn deposits, you can use an old toothbrush to gently scrub them away.
Cleaning Your Blender the Easy Way
Cleaning a blender can be a pain, especially after making smoothies or sauces. This method is quick, easy, and requires minimal effort.
What You’ll Need:
* Water
* Dish soap
Step-by-Step Instructions:
1. Fill it Up: Fill the blender jar about halfway with warm water.
2. Add Soap: Add a squirt of dish soap.
3. Blend Away: Secure the lid and blend on high speed for about 30-60 seconds.
4. Rinse and Dry: Pour out the soapy water and rinse the blender jar thoroughly with clean water. Let it air dry or dry it with a clean towel.
De-Gunking Your Grout
Dirty grout can make your entire bathroom or kitchen look dingy. This simple paste will brighten your grout lines and make your tiles sparkle.
What You’ll Need:
* Baking soda
* White vinegar
* Old toothbrush or grout brush
* Water
Step-by-Step Instructions:
1. Make a Paste: In a small bowl, mix baking soda and white vinegar to form a paste. The mixture will fizz, which is normal.
2. Apply the Paste: Apply the paste to the grout lines using your fingers or a small spatula.
3. Scrub-a-Dub-Dub: Use an old toothbrush or grout brush to scrub the grout lines. Focus on areas with heavy staining or mildew.
4. Let it Sit: Let the paste sit on the grout for about 5-10 minutes.
5. Rinse and Repeat: Rinse the grout lines with water and wipe away any remaining paste. For stubborn stains, you may need to repeat the process.
Freshening Up Your Garbage Disposal
A smelly garbage disposal can stink up your entire kitchen. This simple trick will freshen it up and eliminate odors.
What You’ll Need:
* Ice cubes
* Lemon or lime wedges
* Salt
Step-by-Step Instructions:
1. Ice, Ice Baby: Fill the garbage disposal with ice cubes.
2. Add Citrus and Salt: Add a few lemon or lime wedges and a tablespoon of salt.
3. Grind Away: Turn on the cold water and run the garbage disposal until all the ice is gone. The ice helps to scrub the disposal blades, while the citrus and salt help to deodorize and disinfect.
Cleaning Your Dishwasher Like a Pro
Your dishwasher cleans your dishes, but it needs cleaning too! This simple method will remove buildup and keep your dishwasher running smoothly.
What You’ll Need:
* White vinegar
* Baking soda
Step-by-Step Instructions:
1. Vinegar Power: Place a dishwasher-safe cup filled with white vinegar on the top rack of your empty dishwasher.
2. Run a Cycle: Run the dishwasher on a hot cycle.
3. Baking Soda Boost: Once the cycle is complete, sprinkle a cup of baking soda on the bottom of the dishwasher.
4. Another Cycle: Run another short, hot cycle. The vinegar will help to dissolve grease and grime, while the baking soda will help to deodorize and freshen the dishwasher.
Making Your Own All-Purpose Cleaner
Why spend money on expensive cleaning products when you can make your own effective and eco-friendly cleaner?
What You’ll Need:
* Spray bottle
* Water
* White vinegar
* Essential oil (optional, for scent)
Step-by-Step Instructions:
1. Mix it Up: In the spray bottle, combine equal parts water and white vinegar.
2. Add Scent (Optional): Add a few drops of your favorite essential oil, such as lemon, lavender, or tea tree oil.
3. Shake Well: Shake the bottle well to combine the ingredients.
4. Spray and Wipe: Spray the cleaner on surfaces and wipe clean with a cloth. This cleaner is great for countertops, sinks, and other non-porous surfaces.
Cleaning Stainless Steel Appliances
Stainless steel appliances can be beautiful, but they’re also prone to fingerprints and smudges. This simple trick will keep them looking their best.
What You’ll Need:
* White vinegar
* Microfiber cloth
Step-by-Step Instructions:
1. Spray it Down: Lightly spray the stainless steel appliance with white vinegar.
2. Wipe with the Grain: Use a microfiber cloth to wipe the appliance in the direction of the grain. This will help to prevent streaks.
3. Buff to Shine: Use a clean, dry microfiber cloth to buff the appliance to a shine.
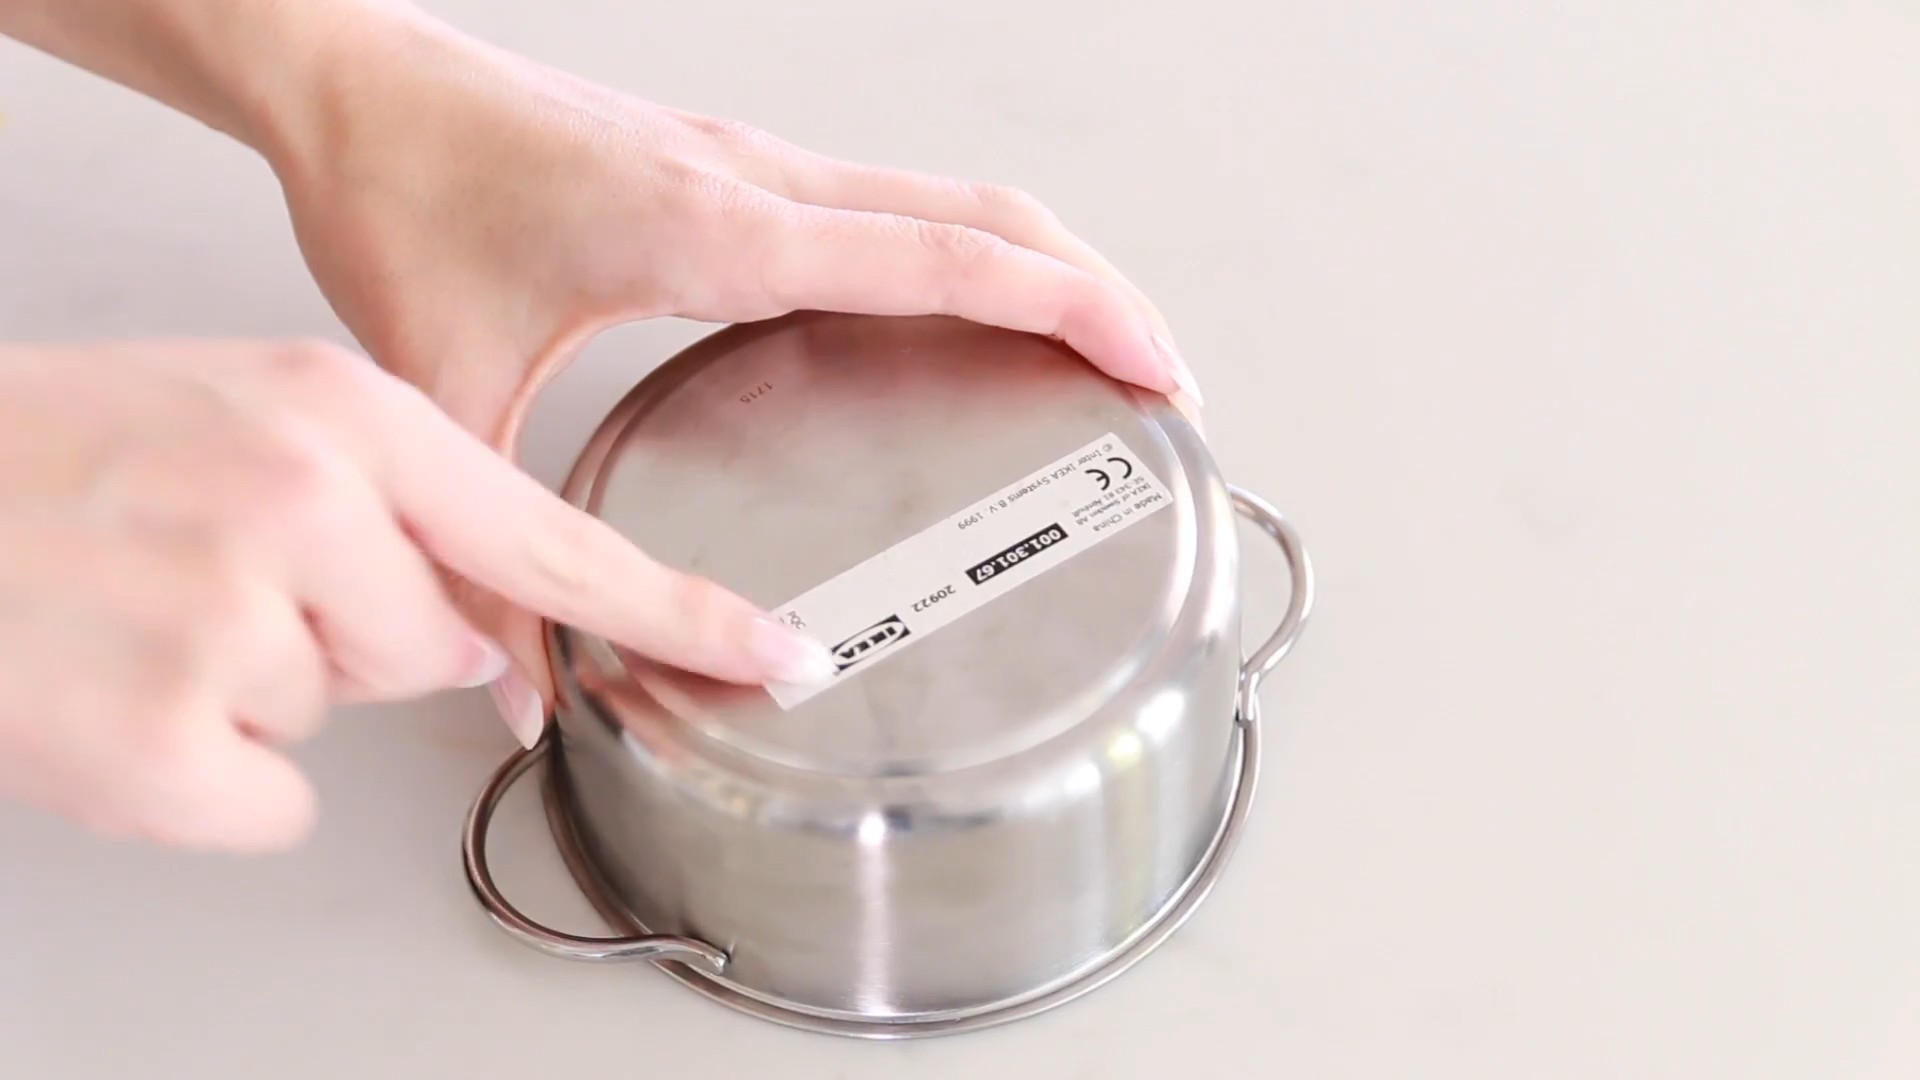
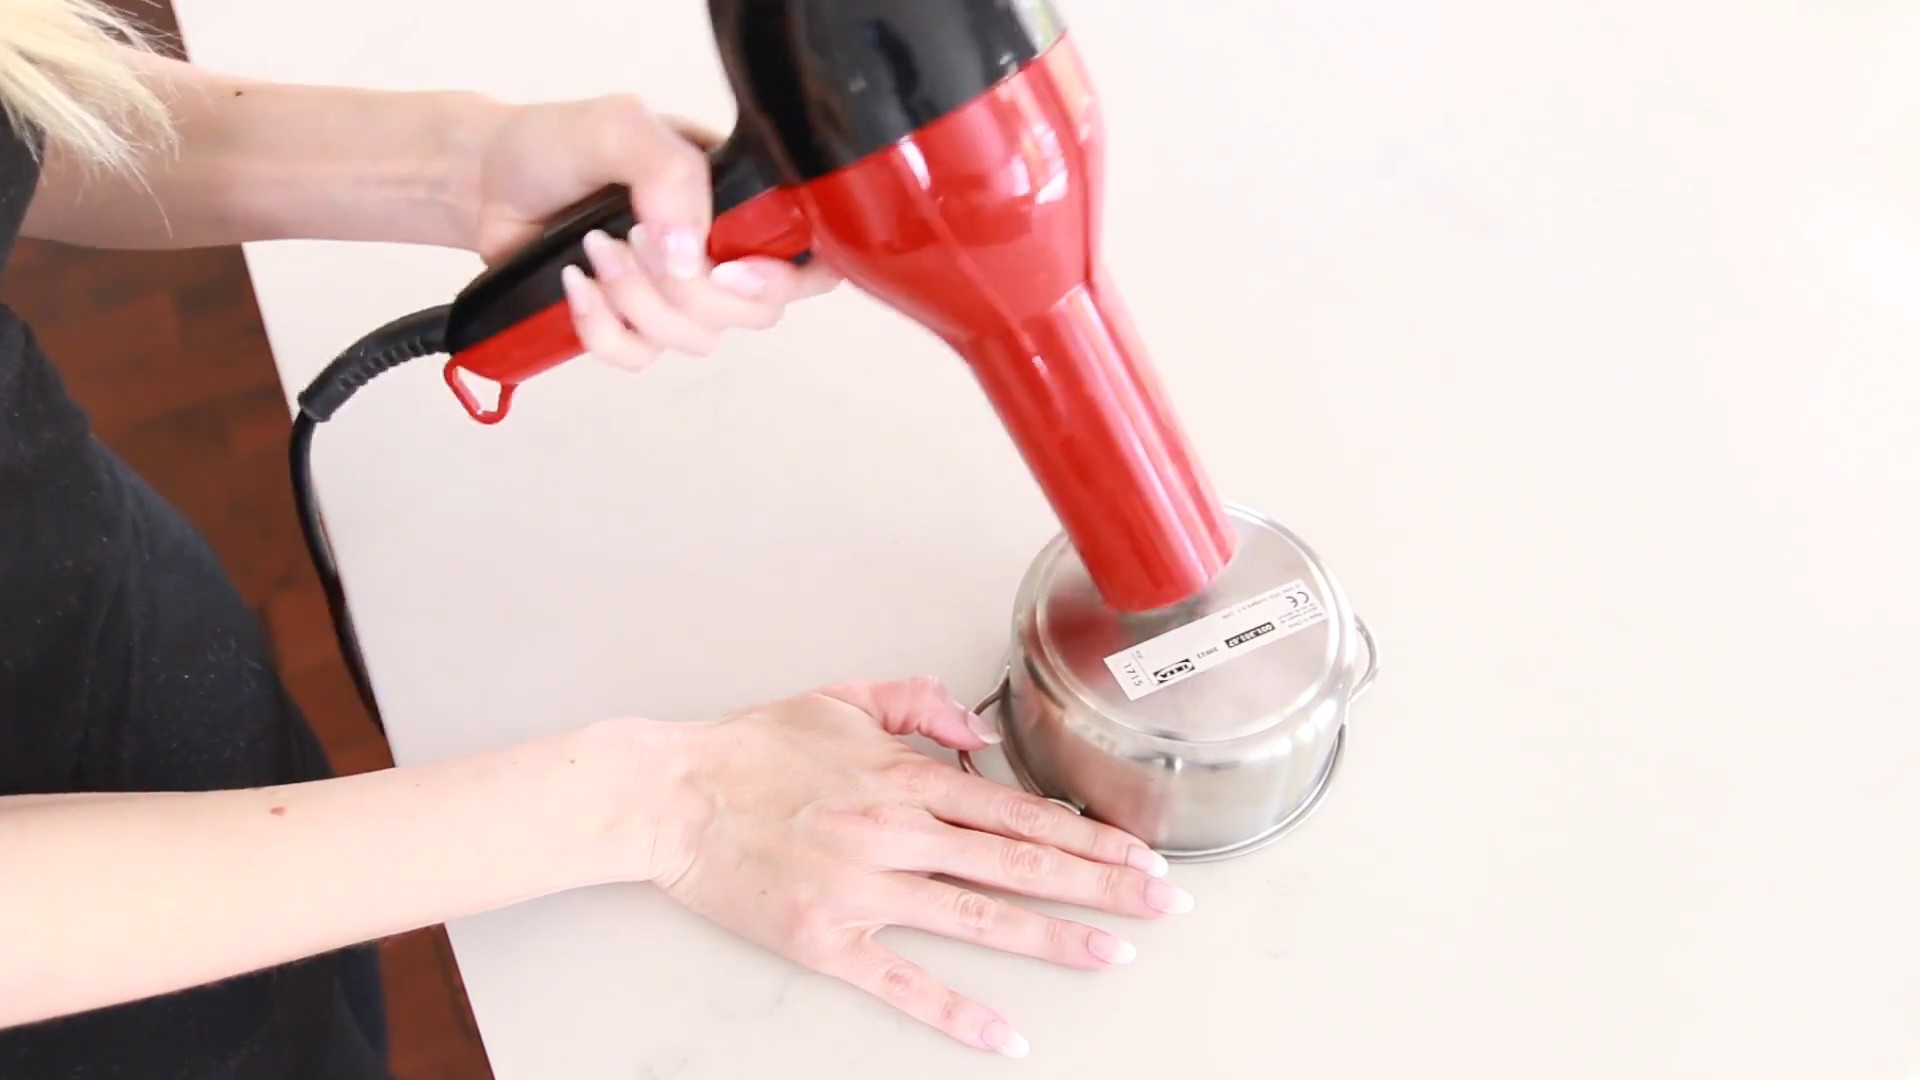
Removing Water Stains from Wood Furniture
Water rings on wood furniture are a common problem. This simple trick can help to remove them.
What You’ll Need:
* Hair dryer
* Soft cloth
Step-by-Step Instructions:
1. Heat it Up: Set your hair dryer to a low setting and direct the heat at the water stain.
2. Wipe Gently: As the stain begins to fade, gently wipe the area with a soft cloth.
3. Repeat if Necessary: Repeat the process until the stain is gone. Be careful not to overheat the wood.
Cleaning Window Blinds with a Sock
Cleaning window blinds can be tedious, but this simple trick makes it much easier.
What You’ll Need:
* Old sock
* White vinegar
* Water
* Spray bottle
Step-by-Step Instructions:
1. Prepare the Sock: Mix equal parts white vinegar and water in a spray bottle. Spray the sock lightly with the mixture.
2. Slip it On: Slip the sock over your hand, like a
Conclusion
So, there you have it! This simple yet incredibly effective DIY cleaning trick is more than just a shortcut; it’s a game-changer for anyone looking to maintain a sparkling clean home without spending hours scrubbing or breaking the bank on expensive commercial cleaners. We’ve shown you how to harness the power of readily available ingredients to create a potent cleaning solution that tackles grime, grease, and everyday messes with ease.
Why is this a must-try? Because it’s efficient, economical, and environmentally friendly. You’re not only saving time and money, but you’re also reducing your reliance on harsh chemicals that can be harmful to your health and the planet. Plus, the satisfaction of creating your own cleaning solution and seeing it work wonders is truly rewarding.
But the beauty of this DIY cleaning trick lies in its versatility. Feel free to experiment with variations to suit your specific needs and preferences. For instance, if you’re dealing with stubborn stains on colored fabrics, add a tablespoon of white vinegar to your cleaning solution for an extra boost. Or, if you prefer a more fragrant cleaning experience, infuse your solution with a few drops of your favorite essential oils, such as lemon, lavender, or tea tree. Just be sure to test any new additions on an inconspicuous area first to ensure they don’t cause any discoloration or damage.
Another fantastic variation is to adjust the consistency of the cleaning solution to create a paste for tackling particularly tough grime. Simply add more of the thickening agent, such as baking soda or cornstarch, until you achieve the desired consistency. This paste is perfect for cleaning oven doors, stovetops, and even grout.
We’re confident that once you try this DIY cleaning trick, you’ll be amazed by its effectiveness and simplicity. It’s a practical solution for busy individuals, families, and anyone who wants to keep their home clean and healthy without sacrificing their time or budget.
Don’t just take our word for it, though. We encourage you to give this DIY cleaning trick a try and see the results for yourself. We’re eager to hear about your experiences and any variations you discover along the way. Share your tips, tricks, and before-and-after photos in the comments section below. Let’s create a community of cleaning enthusiasts who are passionate about finding innovative and sustainable ways to keep our homes sparkling clean! Remember, a clean home is a happy home, and this DIY cleaning trick is the perfect way to achieve both.
Frequently Asked Questions (FAQs)
What exactly makes this DIY cleaning trick so effective?
The effectiveness of this DIY cleaning trick stems from the synergistic action of its ingredients. Typically, these ingredients include a combination of a cleaning agent (like dish soap or castile soap), a scrubbing agent (like baking soda or salt), and a disinfectant (like vinegar or hydrogen peroxide). The cleaning agent helps to loosen dirt and grime, the scrubbing agent provides gentle abrasion to remove stubborn stains, and the disinfectant kills bacteria and germs. When combined, these ingredients create a powerful cleaning solution that is capable of tackling a wide range of messes. The beauty is that these ingredients are often already in your pantry, making it a cost-effective and readily available solution.
Is this DIY cleaning solution safe to use on all surfaces?
While this DIY cleaning solution is generally safe for most surfaces, it’s always a good idea to test it on an inconspicuous area first, especially on delicate or sensitive materials like wood, marble, or granite. Certain ingredients, such as vinegar, can be acidic and may damage or discolor some surfaces. Avoid using abrasive scrubbing agents on surfaces that are prone to scratching. Always read the labels of your ingredients to ensure they are compatible with the surfaces you intend to clean. If you’re unsure, err on the side of caution and test the solution on a small, hidden area before applying it to the entire surface.
Can I store this DIY cleaning solution for later use?
Yes, you can store this DIY cleaning solution for later use, but it’s important to store it properly to maintain its effectiveness and prevent spoilage. Store the solution in an airtight container in a cool, dark place. Avoid storing it in direct sunlight or near heat sources, as this can degrade the ingredients and reduce its cleaning power. It’s also a good idea to label the container with the date it was made so you can keep track of its freshness. Generally, a DIY cleaning solution made with natural ingredients will last for several weeks to a few months. If you notice any changes in color, odor, or consistency, it’s best to discard the solution and make a fresh batch.
How often should I use this DIY cleaning trick?
The frequency of using this DIY cleaning trick depends on your cleaning needs and habits. For everyday cleaning tasks, such as wiping down countertops and sinks, you can use it as often as needed. For more intensive cleaning tasks, such as scrubbing bathrooms or kitchens, you may only need to use it once or twice a week. Pay attention to the areas in your home that tend to get dirty quickly and adjust your cleaning schedule accordingly. Regular cleaning with this DIY solution can help prevent the buildup of dirt and grime, making it easier to maintain a clean and healthy home.
What are some common mistakes to avoid when making and using this DIY cleaning solution?
One common mistake is using the wrong proportions of ingredients. Too much of one ingredient can make the solution ineffective or even harmful. Always follow the recipe carefully and measure the ingredients accurately. Another mistake is using incompatible ingredients. For example, mixing vinegar and bleach can create toxic fumes. Always research the ingredients you’re using and make sure they are safe to combine. Finally, avoid using abrasive scrubbing agents on delicate surfaces. This can scratch or damage the surface. Always test the solution on an inconspicuous area first to ensure it’s safe to use.
Can I use essential oils in this DIY cleaning solution, and if so, which ones are best?
Yes, you can definitely use essential oils in this DIY cleaning solution! Not only do they add a pleasant fragrance, but many essential oils also have antibacterial, antiviral, and antifungal properties, which can enhance the cleaning power of the solution. Some of the best essential oils to use in cleaning solutions include lemon, lavender, tea tree, eucalyptus, peppermint, and orange. Lemon essential oil is a great degreaser and has a refreshing scent. Lavender essential oil has calming properties and is effective against bacteria and fungi. Tea tree essential oil is a powerful antiseptic and is great for disinfecting surfaces. When using essential oils, start with a few drops and adjust the amount to your preference. Be sure to use pure, high-quality essential oils for the best results.
What if I have allergies or sensitivities to certain ingredients?
If you have allergies or sensitivities to certain ingredients, it’s important to choose alternative ingredients that are safe for you to use. For example, if you’re allergic to citrus, you can substitute lemon juice with vinegar or another acidic ingredient. If you’re sensitive to fragrances, you can omit essential oils or use unscented cleaning products. Always read the labels of your ingredients carefully and consult with a doctor or allergist if you have any concerns. You can also try making a small batch of the cleaning solution and testing it on a small area of your skin to see if you have any reaction before using it on a larger scale.

Leave a Comment