

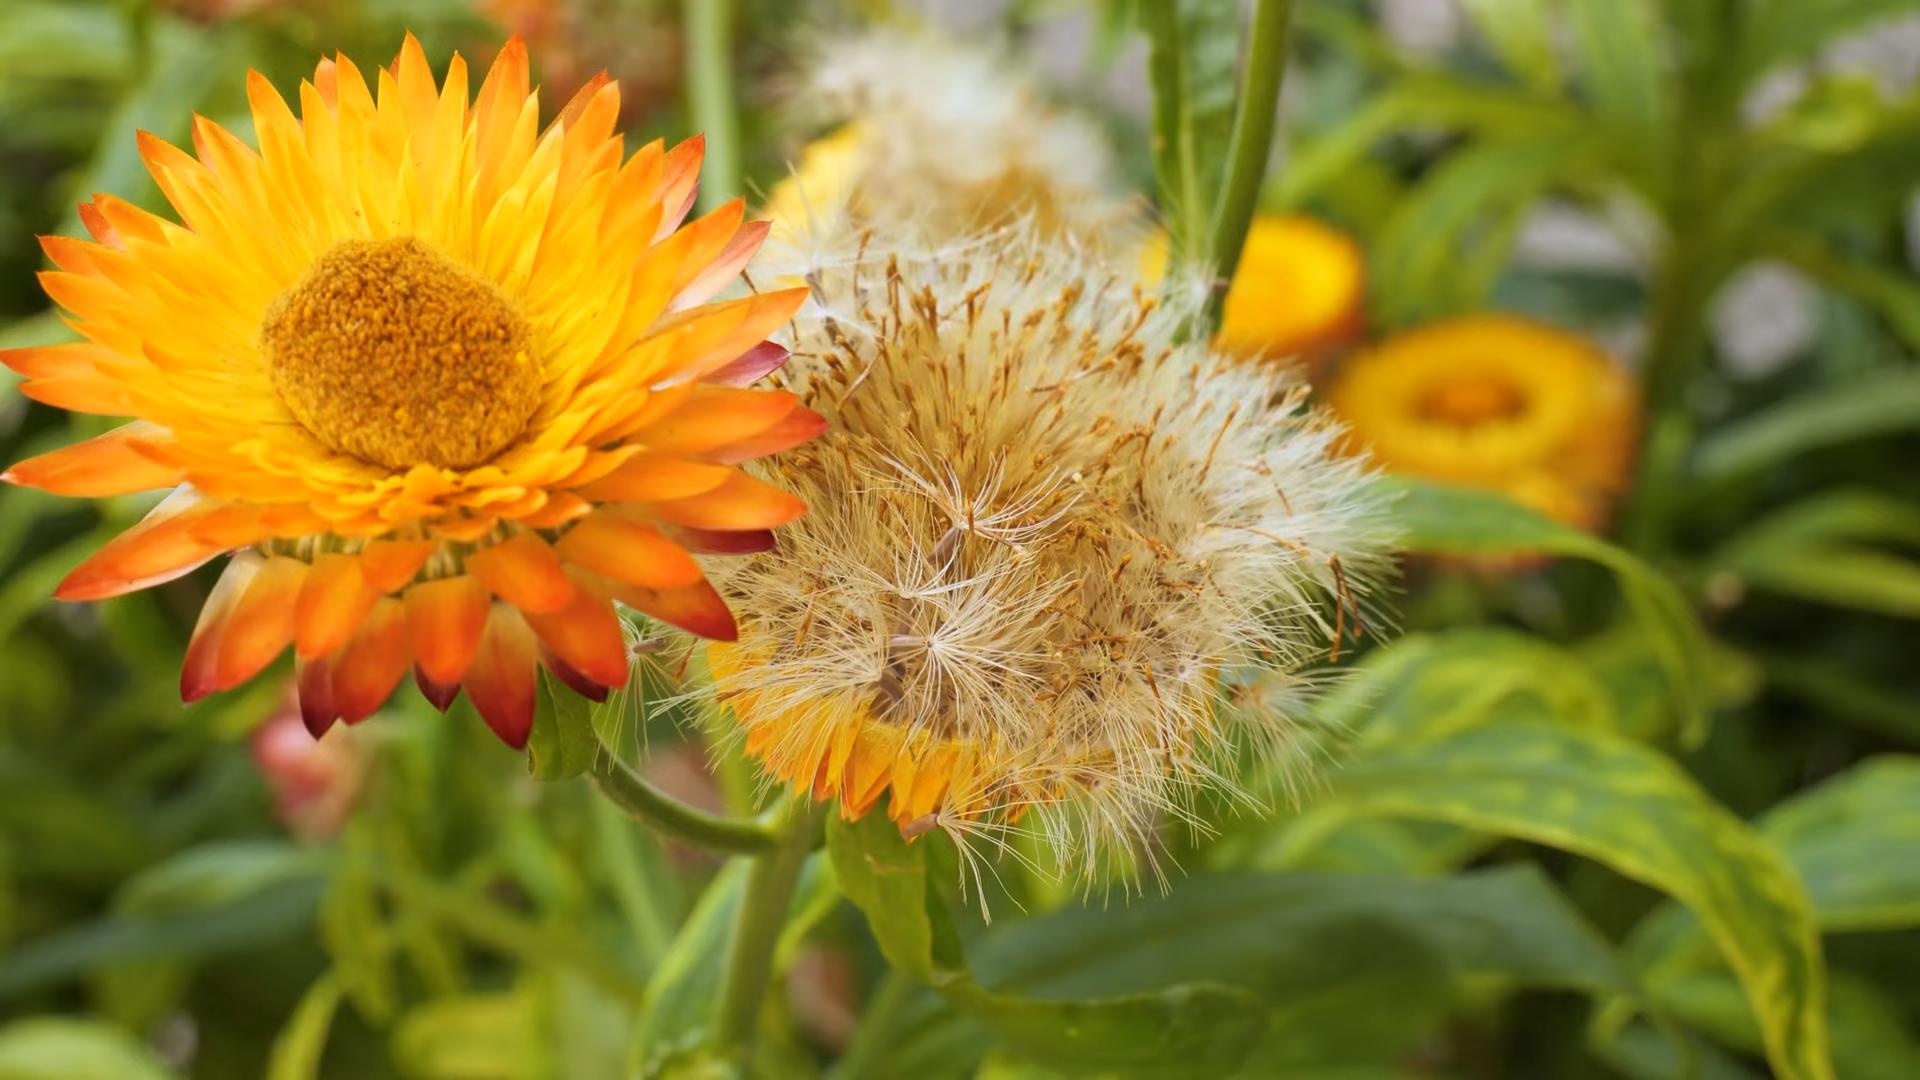
Grow Strawflowers From Seed and unlock a world of everlasting beauty right in your own backyard! Have you ever wished you could hold onto the vibrant colors of summer a little longer? Or perhaps create stunning, dried floral arrangements that last for years? Well, with strawflowers, you absolutely can! These charming blooms, with their papery petals and cheerful hues, have been captivating gardeners for centuries. Originating from Australia, strawflowers (also known as everlasting daisies) quickly spread across the globe, becoming a favorite for their unique texture and incredible longevity.
But why should you learn to grow strawflowers from seed? In today’s fast-paced world, finding moments of tranquility and connection with nature is more important than ever. Gardening offers a therapeutic escape, and strawflowers, in particular, are incredibly rewarding to cultivate. Not only are they relatively easy to grow, even for beginners, but they also provide a continuous supply of cut flowers for fresh or dried arrangements. Plus, imagine the satisfaction of gifting a bouquet of flowers you nurtured from tiny seeds! I’m excited to share my favorite tips and tricks for successfully growing these delightful blooms, ensuring you have a garden bursting with color and a stash of everlasting beauty to enjoy all year round.
Growing Strawflowers From Seed: A Complete DIY Guide
Hey there, fellow gardening enthusiasts! I’m so excited to share my experience with growing strawflowers from seed. These beauties are not only stunning in the garden, but they also make fantastic dried flowers that last for ages. Trust me, once you get the hang of it, you’ll be hooked! This guide will walk you through every step, from starting your seeds indoors to harvesting those vibrant blooms.
Why Grow Strawflowers?
Before we dive in, let’s talk about why strawflowers are so awesome.
* Long-lasting Color: Strawflowers retain their color even when dried, making them perfect for crafts, wreaths, and bouquets.
* Easy to Grow: They’re relatively low-maintenance and can tolerate a variety of conditions.
* Attract Pollinators: Bees and butterflies love them!
* Unique Texture: The papery petals add a unique textural element to any arrangement.
* Variety of Colors: You can find strawflowers in a rainbow of hues, from vibrant reds and oranges to soft pinks and yellows.
Materials You’ll Need
Okay, let’s gather our supplies. Here’s what you’ll need to grow strawflowers from seed:
* Strawflower Seeds: Choose your favorite colors and varieties. I personally love the ‘Monstrosum’ mix for its large, showy blooms.
* Seed Starting Trays or Pots: These should have drainage holes.
* Seed Starting Mix: This is a light, sterile mix that’s perfect for delicate seedlings.
* Spray Bottle: For gentle watering.
* Heat Mat (Optional): To speed up germination.
* Grow Lights (Optional): If you don’t have a sunny windowsill.
* Small Pots (for transplanting): 3-4 inch pots are ideal.
* Potting Mix: For transplanting seedlings into larger pots.
* Gardening Gloves: To keep your hands clean.
* Trowel or Small Shovel: For transplanting.
* Watering Can or Hose: For watering established plants.
* Fertilizer: A balanced, water-soluble fertilizer.
* Scissors or Pruning Shears: For harvesting.
* Twine or String: For hanging flowers to dry.
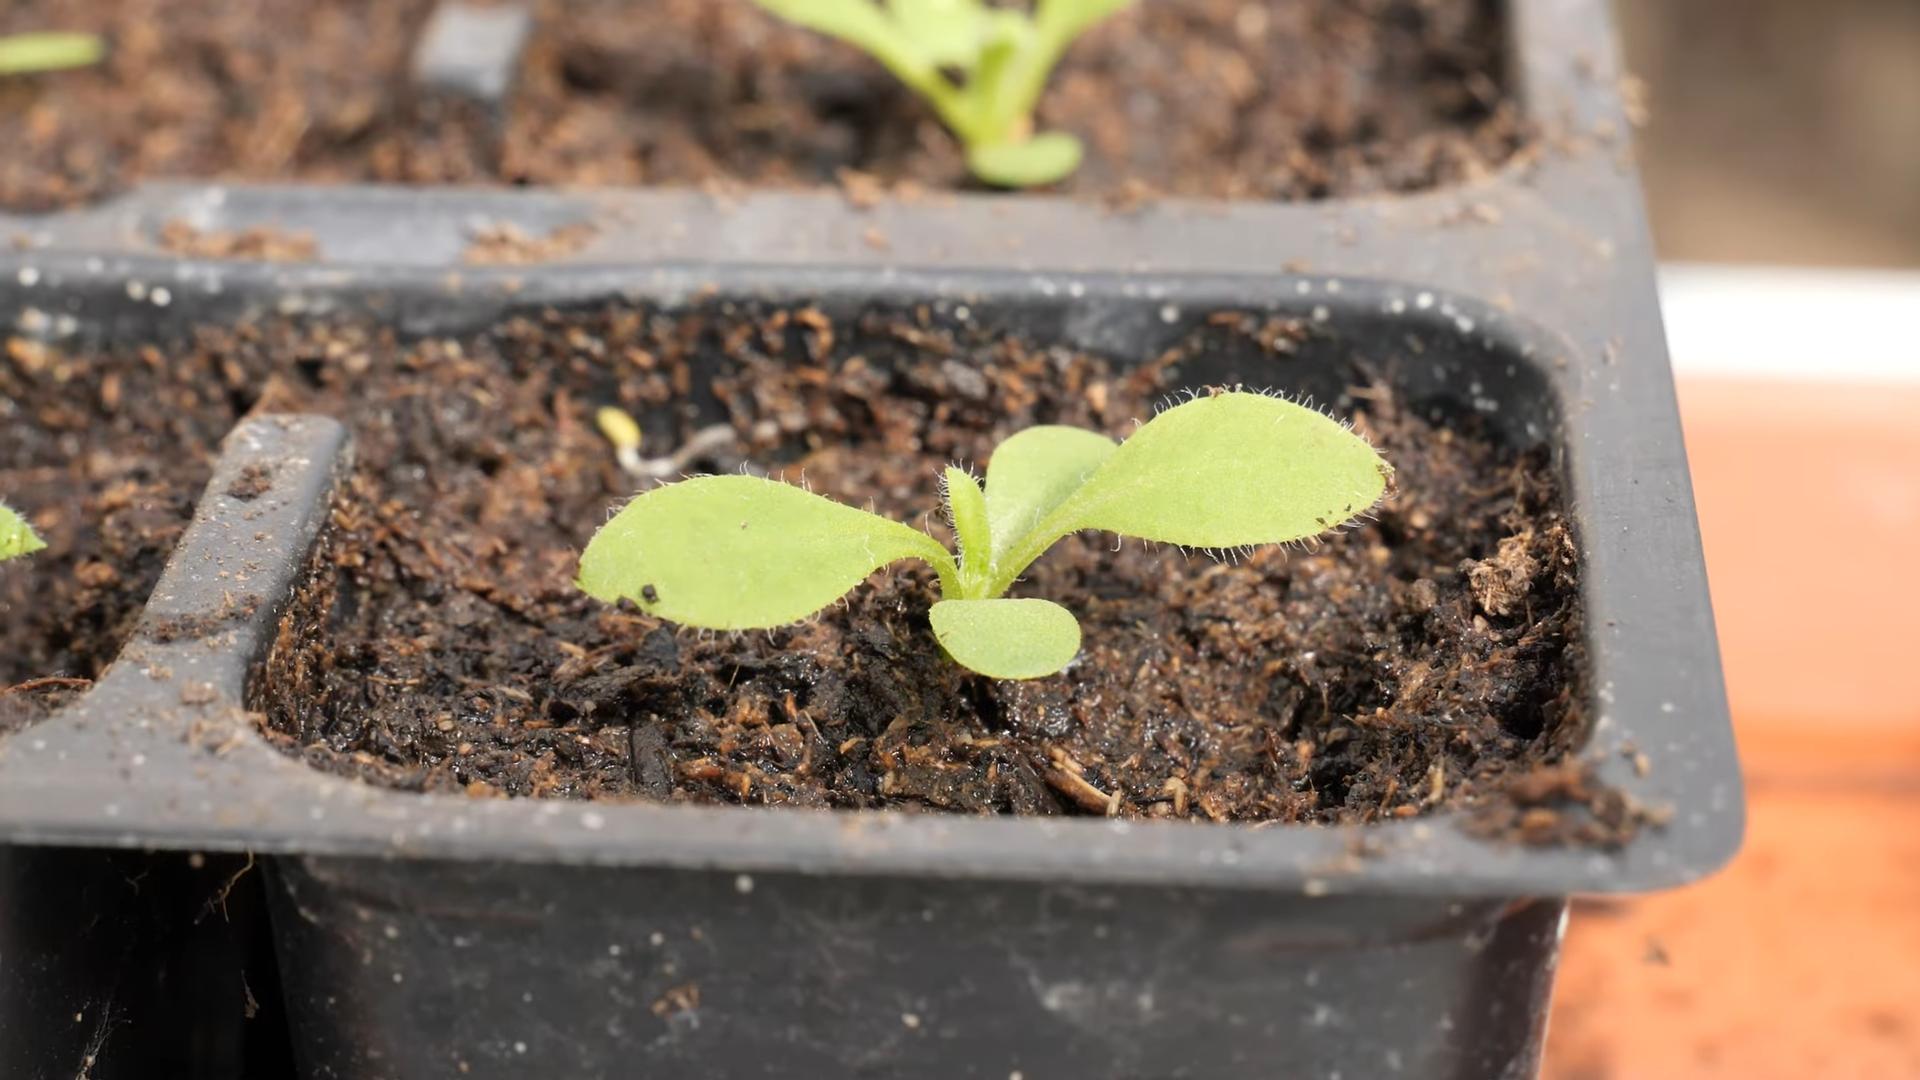
Starting Seeds Indoors
Starting strawflower seeds indoors gives them a head start, especially if you live in a cooler climate. I usually start mine about 6-8 weeks before the last expected frost.
1. Prepare Your Seed Starting Trays: Fill your seed starting trays or pots with seed starting mix. Gently press down to firm the soil, but don’t pack it too tightly.
2. Sow the Seeds: Strawflower seeds are tiny, so be careful not to overcrowd them. I usually sow 2-3 seeds per cell or pot. Sprinkle the seeds on top of the soil and then lightly cover them with a thin layer of seed starting mix (about 1/8 inch).
3. Water Gently: Use a spray bottle to mist the soil thoroughly. You want the soil to be moist, but not soggy.
4. Provide Warmth: Strawflower seeds germinate best in warm conditions. If you have a heat mat, place your seed starting trays on it. Otherwise, find a warm spot in your house, like on top of the refrigerator.
5. Cover with a Dome or Plastic Wrap: This will help retain moisture and create a humid environment. Make sure to remove the cover once the seeds start to germinate to prevent fungal diseases.
6. Provide Light: Once the seeds germinate (usually within 7-14 days), they’ll need plenty of light. Place your seed starting trays under grow lights or on a sunny windowsill. If using a windowsill, rotate the trays regularly to prevent the seedlings from leaning towards the light.
7. Keep the Soil Moist: Check the soil daily and mist it with a spray bottle whenever it feels dry to the touch.
Transplanting Seedlings
Once your seedlings have developed a few sets of true leaves (the leaves that look like miniature versions of the adult plant’s leaves), it’s time to transplant them into larger pots.
1. Prepare Your Pots: Fill your 3-4 inch pots with potting mix.
2. Gently Remove Seedlings: Carefully remove the seedlings from the seed starting trays. I like to use a small spoon or fork to gently lift them out, being careful not to damage the roots. If you sowed multiple seeds per cell, you may need to gently separate them.
3. Plant Seedlings: Make a small hole in the center of the potting mix in each pot. Place the seedling in the hole and gently backfill with potting mix. Make sure the top of the root ball is level with the soil surface.
4. Water Thoroughly: Water the transplanted seedlings thoroughly.
5. Provide Light and Warmth: Place the transplanted seedlings under grow lights or on a sunny windowsill. Continue to keep the soil moist.
Hardening Off Seedlings
Before you can plant your strawflower seedlings outdoors, you need to “harden them off.” This process gradually acclimates them to outdoor conditions, preventing them from getting shocked by the sun, wind, and temperature changes.
1. Start Slowly: Begin by placing your seedlings outdoors in a sheltered location (like a porch or patio) for just a few hours each day.
2. Gradually Increase Exposure: Over the course of a week or two, gradually increase the amount of time the seedlings spend outdoors. Also, gradually expose them to more direct sunlight and wind.
3. Monitor the Weather: If the weather is particularly harsh (e.g., strong winds, heavy rain, or extreme temperatures), bring the seedlings back indoors.
Planting Outdoors
Once your seedlings are hardened off and the danger of frost has passed, it’s time to plant them in your garden.
1. Choose a Sunny Location: Strawflowers need at least 6 hours of sunlight per day.
2. Prepare the Soil: Strawflowers prefer well-drained soil. If your soil is heavy clay, amend it with compost or other organic matter to improve drainage.
3. Dig Holes: Dig holes that are slightly larger than the root balls of your seedlings. Space the holes about 12-18 inches apart.
4. Plant Seedlings: Gently remove the seedlings from their pots and place them in the holes. Backfill with soil and gently firm around the base of the plants.
5. Water Thoroughly: Water the newly planted seedlings thoroughly.
6. Mulch (Optional): Apply a layer of mulch around the plants to help retain moisture and suppress weeds.
Caring for Strawflowers
Strawflowers are relatively low-maintenance, but here are a few tips to keep them happy and healthy:
* Watering: Water regularly, especially during dry spells. Avoid overwatering, as this can lead to root rot.
* Fertilizing: Fertilize every 2-3 weeks with a balanced, water-soluble fertilizer.
* Deadheading: Remove spent flowers to encourage more blooms.
* Pest Control: Strawflowers are generally pest-resistant, but keep an eye out for aphids and other common garden pests. If you spot any pests, treat them with insecticidal soap or neem oil.
* Support: Taller varieties may need staking to prevent them from flopping over.
Harvesting and Drying Strawflowers
This is the most rewarding part! Here’s how to harvest and dry your strawflowers:
1. Harvest When Buds are Partially Open: The best time to harvest strawflowers for drying is when the buds are partially open, but the center is still tight. This will ensure that the flowers retain their shape and color when dried.
2. Cut the Stems: Use sharp scissors or pruning shears to cut the stems as long as possible. I usually cut them about 12-18 inches long.
3. Remove Foliage: Remove any leaves from the stems.
4. Bundle the Flowers: Gather the flowers into small bundles of 5-10 stems.
5. Tie with Twine: Tie the bundles tightly with twine or string.
6. Hang Upside Down: Hang the bundles upside down in a cool, dark, and well-ventilated place. A closet, attic, or garage works well.
7. Allow to Dry: Allow the flowers to dry completely, which usually takes 2-4 weeks. They’re dry when the petals feel papery and crisp.
8. Store Properly: Once the flowers are dry, you can store them in an airtight container in a cool, dark place. They should last for several years.
Troubleshooting
Even with the best care, you might encounter a few problems
Conclusion
So, there you have it! Growing strawflowers from seed isn’t just a gardening project; it’s an investment in a vibrant, long-lasting display of color that will brighten your home and garden for months to come. We’ve walked through each step, from selecting the right seeds to nurturing your seedlings and finally, harvesting those stunning, papery blooms.
Why is this DIY trick a must-try? Because it offers a unique blend of satisfaction and practicality. There’s nothing quite like the feeling of watching a tiny seed transform into a beautiful flower, knowing you played an integral role in its growth. Beyond the personal fulfillment, you’re also gaining access to a readily available supply of gorgeous, everlasting flowers that can be used in countless ways. Forget expensive floral arrangements that wilt within days; with your own homegrown strawflowers, you’ll have a sustainable source of beauty at your fingertips.
But the best part? You’re not limited to just one variety. Experiment with different colors and sizes! Try growing dwarf strawflowers for container gardens or taller varieties for dramatic backdrops in your flower beds. Consider interplanting them with other drought-tolerant flowers like zinnias or cosmos for a vibrant, mixed display. You can even try succession planting, sowing seeds every few weeks to ensure a continuous harvest throughout the growing season.
And don’t be afraid to get creative with your harvested strawflowers! Use them in dried flower arrangements, wreaths, potpourri, or even as unique embellishments for gift wrapping. The possibilities are truly endless.
This method of growing strawflowers from seed is not only cost-effective but also incredibly rewarding. It allows you to connect with nature, learn new skills, and create something beautiful with your own two hands. It’s a project that’s suitable for gardeners of all levels, from beginners to seasoned pros.
We wholeheartedly encourage you to give this DIY trick a try. Start small, perhaps with just a few seeds, and see the magic unfold. And most importantly, share your experience with us! We’d love to hear about your successes, your challenges, and any tips or tricks you discover along the way. Post photos of your strawflower gardens, share your dried flower creations, and let’s build a community of strawflower enthusiasts together! Your insights could inspire others to embark on their own strawflower growing journey. So, grab your seeds, get your hands dirty, and prepare to be amazed by the beauty and versatility of these remarkable flowers. Happy gardening!
Frequently Asked Questions (FAQ)
What are the best varieties of strawflowers to grow from seed?
There are many fantastic strawflower varieties to choose from, each offering unique colors, sizes, and characteristics. Some popular choices include:
* **’Monstrosum’**: Known for its large, showy blooms in a wide range of colors, including red, orange, yellow, pink, and white.
* **’Bright Bikini’**: A compact variety that’s perfect for containers and small gardens. It produces an abundance of vibrant, double-petaled flowers.
* **’King Size Mix’**: As the name suggests, this variety boasts extra-large flowers in a mix of bold colors.
* **’Apricot Twist’**: A beautiful variety with soft apricot-colored petals that add a touch of elegance to any garden.
* **’Chico’**: A dwarf variety that’s ideal for edging and borders. It produces small, but abundant, flowers in a variety of colors.
Consider your garden space, desired flower size, and preferred color palette when selecting your strawflower varieties.
How long does it take for strawflowers to germinate from seed?
Strawflower seeds typically germinate within 7-21 days, depending on factors such as temperature, moisture, and seed quality. To ensure optimal germination, maintain a consistent soil temperature of around 70-75°F (21-24°C) and keep the soil consistently moist but not waterlogged. Using a heat mat can help speed up the germination process, especially in cooler climates.
What kind of soil is best for growing strawflowers from seed?
Strawflowers thrive in well-draining soil that is moderately fertile. Avoid heavy clay soils that retain too much moisture, as this can lead to root rot. Amend heavy soils with compost or other organic matter to improve drainage and aeration. A slightly acidic to neutral soil pH (around 6.0-7.0) is ideal. You can test your soil pH using a soil testing kit available at most garden centers.
How much sunlight do strawflowers need?
Strawflowers require at least 6-8 hours of direct sunlight per day to thrive. Insufficient sunlight can result in leggy growth, fewer flowers, and duller colors. Choose a sunny location in your garden or ensure that your indoor seedlings receive adequate light from a grow light.
When is the best time to harvest strawflowers?
The best time to harvest strawflowers for drying is when the flowers are about halfway open. At this stage, the petals are firm and the colors are most vibrant. Avoid harvesting flowers that are fully open or starting to fade, as they may not dry as well. Cut the stems long, leaving at least 6-8 inches for easy handling and drying.
How do I dry strawflowers?
There are several methods for drying strawflowers, but the most common and effective is air drying. To air dry strawflowers, gather the stems into small bunches and tie them together with twine or rubber bands. Hang the bunches upside down in a cool, dark, and well-ventilated area. Avoid direct sunlight, as this can cause the colors to fade. The drying process typically takes 2-4 weeks, depending on the humidity and temperature. Once the petals are papery and crisp to the touch, the strawflowers are fully dried and ready to use.
Are strawflowers annuals or perennials?
Strawflowers are typically grown as annuals, meaning they complete their life cycle in one growing season. However, in warmer climates (USDA zones 9-11), they may behave as short-lived perennials, returning for a second year.
Do strawflowers attract pollinators?
Yes, strawflowers are attractive to pollinators such as bees, butterflies, and other beneficial insects. Their bright colors and abundant nectar make them a valuable addition to any pollinator garden.
How do I prevent diseases and pests in my strawflower garden?
To prevent diseases and pests in your strawflower garden, follow these tips:
* Choose disease-resistant varieties.
* Provide good air circulation by spacing plants adequately.
* Water at the base of the plants to avoid wetting the foliage.
* Remove any diseased or damaged leaves promptly.
* Monitor plants regularly for signs of pests and take appropriate action if necessary.
* Consider using organic pest control methods, such as insecticidal soap or neem oil.
Can I save seeds from my strawflowers to grow next year?
Yes, you can save seeds from your strawflowers to grow next year. Allow the flowers to fully mature and dry on the plant. Once the flower heads are completely dry, gently rub them between your fingers to release the seeds. Store the seeds in a cool, dry, and dark place until you are ready to sow them. Keep in mind that seeds saved from hybrid varieties may not produce plants that are true to type.

Leave a Comment