

Sack gardening watermelon – sounds a little crazy, right? But trust me, it’s a game-changer for anyone dreaming of homegrown watermelon, especially if you’re short on space or dealing with less-than-ideal soil. For centuries, humans have cultivated watermelons, tracing their origins back to Africa where they were initially prized for their water content in arid environments. Now, we’re taking this ancient fruit and giving it a modern, space-saving twist!
I know what you’re thinking: “Watermelons need sprawling vines and tons of room!” And traditionally, you’d be right. But that’s where sack gardening comes in. This DIY trick allows you to grow delicious, juicy watermelons in a fraction of the space, using readily available materials like burlap sacks or large grow bags. Imagine biting into a sweet, refreshing watermelon you grew yourself, even if you only have a small balcony or patio.
This article is your ultimate guide to mastering sack gardening watermelon. We’ll walk you through every step, from choosing the right sack and soil to nurturing your watermelon plant for a bountiful harvest. So, ditch the store-bought melons and get ready to experience the joy of growing your own – it’s easier than you think!
DIY Watermelon Sack Garden: Grow Your Own Juicy Melons in a Bag!
Hey there, fellow gardening enthusiasts! Ever dreamed of growing your own watermelons but thought you didn’t have the space? Well, I’m here to tell you that you absolutely can, even if you only have a small patio or balcony! We’re going to dive into the wonderful world of sack gardening and learn how to grow delicious watermelons in a simple, space-saving bag. Trust me, it’s easier than you think, and the reward of biting into a homegrown watermelon is absolutely worth it.
What You’ll Need
Before we get started, let’s gather our supplies. This is a pretty straightforward project, so you probably have some of these items lying around already.
* A Large, Sturdy Sack: Think burlap, heavy-duty plastic (like a feed sack), or even a reinforced grow bag designed for potatoes. The bigger, the better – aim for at least 20-25 gallons. This will give your watermelon roots plenty of room to spread out.
* Potting Mix: This is crucial! Don’t skimp on quality. Use a well-draining potting mix specifically formulated for vegetables. Avoid using garden soil directly, as it can compact and hinder drainage.
* Compost: Compost is your watermelon’s best friend. It provides essential nutrients and helps retain moisture. I like to use a mix of homemade and store-bought compost.
* Watermelon Seeds or Seedlings: You can start from seeds or buy seedlings from your local nursery. If you’re starting from seeds, I recommend starting them indoors a few weeks before the last expected frost.
* Slow-Release Fertilizer: Watermelons are heavy feeders, so a slow-release fertilizer will provide a steady supply of nutrients throughout the growing season. Look for a fertilizer with a balanced NPK ratio (nitrogen, phosphorus, potassium).
* Water: Obvious, but essential! Watermelons need consistent moisture, especially during hot weather.
* Trowel or Shovel: For mixing and transferring soil.
* Scissors or Knife: For cutting drainage holes in the sack.
* Support Structure (Optional): Depending on the watermelon variety, you might need a trellis or support structure to keep the vines off the ground. Smaller, bush-type varieties might not need this.
* Mulch (Optional): Mulch helps retain moisture, suppress weeds, and regulate soil temperature. Straw, wood chips, or even shredded leaves work well.
Preparing Your Sack Garden
Okay, let’s get our hands dirty! This is where the magic begins.
1. Choose Your Location: Watermelons need at least 6-8 hours of direct sunlight per day. Pick a sunny spot on your patio, balcony, or in your yard. Make sure the location is easily accessible for watering.
2. Prepare the Sack: If you’re using a burlap sack, you might want to line it with a plastic bag (poke holes for drainage!) to prevent it from rotting too quickly. For plastic sacks, make sure they are clean and free of any harmful chemicals.
3. Create Drainage Holes: This is super important! Waterlogged soil is a watermelon’s worst enemy. Cut several drainage holes in the bottom of the sack. I usually make about 6-8 holes, each about half an inch in diameter.
4. Mix Your Soil: In a large container or directly on the ground, mix your potting mix, compost, and slow-release fertilizer. I usually go for a ratio of about 2 parts potting mix, 1 part compost, and follow the fertilizer instructions on the package. Mix everything thoroughly to ensure even distribution of nutrients.
5. Fill the Sack: Now, carefully fill the sack with your soil mixture. Leave about 4-6 inches of space at the top. This will prevent the soil from overflowing when you water.
Planting Your Watermelon
Time to get those watermelon seeds or seedlings into their new home!
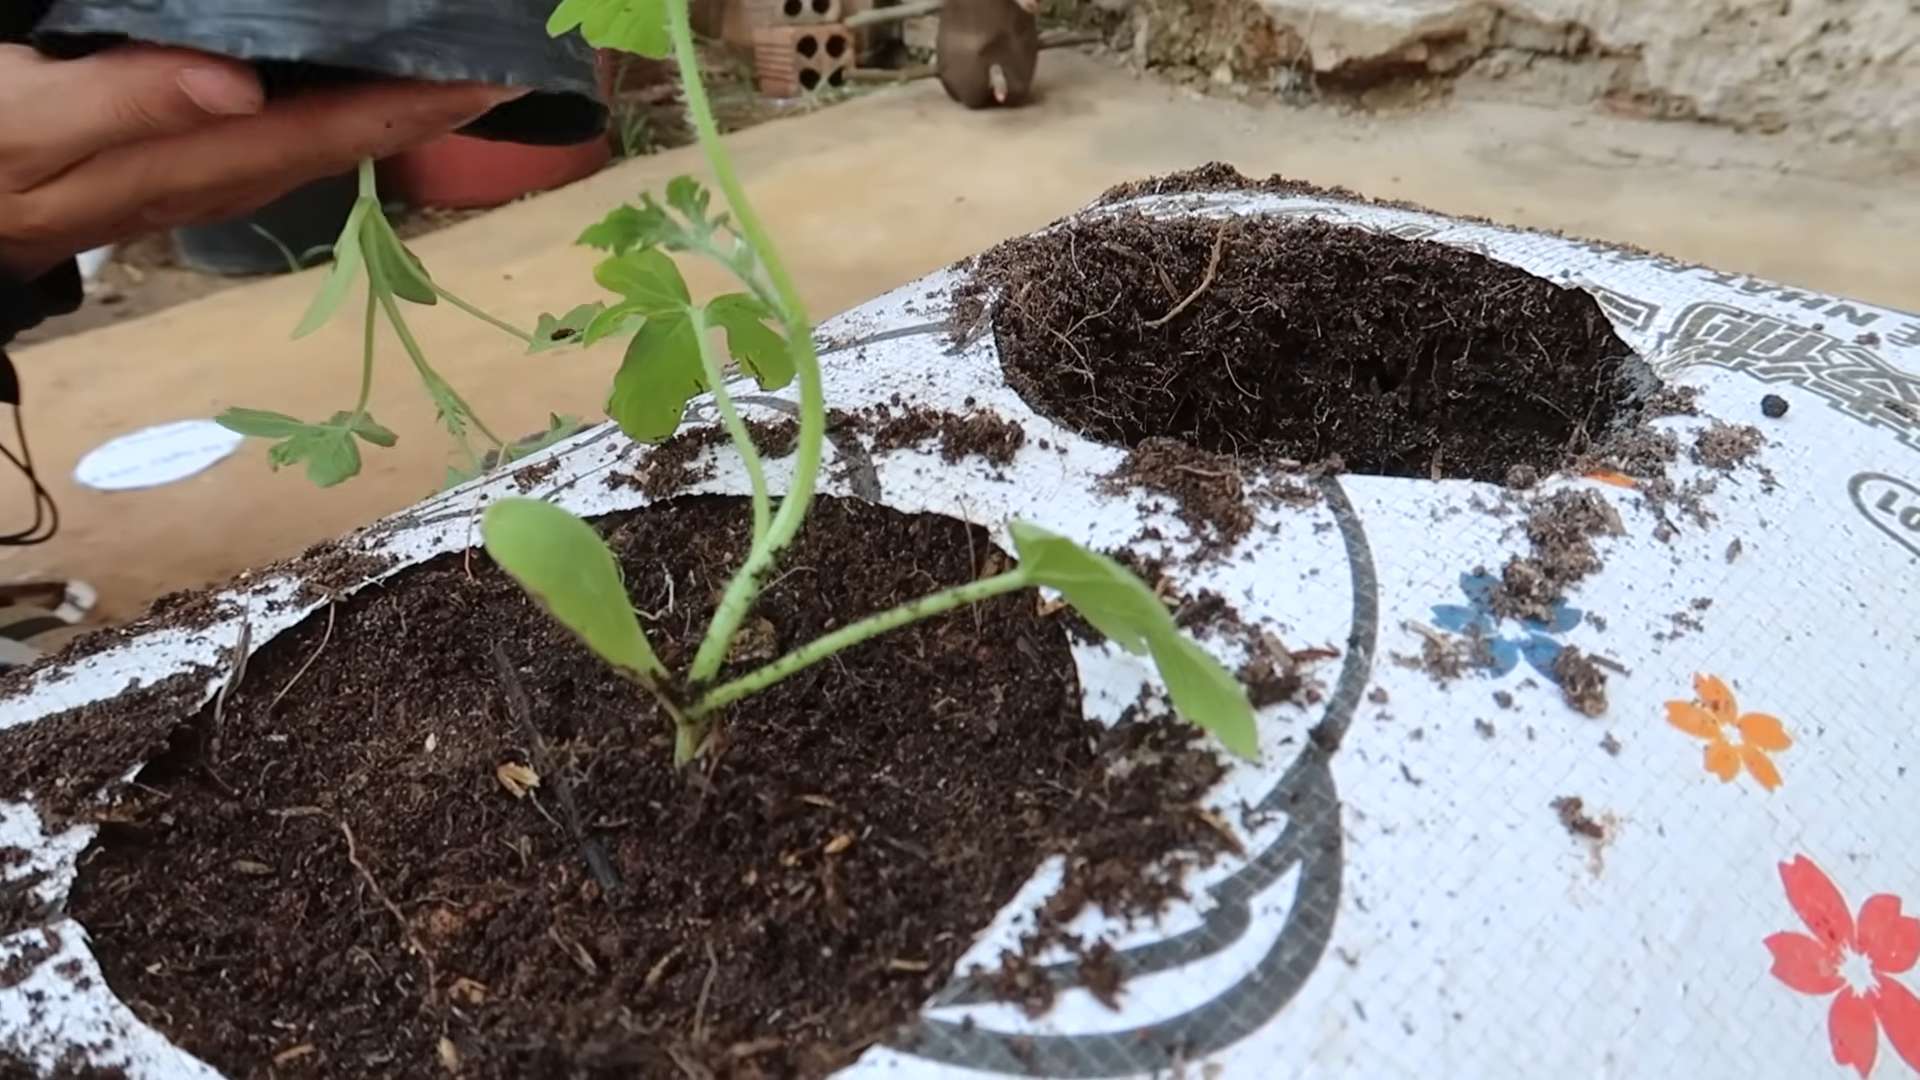
1. Starting from Seeds: If you’re starting from seeds, make a small hole in the soil about an inch deep. Place 2-3 seeds in each hole (just in case some don’t germinate). Cover the seeds with soil and gently water.
2. Transplanting Seedlings: If you’re using seedlings, gently remove them from their containers. Loosen the roots slightly before planting. Make a hole in the soil large enough to accommodate the root ball. Place the seedling in the hole and cover the roots with soil. Gently pat the soil around the base of the plant.
3. Water Thoroughly: After planting, water the sack garden thoroughly until water drains out of the drainage holes. This will help settle the soil and ensure the roots have access to moisture.
4. Mulch (Optional): Apply a layer of mulch around the base of the plant to help retain moisture and suppress weeds.
Caring for Your Watermelon Sack Garden
Now comes the fun part – watching your watermelon grow! Here’s what you need to do to keep your plant happy and healthy.
1. Watering: Watermelons need consistent moisture, especially during hot weather. Check the soil moisture regularly by sticking your finger into the soil. If the top inch feels dry, it’s time to water. Water deeply and thoroughly, making sure the water reaches the roots. Avoid overwatering, as this can lead to root rot.
2. Fertilizing: Watermelons are heavy feeders, so you’ll need to supplement the slow-release fertilizer with additional feedings throughout the growing season. I like to use a liquid fertilizer specifically formulated for vegetables every 2-3 weeks. Follow the instructions on the fertilizer package.
3. Pruning (Optional): Some gardeners like to prune their watermelon vines to encourage larger fruit production. If you choose to prune, remove any suckers (small shoots that grow from the base of the plant) and any excess vines that are not producing fruit.
4. Pest and Disease Control: Keep an eye out for common watermelon pests like aphids, squash bugs, and vine borers. You can use insecticidal soap or neem oil to control these pests. Also, watch out for diseases like powdery mildew and fusarium wilt. Ensure good air circulation around the plant and avoid overhead watering to prevent these diseases.
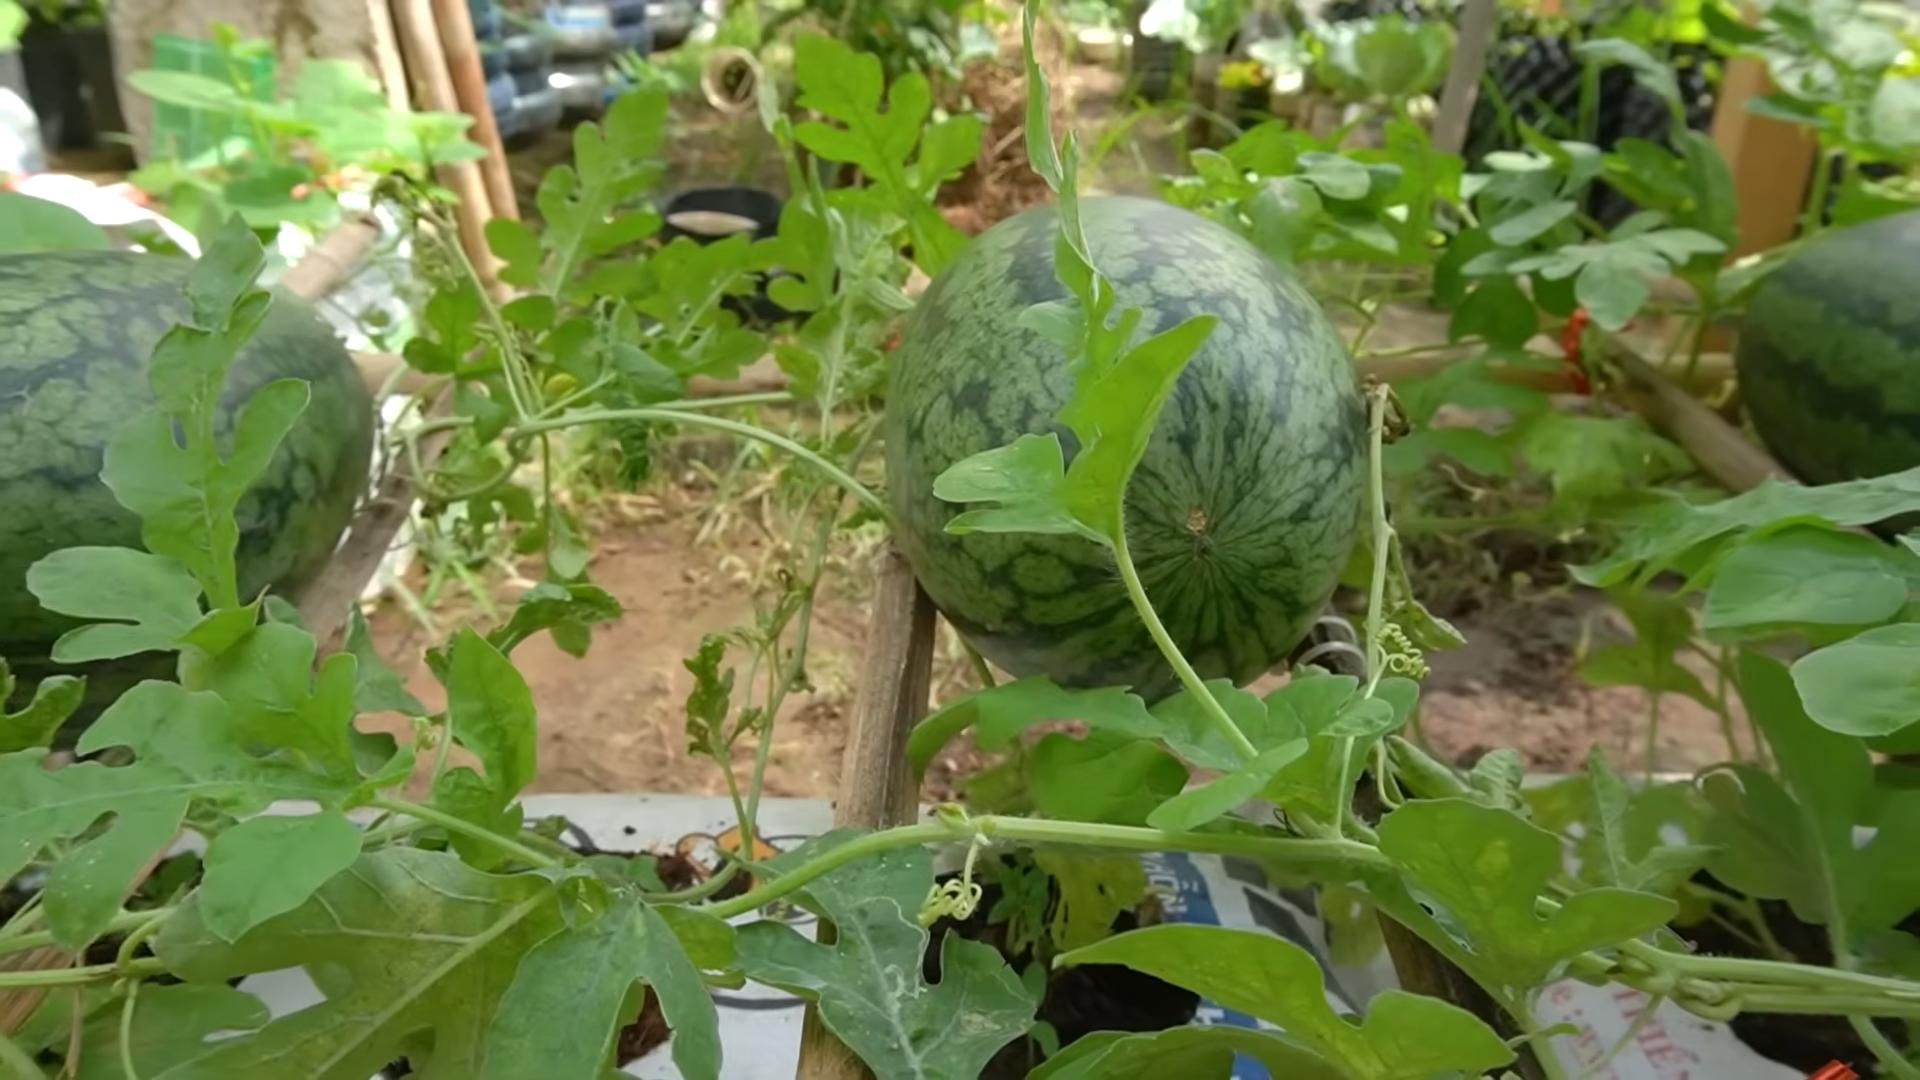
5. Support Structure (Optional): As your watermelon vines grow, they might need some support. If you’re growing a larger variety, consider using a trellis or other support structure to keep the vines off the ground. This will also help prevent the fruit from rotting. You can even use old pantyhose to create slings for the developing watermelons to support their weight.
6. Pollination: Watermelons need to be pollinated in order to produce fruit. If you’re growing your watermelon indoors or in an area with limited bee activity, you might need to hand-pollinate the flowers. To do this, use a small paintbrush to transfer pollen from the male flowers to the female flowers. Female flowers have a small, immature watermelon at the base of the flower.
Harvesting Your Watermelon
The moment we’ve all been waiting for! Knowing when to harvest your watermelon can be a bit tricky, but here are a few signs to look for:
1. The Tendril: The tendril closest to the watermelon stem will turn brown and dry.
2. The Ground Spot: The spot where the watermelon rests on the ground (the “ground spot”) will turn from white to yellow.
3. The Sound: When you thump the watermelon, it should sound dull and hollow.
4. Days to Maturity: Check the seed packet or seedling tag for the estimated days to maturity. This will give you a general idea of when your watermelon should be ready to harvest.
Once you’re confident that your watermelon is ripe, use a sharp knife to cut it from the vine, leaving a few inches of stem attached.
Enjoying Your Homegrown Watermelon
Congratulations! You’ve successfully grown your own watermelon in a sack garden. Now it’s time to enjoy the fruits (or rather, the melon) of your labor. Slice it up, share it with friends and family, and savor the delicious taste of homegrown goodness.
Tips for Success:
* Choose the Right Variety: Some watermelon varieties are better suited for container gardening than others. Look for smaller, bush-type varieties like ‘Sugar Baby’ or ‘Bush Sugar Baby’.
* Don’t Overcrowd: If you’re planting multiple watermelon plants in the same sack, make sure to give them enough space. Overcrowding can lead to stunted growth and reduced fruit production.
* Protect from Pests: Keep a close eye on your watermelon plants for pests and diseases. Take action quickly to prevent problems from spreading.
* Be Patient: Watermelons take time to mature, so don’t get discouraged if you don’t see results right away. With proper care and attention, you’ll be enjoying your own homegrown watermelons in no time!
*
Conclusion
So, there you have it! Transforming a simple sack into a thriving watermelon garden is not just a fun project; it’s a game-changer for anyone with limited space, challenging soil, or simply a desire to try something new and rewarding. We’ve walked you through the process, highlighting the ease and efficiency of this method. But why is sack gardening watermelon a must-try?
Firstly, the space-saving aspect is undeniable. Imagine enjoying homegrown, juicy watermelons even if you only have a balcony or a small patio. Traditional watermelon cultivation demands significant ground space, but the sack method neatly sidesteps this limitation. Secondly, you have complete control over the soil composition. No more battling with poor native soil! You can create the perfect, nutrient-rich environment for your watermelon plants to flourish, leading to healthier, more productive vines and, ultimately, sweeter, more delicious fruit. Thirdly, sack gardening offers excellent drainage, preventing root rot, a common problem with watermelons grown directly in the ground.
But the benefits don’t stop there. Sack gardening also makes it easier to manage pests and diseases. The elevated position reduces access for ground-dwelling pests, and the contained environment allows for targeted treatment if needed. Plus, the portability of the sack means you can easily move your watermelon plants to optimize sunlight exposure or protect them from harsh weather conditions.
Ready to take your sack gardening watermelon adventure to the next level? Consider these variations:
* **Vertical Support:** As your watermelon vines grow, provide vertical support using a trellis or netting attached to a nearby wall or fence. This will help to keep the fruit off the ground and improve air circulation, further reducing the risk of disease.
* **Companion Planting:** Plant companion herbs like basil or marigolds around the base of your sack. These herbs can help to deter pests and attract beneficial insects, creating a healthier ecosystem for your watermelon plants.
* **Different Watermelon Varieties:** Experiment with different watermelon varieties to find your favorites. Bush varieties, like ‘Bush Sugar Baby,’ are particularly well-suited for sack gardening due to their compact size.
* **Fertilizer Boost:** Supplement your soil with a slow-release fertilizer specifically formulated for fruiting plants. This will provide your watermelon plants with the extra nutrients they need to produce large, juicy fruits.
* **Watering System Upgrade:** Consider installing a simple drip irrigation system to ensure consistent and efficient watering, especially during hot summer months.
We are confident that you’ll find sack gardening watermelon to be a rewarding and enjoyable experience. It’s a fantastic way to connect with nature, grow your own food, and impress your friends and family with your gardening prowess.
So, what are you waiting for? Grab a sack, some soil, and a watermelon seedling, and get started today! We can’t wait to hear about your success. Share your photos, tips, and experiences with us in the comments below. Let’s build a community of sack gardening watermelon enthusiasts and inspire others to embrace this innovative and sustainable gardening technique. Happy gardening!
Frequently Asked Questions (FAQ)
**Q: What kind of sack should I use for sack gardening watermelon?**
A: The ideal sack is a woven polypropylene bag, similar to those used for animal feed or grain. These bags are strong, durable, and allow for good drainage. Avoid using plastic bags, as they don’t breathe well and can lead to root rot. You can often find these bags at farm supply stores or online retailers. Make sure the sack is clean and free of any harmful chemicals before using it. The size of the sack depends on the variety of watermelon you plan to grow. A larger sack (at least 24 inches in diameter and 24 inches deep) is recommended for most standard watermelon varieties. For bush varieties, a slightly smaller sack may suffice.
**Q: What type of soil is best for growing watermelons in a sack?**
A: Watermelons thrive in well-draining, nutrient-rich soil. A good mix consists of equal parts compost, potting soil, and perlite or vermiculite. The compost provides essential nutrients, the potting soil offers a good base for root growth, and the perlite or vermiculite improves drainage and aeration. Avoid using heavy clay soil, as it can become waterlogged and suffocate the roots. You can also amend your soil with a slow-release fertilizer specifically formulated for fruiting plants to provide a sustained release of nutrients throughout the growing season.
**Q: How often should I water my sack-grown watermelon?**
A: Watermelons need consistent moisture, especially during hot weather and when the fruit is developing. Check the soil moisture daily by sticking your finger a few inches into the soil. If the soil feels dry, it’s time to water. Water deeply until water drains out of the bottom of the sack. Avoid overwatering, as this can lead to root rot. A good rule of thumb is to water every 1-3 days, depending on the weather conditions. Consider using a drip irrigation system to ensure consistent and efficient watering.
**Q: How much sunlight do watermelons need when grown in a sack?**
A: Watermelons need at least 6-8 hours of direct sunlight per day to thrive. Choose a location for your sack garden that receives plenty of sunlight throughout the day. If you live in a particularly hot climate, you may need to provide some afternoon shade to prevent the plants from overheating. The portability of the sack allows you to easily move your watermelon plants to optimize sunlight exposure.
**Q: How do I prevent pests and diseases from affecting my sack-grown watermelon?**
A: Sack gardening naturally reduces the risk of some pests and diseases, but it’s still important to take preventative measures. Regularly inspect your plants for signs of pests or diseases. Remove any affected leaves or fruit immediately. Use organic pest control methods, such as insecticidal soap or neem oil, to control common pests like aphids and squash bugs. Ensure good air circulation around the plants to prevent fungal diseases. Avoid overhead watering, as this can create a humid environment that encourages disease development. Consider planting companion herbs like basil or marigolds to deter pests and attract beneficial insects.
**Q: How do I know when my watermelon is ripe?**
A: Determining when a watermelon is ripe can be tricky, but there are a few telltale signs to look for. First, check the tendril closest to the watermelon stem. When this tendril turns brown and dries up, it’s a good indication that the watermelon is ripe. Second, look at the spot where the watermelon rests on the ground (or the sack). This spot should turn from white to a creamy yellow color. Finally, give the watermelon a gentle thump. A ripe watermelon will sound hollow and deep. If it sounds dull or flat, it’s not quite ready.
**Q: Can I grow other vegetables in a sack besides watermelon?**
A: Absolutely! Sack gardening is a versatile technique that can be used to grow a wide variety of vegetables, herbs, and flowers. Some popular choices for sack gardening include tomatoes, peppers, cucumbers, lettuce, spinach, and strawberries. The key is to choose plants that are well-suited to the size of the sack and the growing conditions in your area.
**Q: What do I do with the sack and soil after the growing season is over?**
A: After the growing season is over, you can reuse the sack for another season or repurpose it for other gardening projects. The soil can be amended with compost and used to improve the soil in your garden beds or containers. Alternatively, you can compost the soil along with the plant debris.
**Q: Is sack gardening watermelon really worth the effort?**
A: Absolutely! While it requires some initial setup and ongoing care, sack gardening watermelon offers numerous benefits, including space-saving, improved soil control, better drainage, and reduced pest and disease problems. Plus, there’s nothing quite like the satisfaction of harvesting your own homegrown watermelons. Give it a try, and you might just be surprised at how easy and rewarding it can be!

Leave a Comment