

Growing Peanuts in Foam Boxes: Ever dreamt of harvesting your own crunchy, homegrown peanuts, but thought you needed acres of farmland? Think again! I’m here to tell you that you can cultivate these delicious legumes right in your backyard, balcony, or even on your patio using a simple, readily available material: foam boxes!
The humble peanut, despite its name, isn’t actually a nut! It’s a legume with a fascinating history, dating back thousands of years to South America. Evidence suggests peanuts were cultivated as early as 7,600 years ago in Peru. From ancient civilizations to modern-day snacks, peanuts have nourished and delighted people across the globe. Now, you can be a part of that legacy, no matter how small your space.
Why should you try growing peanuts in foam boxes? Well, traditional peanut farming requires specific soil conditions and a lot of space. But this DIY method bypasses those limitations! Foam boxes provide excellent drainage, insulation, and are lightweight, making them perfect for urban gardeners or anyone with limited mobility. Plus, it’s a fantastic way to recycle those styrofoam containers that often end up in landfills. Imagine the satisfaction of snacking on peanuts you nurtured from seed to harvest, all while being eco-conscious! I’m excited to share this simple, effective trick that will bring the joy of peanut cultivation right to your doorstep.
Erdnüsse im Styropor-Behälter anbauen: Eine DIY-Anleitung
Hallo liebe Gartenfreunde! Habt ihr Lust, etwas Neues auszuprobieren und eure eigenen Erdnüsse anzubauen? Ich zeige euch, wie ihr das ganz einfach in Styropor-Behältern machen könnt. Es ist ein tolles Projekt, das nicht nur Spaß macht, sondern euch auch mit leckeren, selbstgezogenen Erdnüssen belohnt. Los geht’s!
Was ihr für den Erdnussanbau im Styropor-Behälter benötigt:
Hier ist eine Liste der Materialien und Werkzeuge, die ihr für dieses Projekt benötigt. Keine Sorge, die meisten davon habt ihr wahrscheinlich schon zu Hause!
* Styropor-Behälter: Am besten eignen sich große, tiefe Behälter. Achtet darauf, dass sie sauber und unbeschädigt sind. Je größer der Behälter, desto mehr Erdnüsse könnt ihr anbauen.
* Erdnüsse (ungesalzen, ungeröstet): Ihr braucht rohe, unbehandelte Erdnüsse. Diese findet ihr oft im Supermarkt oder im Bioladen. Achtet darauf, dass sie nicht geröstet oder gesalzen sind, da sie sonst nicht keimen.
* Erde: Eine gute Mischung aus Gartenerde, Kompost und Sand ist ideal. Die Erde sollte locker und gut durchlässig sein.
* Sand: Sand hilft, die Erde locker zu halten und die Drainage zu verbessern.
* Kompost: Kompost ist ein natürlicher Dünger und versorgt die Erdnusspflanzen mit wichtigen Nährstoffen.
* Bohrmaschine oder Schraubenzieher: Um Löcher in den Styropor-Behälter zu bohren, damit das Wasser ablaufen kann.
* Gießkanne: Zum Bewässern der Pflanzen.
* Pflanzschaufel: Zum Einpflanzen der Erdnüsse.
* Gartenvlies (optional): Um den Boden des Behälters auszulegen und die Drainage zu verbessern.
* Mulch (optional): Um die Feuchtigkeit im Boden zu halten und Unkraut zu unterdrücken.
Schritt-für-Schritt-Anleitung: Erdnüsse im Styropor-Behälter anbauen
Jetzt geht es ans Eingemachte! Hier ist eine detaillierte Anleitung, wie ihr eure Erdnüsse im Styropor-Behälter anbauen könnt.
1. Vorbereitung des Styropor-Behälters
1. Löcher bohren: Nehmt eure Bohrmaschine oder den Schraubenzieher und bohrt mehrere Löcher in den Boden des Styropor-Behälters. Diese Löcher sind wichtig, damit überschüssiges Wasser ablaufen kann und die Wurzeln der Erdnusspflanzen nicht faulen. Ich empfehle, etwa alle 10-15 cm ein Loch zu bohren.
2. Gartenvlies auslegen (optional): Wenn ihr möchtet, könnt ihr den Boden des Behälters mit Gartenvlies auslegen. Das verhindert, dass Erde durch die Löcher gespült wird und verbessert die Drainage. Schneidet das Vlies einfach passend zu und legt es in den Behälter.
2. Vorbereitung der Erde
1. Erde mischen: Mischt eure Gartenerde, den Kompost und den Sand in einem Verhältnis von etwa 2:1:1. Das bedeutet, dass ihr doppelt so viel Gartenerde wie Kompost und Sand verwendet. Die Mischung sollte locker und krümelig sein.
2. Behälter befüllen: Füllt den Styropor-Behälter mit der Erdmischung. Lasst etwa 5-10 cm Platz bis zum Rand des Behälters.
3. Erdnüsse vorbereiten und pflanzen
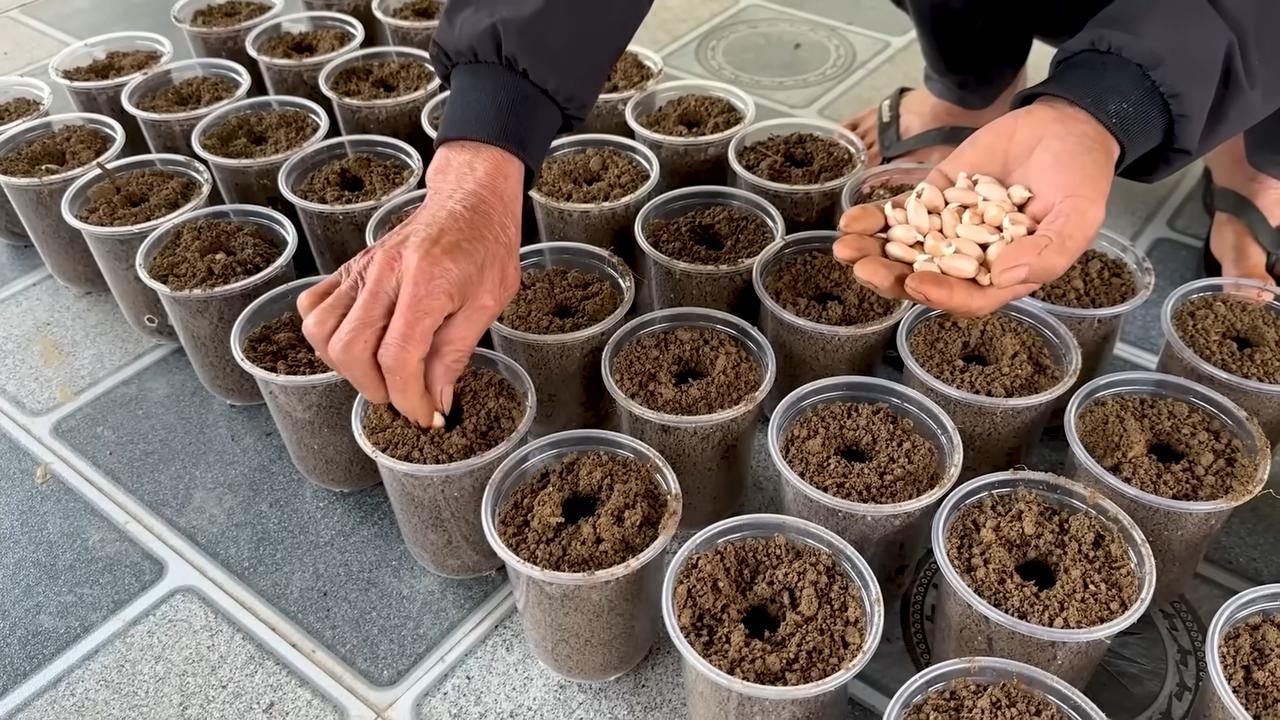
1. Erdnüsse auswählen: Sucht euch die größten und gesündesten Erdnüsse aus. Achtet darauf, dass sie keine Risse oder Beschädigungen haben.
2. Erdnüsse einweichen (optional): Ihr könnt die Erdnüsse vor dem Pflanzen für etwa 24 Stunden in lauwarmes Wasser legen. Das hilft, die Keimung zu beschleunigen. Ich mache das meistens, aber es ist kein Muss.
3. Erdnüsse pflanzen: Macht mit dem Finger oder einer Pflanzschaufel kleine Löcher in die Erde, etwa 3-5 cm tief. Pflanzt die Erdnüsse in die Löcher und bedeckt sie mit Erde. Achtet darauf, dass die Erdnüsse nicht zu dicht beieinander liegen. Ich empfehle, etwa 10-15 cm Abstand zwischen den Erdnüssen zu lassen.
4. Angießen: Gießt die Erde vorsichtig an, sodass sie gut durchfeuchtet ist. Vermeidet es, die Erde zu stark zu gießen, da die Erdnüsse sonst faulen könnten.
4. Pflege der Erdnusspflanzen
1. Standort: Stellt den Styropor-Behälter an einen sonnigen und warmen Ort. Erdnüsse lieben die Sonne und brauchen mindestens 6-8 Stunden Sonnenlicht pro Tag.
2. Bewässerung: Gießt die Erdnusspflanzen regelmäßig, besonders während der heißen Sommermonate. Die Erde sollte immer leicht feucht sein, aber nicht nass. Achtet darauf, dass das Wasser gut ablaufen kann, um Staunässe zu vermeiden.
3. Düngung: Düngt die Erdnusspflanzen etwa alle 2-3 Wochen mit einem organischen Dünger. Ich verwende gerne Komposttee oder einen Flüssigdünger für Gemüse.
4. Häufeln: Wenn die Erdnusspflanzen etwa 15-20 cm hoch sind, solltet ihr sie anhäufeln. Das bedeutet, dass ihr Erde um die Basis der Pflanzen herum anhäuft. Das fördert die Bildung von Erdnüssen.
5. Unkraut entfernen: Entfernt regelmäßig Unkraut, das im Styropor-Behälter wächst. Unkraut kann den Erdnusspflanzen Nährstoffe und Wasser entziehen.
6. Mulchen (optional): Ihr könnt die Erde um die Erdnusspflanzen herum mit Mulch bedecken. Das hilft, die Feuchtigkeit im Boden zu halten und Unkraut zu unterdrücken.
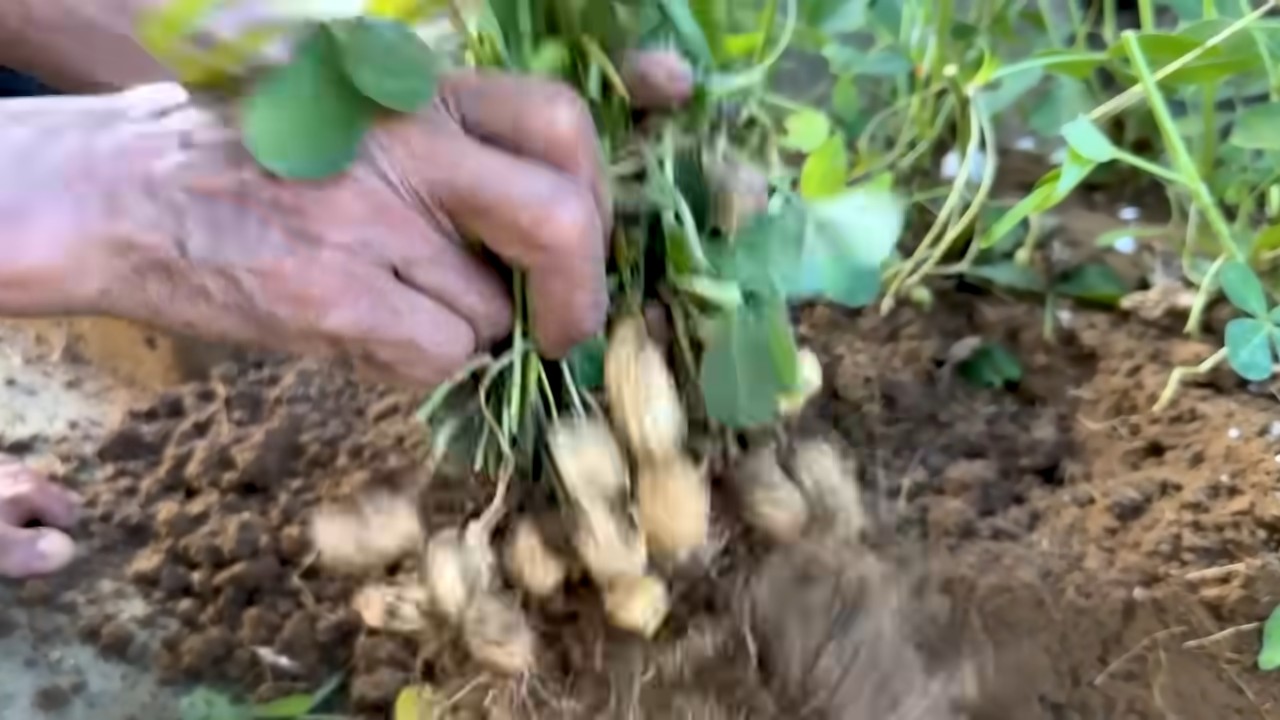
5. Ernte der Erdnüsse
1. Erntezeitpunkt: Die Erdnüsse sind reif, wenn die Blätter der Pflanzen gelb werden und absterben. Das ist normalerweise etwa 4-5 Monate nach dem Pflanzen der Fall.
2. Ernte: Zieht die Erdnusspflanzen vorsichtig aus der Erde. Schüttelt die Erde ab und lasst die Erdnüsse an den Pflanzen trocknen.
3. Trocknen: Hängt die Erdnusspflanzen an einem trockenen und luftigen Ort auf, bis die Erdnüsse vollständig getrocknet sind. Das kann etwa 2-3 Wochen dauern.
4. Erdnüsse ernten: Brecht die Erdnüsse von den Pflanzen ab und lagert sie an einem kühlen und trockenen Ort.
Zusätzliche Tipps und Tricks
* Sortenwahl: Es gibt verschiedene Erdnusssorten. Informiert euch, welche Sorte am besten für euer Klima geeignet ist.
* Schädlinge und Krankheiten: Achtet auf Schädlinge und Krankheiten. Bei Bedarf könnt ihr biologische Schädlingsbekämpfungsmittel einsetzen.
* Geduld: Der Anbau von Erdnüssen braucht Zeit und Geduld. Lasst euch nicht entmutigen, wenn es nicht gleich beim ersten Mal klappt.
Ich hoffe, diese Anleitung hilft euch dabei, eure eigenen Erdnüsse im Styropor-Behälter anzubauen. Es ist ein tolles Projekt, das euch viel Freude bereiten wird. Viel Erfolg und guten Appetit!
Conclusion
So, there you have it! Growing peanuts in foam boxes isn’t just a quirky gardening experiment; it’s a surprisingly effective way to cultivate these delicious legumes, especially if you’re short on space or dealing with less-than-ideal soil conditions. We’ve walked you through the entire process, from selecting the right foam box to harvesting your homegrown bounty.
But why is this DIY trick a must-try? First and foremost, it offers unparalleled control over the growing environment. You can easily manage soil quality, drainage, and even temperature, giving your peanut plants the best possible chance to thrive. This is particularly beneficial if you live in an area with unpredictable weather or poor soil. Secondly, foam boxes are incredibly lightweight and portable. Need to move your plants to a sunnier spot? No problem! Want to protect them from an unexpected frost? Simply relocate the box. This flexibility is a game-changer for urban gardeners or anyone with limited outdoor space. Finally, and perhaps most importantly, growing your own peanuts is incredibly rewarding. There’s nothing quite like the satisfaction of harvesting your own food, knowing exactly where it came from and how it was grown.
Now, let’s talk about variations and suggestions. While we’ve focused on using foam boxes, you can adapt this method to other containers as well. Large plastic tubs or even repurposed storage bins can work just as well, as long as they have adequate drainage. Experiment with different peanut varieties to find your favorite. Virginia peanuts tend to be larger and more flavorful, while Spanish peanuts are smaller and sweeter. Consider adding companion plants to your foam box to deter pests and improve soil health. Marigolds, basil, and nasturtiums are all excellent choices. Don’t be afraid to get creative and personalize your peanut-growing experience.
Growing peanuts in foam boxes is a fantastic way to enjoy fresh, homegrown peanuts, regardless of your gardening experience or space constraints. It’s a fun, educational, and ultimately delicious project that the whole family can enjoy.
We’re confident that you’ll be amazed by the results. So, grab a foam box, some peanut seeds, and get ready to embark on a peanut-growing adventure! We encourage you to try this DIY trick and share your experience with us. Post photos of your peanut plants, share your tips and tricks, and let us know how it goes. We can’t wait to see your homegrown peanut harvests! Happy gardening!
Frequently Asked Questions (FAQ)
1. What kind of foam box is best for growing peanuts?
The ideal foam box is one that is clean, sturdy, and has adequate drainage. Look for boxes that are at least 12 inches deep to allow for proper root development. The size of the box will depend on how many peanut plants you want to grow. A box that is approximately 2 feet by 3 feet can comfortably accommodate 3-4 plants. Make sure the box is food-grade if possible, although this isn’t strictly necessary as the peanuts aren’t directly touching the foam. Ensure there are drainage holes in the bottom to prevent waterlogging. You can drill these yourself if the box doesn’t already have them.
2. What type of soil should I use for growing peanuts in foam boxes?
Peanuts thrive in well-draining, sandy loam soil. Avoid heavy clay soils, as they can become waterlogged and inhibit root growth. You can purchase a pre-mixed potting soil specifically formulated for vegetables, or you can create your own mix by combining equal parts of garden soil, compost, and sand. The soil should be slightly acidic to neutral, with a pH between 6.0 and 7.0. Adding some organic matter, such as compost or well-rotted manure, will improve soil fertility and drainage.
3. How often should I water my peanut plants in foam boxes?
Water your peanut plants regularly, especially during hot, dry weather. The soil should be kept consistently moist, but not waterlogged. Water deeply whenever the top inch of soil feels dry to the touch. Avoid overhead watering, as this can promote fungal diseases. Instead, water at the base of the plants. During periods of heavy rain, you may need to reduce watering frequency to prevent the soil from becoming waterlogged.
4. How much sunlight do peanut plants need?
Peanut plants need at least 6-8 hours of direct sunlight per day to thrive. Choose a location for your foam box that receives plenty of sunlight throughout the day. If you live in a particularly hot climate, you may need to provide some afternoon shade to prevent the plants from scorching. If you’re growing peanuts indoors, you’ll need to supplement with artificial lighting, such as grow lights.
5. When is the best time to plant peanuts in foam boxes?
The best time to plant peanuts is after the last frost, when the soil has warmed up to at least 65 degrees Fahrenheit. In most regions, this is typically in late spring or early summer. You can start peanut seeds indoors 4-6 weeks before the last frost to get a head start on the growing season. Transplant the seedlings into your foam box once the weather has warmed up and the risk of frost has passed.
6. How long does it take for peanuts to mature in foam boxes?
Peanuts typically take 120-150 days to mature, depending on the variety and growing conditions. You’ll know your peanuts are ready to harvest when the foliage begins to turn yellow and the pods feel plump and full. To check for maturity, dig up a few plants and examine the pods. The inside of the pods should be dark and the kernels should be fully developed.
7. What are some common pests and diseases that affect peanut plants?
Common pests that can affect peanut plants include aphids, spider mites, and leafhoppers. These pests can be controlled with insecticidal soap or neem oil. Common diseases include leaf spot and root rot. Leaf spot can be prevented by ensuring good air circulation and avoiding overhead watering. Root rot can be prevented by ensuring good drainage and avoiding overwatering.
8. Can I grow peanuts in foam boxes indoors?
Yes, you can grow peanuts in foam boxes indoors, but it will require some extra effort. You’ll need to provide adequate lighting, using grow lights to supplement natural sunlight. You’ll also need to ensure good air circulation and maintain a consistent temperature. Indoor peanut plants may not produce as many peanuts as outdoor plants, but it’s still possible to enjoy a small harvest.
9. How do I harvest peanuts from foam boxes?
To harvest peanuts, carefully dig up the entire plant, being careful not to damage the pods. Gently shake off any excess soil and allow the plants to dry in the sun for a few days. Once the plants are dry, you can remove the peanuts from the pods.
10. How do I store my harvested peanuts?
Store your harvested peanuts in a cool, dry place. You can store them in their shells or shelled. Shelled peanuts should be stored in an airtight container to prevent them from becoming rancid. Properly stored peanuts can last for several months. You can also roast your peanuts for a longer shelf life and enhanced flavor.

Leave a Comment