

Homegrown Wheatgrass Juice Recipe: Unlock the vibrant health benefits of this superfood right in your own home! Forget expensive juice bars and questionable ingredients. I’m going to show you how incredibly easy and rewarding it is to cultivate your own wheatgrass and whip up a delicious, nutrient-packed juice.
For centuries, wheatgrass has been revered for its potent healing properties. Ancient Egyptians prized it, and its popularity surged again in the 20th century as a natural health remedy. But why buy it when you can grow it? Let’s be honest, store-bought wheatgrass juice can be pricey and sometimes lacks that fresh, vibrant flavor. Plus, knowing exactly where your food comes from is incredibly satisfying.
This DIY guide will walk you through every step, from sourcing your seeds to harvesting your lush, green crop and transforming it into a revitalizing elixir. Imagine starting your day with a shot of pure, homegrown goodness, knowing you’ve nurtured it from seed to sip. I’ll share my favorite tips and tricks for maximizing your yield and ensuring a consistently delicious homegrown wheatgrass juice recipe. Get ready to ditch the store-bought stuff and embrace the power of homegrown health!

Grow Your Own Wheatgrass and Make Delicious, Healthy Juice!
Hey there, health enthusiasts! I’m so excited to share one of my favorite DIY projects with you: growing your own wheatgrass and turning it into a super nutritious juice. It’s easier than you think, and the fresh, vibrant flavor is totally worth the effort. Plus, you’ll save money compared to buying pre-made wheatgrass juice. Let’s get started!
What You’ll Need:
Before we dive in, let’s gather all the necessary supplies. This will make the whole process smoother and more enjoyable.
* Wheatgrass Seeds: Look for organic, hard red winter wheat seeds specifically for sprouting. You can find these at most health food stores or online. I usually buy a pound at a time, which lasts me quite a while.
* Growing Trays: You’ll need at least two shallow trays with drainage holes. One tray will hold the soil, and the other will act as a drip tray. I prefer using plastic trays because they’re easy to clean and reuse.
* Potting Soil: Use a good quality organic potting soil. Avoid soils with added fertilizers, as we want the wheatgrass to grow naturally.
* Spray Bottle: A spray bottle filled with water is essential for keeping the seeds and soil moist.
* Sharp Scissors or Knife: You’ll need these to harvest the wheatgrass.
* Juicer: A dedicated wheatgrass juicer is ideal, but a masticating juicer can also work. Centrifugal juicers aren’t recommended as they don’t extract juice efficiently from wheatgrass.
* Water: Filtered water is best for soaking the seeds and watering the wheatgrass.
* Optional: A small fan to improve air circulation and prevent mold.
Phase 1: Soaking and Sprouting the Seeds
This is a crucial step to kickstart the germination process. Don’t skip it!
1. Rinse the Seeds: Place about a cup of wheatgrass seeds in a bowl and rinse them thoroughly with cool water. Remove any debris or floating seeds.
2. Soak the Seeds: Cover the rinsed seeds with fresh, cool water. Make sure the water level is about two to three times the volume of the seeds, as they will expand as they absorb water.
3. Soaking Time: Let the seeds soak for 8-12 hours, or even overnight. I usually soak them before I go to bed and they’re ready to go in the morning.
4. Drain and Rinse Again: After soaking, drain the water completely and rinse the seeds again with cool water.
5. Sprouting (First Rinse): Place the drained seeds in a sprouting jar or a container with good ventilation. I use a mason jar with a sprouting lid. Rinse the seeds thoroughly with cool water.
6. Sprouting (Second Rinse): Invert the jar to drain as much water as possible. This is important to prevent the seeds from becoming waterlogged and developing mold.
7. Sprouting (Rest): Place the jar in a dark, cool place, such as a cupboard or a drawer. The darkness encourages sprouting.
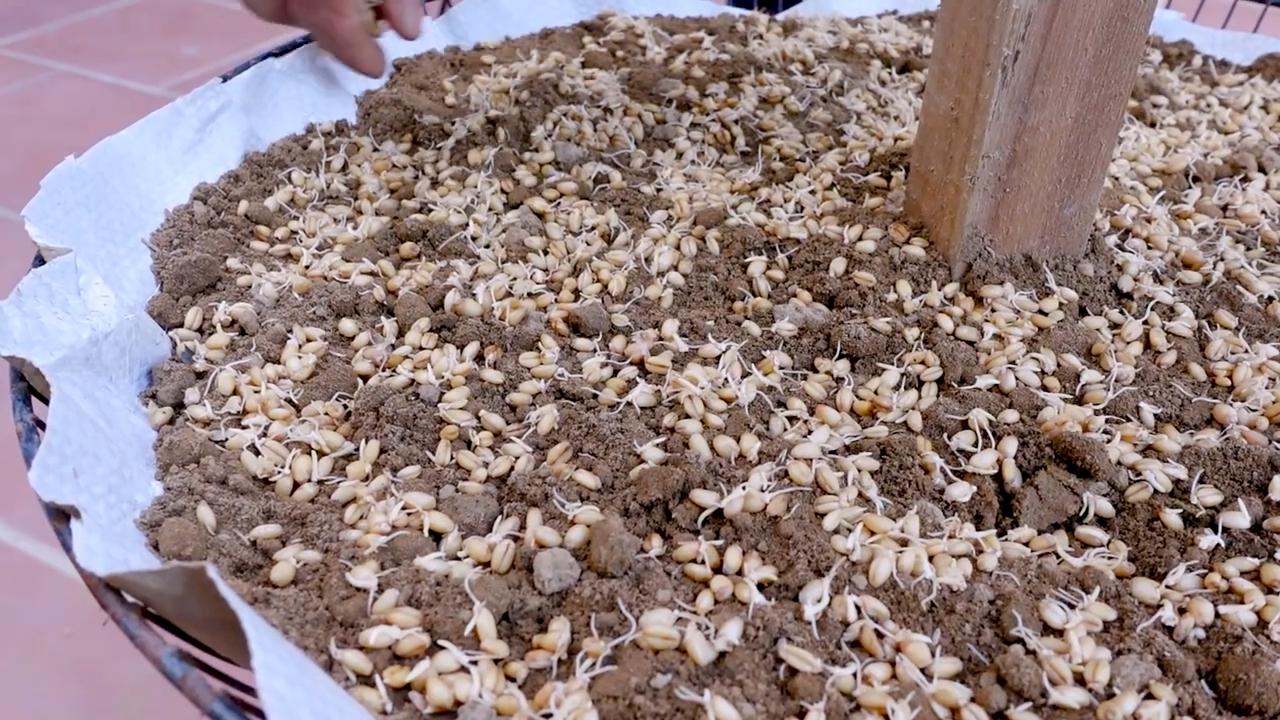
8. Repeat Rinse and Drain: Repeat the rinsing and draining process 2-3 times a day for the next 1-2 days, or until you see small white sprouts emerging from the seeds. This is a sign that they’re ready to be planted. I usually do it morning, noon, and night.
Phase 2: Planting the Sprouted Seeds
Now it’s time to give those little sprouts a home!
1. Prepare the Tray: Fill the growing tray with about 1-2 inches of potting soil. Gently level the soil surface. Don’t pack it down too tightly.
2. Moisten the Soil: Water the soil thoroughly until it’s evenly moist but not soggy. You want it to feel like a wrung-out sponge.
3. Sow the Seeds: Sprinkle the sprouted seeds evenly over the surface of the soil. Don’t overcrowd them; they need space to grow. A dense layer is okay, but avoid piling them on top of each other.
4. Cover Lightly: Gently press the seeds into the soil. You can also sprinkle a very thin layer of soil over the seeds, but it’s not essential. The key is to ensure they have good contact with the moist soil.
5. Water Gently: Use a spray bottle to mist the seeds and soil with water. Be gentle so you don’t dislodge the seeds.
6. Cover the Tray: Cover the tray with a lid or another tray to create a humid environment. This helps the seeds germinate and prevents them from drying out. I often use a clear plastic storage bin turned upside down.
7. Darkness Again: Place the covered tray in a dark, cool place for the first 2-3 days. This encourages the seeds to root.
Phase 3: Growing the Wheatgrass
This is where the magic happens!
1. Uncover the Tray: After 2-3 days in the dark, remove the cover and expose the wheatgrass to indirect sunlight. Avoid direct sunlight, as it can scorch the young plants. A bright windowsill or a shaded outdoor area is ideal.
2. Water Regularly: Water the wheatgrass daily, or as needed, to keep the soil consistently moist. Use a spray bottle to mist the plants, or gently pour water into the tray, being careful not to overwater. The soil should never be soggy.
3. Air Circulation: Ensure good air circulation around the wheatgrass to prevent mold growth. A small fan can be helpful, especially in humid environments.
4. Monitor Growth: Watch the wheatgrass grow! It should reach a height of 4-7 inches in about 7-10 days. The color should be a vibrant green.
5. Rotate the Tray: Rotate the tray regularly to ensure even growth. This is especially important if the wheatgrass is growing near a window, as it will tend to lean towards the light.
Phase 4: Harvesting and Juicing
The moment we’ve been waiting for!
1. Harvest Time: Harvest the wheatgrass when it’s about 4-7 inches tall and has a vibrant green color. This is usually around 7-10 days after planting.
2. Cut the Wheatgrass: Using sharp scissors or a knife, cut the wheatgrass close to the soil surface.
3. Rinse the Wheatgrass: Rinse the harvested wheatgrass thoroughly with cool water to remove any dirt or debris.
4. Prepare the Juicer: Follow the manufacturer’s instructions for your juicer.
5. Juice the Wheatgrass: Feed the wheatgrass into the juicer in small batches.
6. Enjoy Immediately: Drink the wheatgrass juice immediately for the best flavor and nutritional benefits. It’s best consumed on an empty stomach.
7. Storage (Optional): If you can’t drink all the juice right away, you can store it in an airtight container in the refrigerator for up to 24 hours. However, the flavor and nutritional value will diminish over time.
Tips and Troubleshooting
* Mold Prevention: Mold can be a common problem when growing wheatgrass. To prevent mold, ensure good air circulation, avoid overwatering, and use clean trays and soil. If you see mold, remove the affected area immediately.
* Yellowing Wheatgrass: Yellowing wheatgrass can be a sign of overwatering, underwatering, or lack of nutrients. Adjust your watering schedule and consider adding a small amount of organic fertilizer to the soil.
* Slow Growth: Slow growth can be caused by insufficient light, low temperatures, or poor soil quality. Ensure the wheatgrass is getting enough indirect sunlight and that the temperature is between 65-75°F (18-24°C).
* Replanting: You can usually get two harvests from one planting of wheatgrass. After the first harvest, continue watering and caring for the plants. The wheatgrass will regrow, but the second harvest may be less vigorous than the first.
* Experiment: Don’t be afraid to experiment with different growing techniques and varieties of wheatgrass seeds to find what works best for you.
* Cleaning: Always thoroughly clean your trays and juicer after each use to prevent the buildup of bacteria and mold.
Why Grow Your Own Wheatgrass?
* Freshness: You can’t beat the freshness of homegrown wheatgrass. The flavor and nutritional value are at their peak when you juice it immediately after harvesting.
* Cost-Effective: Growing your own wheatgrass is much cheaper than buying pre-made juice.
* Control: You have complete control over the growing process, ensuring that your wheatgrass is organic and free from harmful chemicals.
* Satisfaction: There’s something incredibly satisfying about growing your own food
Conclusion
So, there you have it! Cultivating your own homegrown wheatgrass juice is not just a trend; it’s a commitment to vibrant health and a connection to the natural world. We’ve walked you through the simple yet rewarding process, from sourcing your wheatgrass seeds to that first invigorating sip of freshly squeezed juice. Why is this DIY trick a must-try? Because it puts you in complete control. You know exactly what’s going into your body – no hidden additives, no preservatives, just pure, unadulterated goodness.
Think about the convenience! No more last-minute trips to the health food store or relying on pre-packaged juices that may have lost their potency. With a little planning and minimal effort, you can have a constant supply of fresh, nutrient-rich wheatgrass juice right at your fingertips.
But the benefits extend beyond convenience and purity. Growing your own wheatgrass is incredibly cost-effective. Those tiny shots of wheatgrass juice at juice bars can quickly add up. By investing in a bag of seeds and a few basic supplies, you’ll be saving money while simultaneously boosting your health.
And let’s not forget the satisfaction! There’s something deeply fulfilling about nurturing a plant from seed to harvest. Watching those vibrant green blades sprout and flourish is a reminder of the power of nature and our ability to harness its gifts.
Looking for variations? Absolutely! Consider experimenting with different types of wheatgrass seeds. Some varieties may have a slightly sweeter or milder flavor. You can also incorporate other sprouts into your wheatgrass juice for an extra nutritional boost. Think sunflower sprouts, pea shoots, or even a touch of ginger for added zing.
Another exciting variation is to blend your wheatgrass juice with other fruits and vegetables. A green smoothie with wheatgrass, spinach, banana, and apple is a delicious and nutritious way to start your day. Or, try adding a shot of wheatgrass juice to your favorite juice recipe for an extra dose of vitamins and minerals.
We encourage you to embrace this DIY project and experience the incredible benefits of homegrown wheatgrass juice for yourself. Don’t be intimidated by the process; it’s much simpler than you might think. Start small, experiment with different techniques, and most importantly, have fun!
We’re confident that once you taste the difference between store-bought and homegrown wheatgrass juice, you’ll be hooked. It’s a small change that can have a profound impact on your overall health and well-being.
So, grab your seeds, gather your supplies, and get growing! We can’t wait to hear about your experiences. Share your photos, tips, and recipes with us in the comments below. Let’s create a community of wheatgrass enthusiasts and inspire others to embrace the power of homegrown nutrition. Remember, the journey to better health starts with a single seed. Happy juicing!
Frequently Asked Questions (FAQ)
What exactly is wheatgrass juice, and why is it considered so healthy?
Wheatgrass juice is the liquid extracted from the freshly sprouted leaves of the common wheat plant (Triticum aestivum). It’s often touted as a superfood due to its high concentration of vitamins, minerals, antioxidants, and enzymes. It’s particularly rich in chlorophyll, which is believed to have detoxifying and oxygenating properties. Proponents claim that wheatgrass juice can boost energy levels, strengthen the immune system, aid digestion, and even help fight certain diseases. While more research is needed to confirm all of these claims, the nutritional profile of wheatgrass juice certainly makes it a valuable addition to a healthy diet.
How long does it take to grow wheatgrass from seed to harvest?
Generally, it takes about 7-10 days to grow wheatgrass from seed to harvest. The exact time can vary depending on factors such as temperature, humidity, and the specific variety of wheatgrass seeds you’re using. You’ll know it’s ready to harvest when the blades are about 4-7 inches tall and have developed a vibrant green color.
What kind of equipment do I need to grow wheatgrass at home?
You don’t need a lot of fancy equipment to grow wheatgrass at home. Here’s a basic list:
* Wheatgrass seeds (organic is recommended)
* Growing trays (with drainage holes)
* Potting mix or soil (or a soilless medium like coco coir)
* Spray bottle
* Scissors or a sharp knife for harvesting
* Wheatgrass juicer (a masticating juicer is ideal, but a centrifugal juicer can also be used)
Optional but helpful:
* Humidity dome (to help with germination)
* Grow lights (if you don’t have access to natural sunlight)
Can I grow wheatgrass without soil?
Yes, you can absolutely grow wheatgrass without soil! This is often referred to as hydroponic wheatgrass cultivation. Instead of soil, you can use a soilless medium like coco coir, hemp mats, or even just water. The key is to provide adequate moisture and nutrients to the seeds as they germinate and grow. Hydroponic wheatgrass growing can be cleaner and less prone to mold growth than soil-based methods.
How often should I water my wheatgrass?
You should water your wheatgrass regularly to keep the soil or growing medium consistently moist, but not waterlogged. A good rule of thumb is to water it once or twice a day, depending on the humidity and temperature. Use a spray bottle to gently mist the wheatgrass, being careful not to overwater it. Overwatering can lead to mold growth, which can ruin your crop.
How do I prevent mold from growing on my wheatgrass?
Mold growth is a common concern when growing wheatgrass, but there are several things you can do to prevent it:
* Use clean growing trays and equipment.
* Ensure good air circulation around your wheatgrass.
* Avoid overwatering.
* Use a well-draining growing medium.
* If you see any signs of mold, remove the affected area immediately.
* Consider using a natural fungicide like hydrogen peroxide diluted with water.
How do I harvest wheatgrass?
Harvesting wheatgrass is easy! Once the blades are about 4-7 inches tall, simply use scissors or a sharp knife to cut them off close to the base. It’s best to harvest wheatgrass just before you’re ready to juice it, as it will lose its potency over time.
How much wheatgrass juice should I drink per day?
A typical serving of wheatgrass juice is about 1-2 ounces (30-60 ml). It’s best to start with a small amount and gradually increase your intake as your body adjusts. Some people may experience mild side effects like nausea or stomach upset when they first start drinking wheatgrass juice.
How long does wheatgrass juice last?
Freshly squeezed wheatgrass juice is best consumed immediately. However, if you need to store it, you can keep it in an airtight container in the refrigerator for up to 24 hours. Keep in mind that it will lose some of its potency over time.
Can I freeze wheatgrass juice?
Yes, you can freeze wheatgrass juice to preserve it for longer periods. Pour the juice into ice cube trays and freeze until solid. Then, transfer the cubes to a freezer bag or container. Frozen wheatgrass juice can last for several months. When you’re ready to use it, simply thaw the cubes and add them to your smoothies or juices.
What are the potential side effects of drinking wheatgrass juice?
While wheatgrass juice is generally considered safe, some people may experience mild side effects, especially when they first start drinking it. These side effects can include nausea, stomach upset, diarrhea, headache, or fatigue. These symptoms are usually temporary and subside as your body adjusts. If you experience any severe or persistent side effects, stop drinking wheatgrass juice and consult with your doctor.
Is wheatgrass juice safe for pregnant or breastfeeding women?
Pregnant or breastfeeding women should consult with their doctor before drinking wheatgrass juice. While it’s generally considered safe, there is limited research on its effects during pregnancy and breastfeeding.
Can I give wheatgrass juice to my children?
It’s best to consult with your pediatrician before giving wheatgrass juice to children. While it’s generally considered safe in small amounts, children may be more sensitive to its effects.
Where can I buy wheatgrass seeds?
You can buy wheatgrass seeds at most health food stores, garden centers, and online retailers. Look for organic, food-grade wheatgrass seeds for the best quality.
What is the best type of juicer for wheatgrass?
A masticating juicer (also known as a slow juicer or cold-press juicer) is generally considered the best type of juicer for wheatgrass. Masticating juicers extract more juice and retain more nutrients than centrifugal juicers. However, centrifugal juicers can also be used, although they may not be as efficient.

Leave a Comment