

Grow Long Beans Small Space, even if you think you don’t have the room! Are you dreaming of fresh, homegrown vegetables but feel limited by a tiny balcony, a small patio, or just a lack of sprawling garden beds? Don’t despair! I’m here to tell you that you absolutely *can* cultivate a thriving long bean harvest, no matter how compact your growing area is.
For centuries, resourceful gardeners have found innovative ways to maximize yields in limited spaces. From ancient vertical gardening techniques to modern container gardening methods, the spirit of making the most of what you have is deeply rooted in our horticultural history. Long beans, also known as yardlong beans or asparagus beans, are particularly well-suited to small-space gardening due to their climbing nature. They naturally grow upwards, saving precious ground space.
But why should you bother learning these DIY tricks and hacks to grow long beans small space? Well, imagine stepping outside and snipping fresh, crisp long beans for your stir-fries, salads, or even just a healthy snack. Not only will you enjoy the unparalleled flavor of homegrown produce, but you’ll also save money at the grocery store and reduce your environmental footprint. Plus, gardening is a fantastic stress reliever and a rewarding hobby. So, let’s dive into the secrets of successfully growing these delicious and versatile beans, even if you’re short on space!
Growing Long Beans in a Small Space: A DIY Vertical Trellis Guide
Hey there, fellow gardening enthusiasts! Dreaming of fresh, homegrown long beans but short on space? Don’t worry, I’ve got you covered! Growing long beans vertically is the perfect solution for maximizing your yield in a limited area, whether you have a small balcony, patio, or even just a sunny corner in your yard. This guide will walk you through building a simple yet effective DIY trellis and provide tips for successfully growing these delicious beans.
Why Grow Long Beans Vertically?
Before we dive into the DIY project, let’s quickly touch on why vertical gardening is so beneficial for long beans:
* Space Saving: Long beans are climbers, and they can take up a lot of ground space if left to sprawl. A trellis allows them to grow upwards, utilizing vertical space instead.
* Improved Air Circulation: Vertical growth promotes better air circulation around the plants, reducing the risk of fungal diseases.
* Easier Harvesting: No more bending over and searching through tangled vines! Harvesting becomes much easier when the beans are hanging at eye level.
* Increased Sunlight Exposure: Vertical growth allows for better sunlight penetration, leading to healthier plants and higher yields.
* Aesthetic Appeal: A trellis covered in lush green vines and dangling long beans is simply beautiful and adds a touch of charm to any garden.
Choosing the Right Long Bean Variety
While this guide focuses on building the trellis, it’s important to choose the right long bean variety for your climate and growing conditions. Some popular and reliable choices include:
* Yardlong Bean (Asparagus Bean): This is the most common type, known for its exceptionally long pods.
* Chinese Long Bean: Similar to yardlong beans, but with slightly shorter pods.
* Red Noodle Bean: A unique variety with reddish-purple pods.
Consider factors like disease resistance, days to maturity, and pod length when making your selection.
Building Your DIY Vertical Trellis
Okay, let’s get to the fun part! This trellis design is simple, sturdy, and can be easily customized to fit your specific space.
Materials You’ll Need:
* Wooden Stakes or Posts: (4) 6-8 feet long (depending on how tall you want your trellis) – I recommend using cedar or redwood for durability.
* Heavy-Duty Garden Twine or Jute: Enough to create a grid pattern between the posts.
* Measuring Tape: For accurate spacing.
* Scissors or Pruning Shears: For cutting the twine.
* Hammer or Mallet: For driving the stakes into the ground.
* Optional: Wood Stain or Paint: To protect the wood and add a decorative touch.
* Optional: Metal Wire or Cable Ties: For extra reinforcement (especially if you live in a windy area).
Step-by-Step Instructions:
1. Prepare the Stakes: If you’re using untreated wood, consider staining or painting the stakes to protect them from the elements. This will significantly extend their lifespan. Let the stain or paint dry completely before proceeding.
2. Position the Stakes: Decide where you want to place your trellis. The ideal location should receive at least 6-8 hours of sunlight per day. Space the stakes about 2-3 feet apart in a rectangular or square shape. This spacing will provide ample support for the long bean vines.
3. Drive the Stakes into the Ground: Use a hammer or mallet to drive the stakes firmly into the ground. Make sure they are stable and secure. You’ll want to bury at least 1-2 feet of the stake for stability, depending on the soil type. The deeper, the better, especially in windy areas.
4. Create the Vertical Support: Tie the garden twine or jute to the base of one of the stakes. Begin weaving the twine vertically, wrapping it around each stake as you go. Space the vertical lines of twine about 6-8 inches apart. This will provide plenty of climbing support for the long bean vines. Make sure the twine is taut but not so tight that it puts excessive strain on the stakes.
5. Create the Horizontal Support: Once you’ve completed the vertical lines, start weaving the twine horizontally, creating a grid pattern. Tie the twine securely to each vertical line as you go. Again, space the horizontal lines about 6-8 inches apart. This grid pattern will provide even more support and encourage the vines to spread out evenly.
6. Reinforce the Trellis (Optional): For added stability, especially in windy areas, you can use metal wire or cable ties to reinforce the joints where the vertical and horizontal lines of twine intersect. This will prevent the trellis from sagging or collapsing under the weight of the vines.
7. Trim Excess Twine: Use scissors or pruning shears to trim any excess twine. This will give your trellis a cleaner and more professional look.
Planting Your Long Beans
Now that your trellis is ready, it’s time to plant your long beans!
1. Prepare the Soil: Long beans prefer well-drained soil that is rich in organic matter. Amend your soil with compost or well-rotted manure before planting. This will provide the plants with the nutrients they need to thrive.
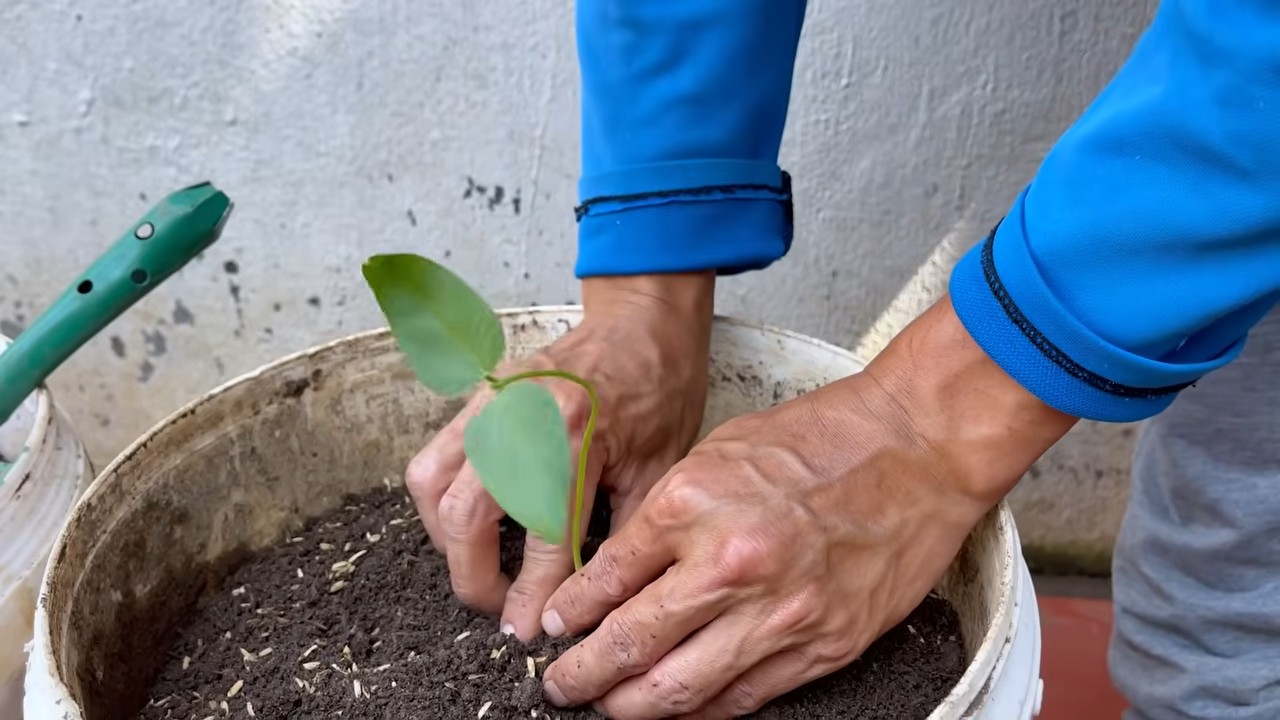
2. Sow the Seeds: Sow the long bean seeds directly into the soil at the base of the trellis. Plant them about 1 inch deep and 2-3 inches apart. You can also start the seeds indoors 2-3 weeks before the last expected frost and transplant them once the weather warms up.
3. Water Thoroughly: After planting, water the seeds thoroughly. Keep the soil consistently moist but not waterlogged.
4. Provide Support: As the seedlings emerge, gently guide them towards the trellis. They will naturally start to climb, but you may need to help them get started by wrapping their tendrils around the twine.
Caring for Your Long Bean Plants
With a little care and attention, your long bean plants will reward you with a bountiful harvest.
1. Watering: Water your long bean plants regularly, especially during hot, dry weather. Aim to keep the soil consistently moist but not waterlogged. Water deeply and less frequently, rather than shallowly and more often.
2. Fertilizing: Feed your long bean plants with a balanced fertilizer every 2-3 weeks. You can also use a liquid seaweed extract or compost tea to provide them with essential nutrients. Avoid over-fertilizing, as this can lead to excessive foliage growth and reduced bean production.
3. Pruning: Prune your long bean plants regularly to encourage bushier growth and higher yields. Remove any yellowing or diseased leaves. You can also pinch off the tips of the vines to encourage branching.
4. Pest and Disease Control: Keep an eye out for common pests such as aphids, bean beetles, and spider mites. Treat infestations promptly with insecticidal soap or neem oil. Prevent fungal diseases by ensuring good air circulation and avoiding overhead watering.
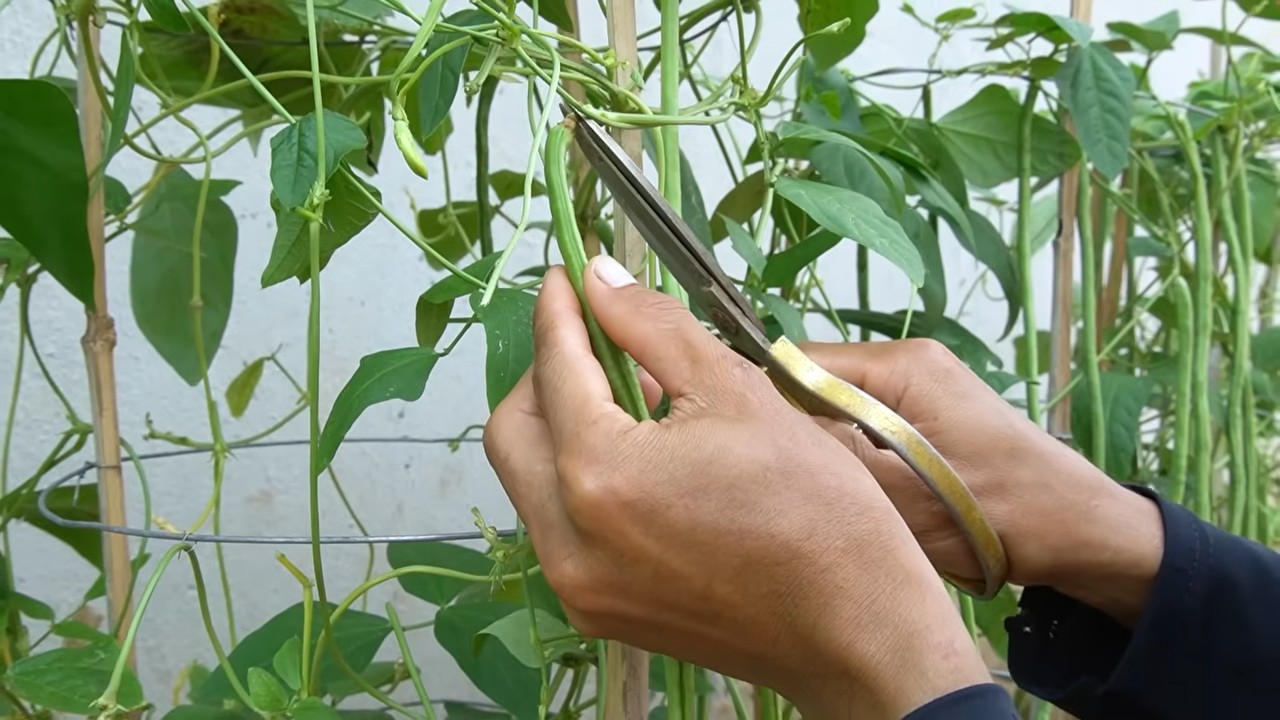
5. Harvesting: Harvest your long beans when they are young and tender, typically about 6-8 inches long. The pods should be firm and snap easily. Harvest regularly to encourage continued production. Overripe beans will become tough and stringy.
Troubleshooting Common Problems
Even with the best care, you may encounter some challenges along the way. Here are some common problems and how to address them:
* Poor Germination: If your seeds are not germinating, make sure the soil is warm enough and consistently moist. You can also try soaking the seeds in water for 24 hours before planting to improve germination rates.
* Yellowing Leaves: Yellowing leaves can be a sign of nutrient deficiency, overwatering, or disease. Check the soil drainage and adjust your watering schedule accordingly. Fertilize with a balanced fertilizer to address nutrient deficiencies.
* Lack of Flowers or Beans: Lack of flowers or beans can be caused by insufficient sunlight, over-fertilizing, or extreme temperatures. Ensure your plants are receiving at least 6-8 hours of sunlight per day. Avoid over-fertilizing, especially with nitrogen-rich fertilizers.
* Pest Infestations: Treat pest infestations promptly with insecticidal soap or neem oil. You can also try attracting beneficial insects to your garden to help control pests naturally.
Enjoying Your Harvest
Congratulations! You’ve successfully grown long beans in a small space using your DIY trellis. Now it’s time to enjoy the fruits (or rather, the beans) of your labor! Long beans are incredibly versatile and can be used in a variety of dishes, from stir-fries and salads to soups and stews. They are also a good source of vitamins, minerals, and fiber.
So, go ahead and harvest those delicious long beans and get creative in the kitchen! And remember, gardening is a journey, not a destination. Don’t be afraid to experiment and learn from your experiences. Happy gardening!
Conclusion
So, there you have it! Growing long beans in a small space is not only achievable but also incredibly rewarding. This DIY trick, focusing on vertical gardening techniques, transforms even the tiniest balcony or patio into a thriving mini-farm. We’ve shown you how to maximize your yield, minimize your space requirements, and enjoy fresh, delicious long beans straight from your “garden.”
But why is this a must-try? Beyond the obvious benefit of fresh produce, this method offers a unique connection to your food. You’ll witness the entire life cycle of the long bean, from tiny sprout to sprawling vine laden with edible treasures. It’s a therapeutic activity, a conversation starter, and a sustainable way to supplement your diet. Plus, imagine the satisfaction of serving a dish made with ingredients you nurtured yourself!
Don’t be afraid to experiment! While we’ve outlined a basic framework, there’s plenty of room for customization. Try different varieties of long beans – some are more heat-tolerant, others have unique colors or flavors. Consider companion planting – basil, marigolds, and nasturtiums can deter pests and attract beneficial insects. You can also adjust the support system to suit your aesthetic preferences. A simple bamboo trellis works wonders, but you could also use repurposed materials like old ladders or even create a living wall effect.
For those looking to enhance the flavor profile of their homegrown long beans, consider adding organic fertilizers rich in phosphorus and potassium during the flowering and fruiting stages. This will encourage abundant blooms and plump, flavorful beans. Remember to water consistently, especially during hot weather, and protect your plants from strong winds.
We are confident that with a little effort and these simple techniques, you’ll be harvesting a bountiful crop of long beans in no time. This DIY project is perfect for beginners and experienced gardeners alike. It’s a fun, engaging, and ultimately delicious way to connect with nature and enjoy the fruits (or rather, vegetables!) of your labor.
Now, we want to hear from you! Give this DIY trick a try and share your experiences. What challenges did you face? What successes did you celebrate? What variations did you implement? Post your photos and stories on social media using #LongBeanDIY and #SmallSpaceGardening. Let’s create a community of urban gardeners who are passionate about growing their own food, one long bean at a time. We can’t wait to see what you create!
Frequently Asked Questions (FAQ)
What kind of soil is best for growing long beans in a small space?
Long beans thrive in well-draining soil that is rich in organic matter. A good starting point is a mix of equal parts potting soil, compost, and perlite or vermiculite. The potting soil provides a base, the compost adds nutrients and improves drainage, and the perlite or vermiculite helps to aerate the soil and prevent compaction. You can also amend your soil with aged manure or bone meal to provide additional nutrients. Avoid using heavy clay soils, as they can become waterlogged and inhibit root growth. Regularly testing your soil pH is also recommended; long beans prefer a slightly acidic to neutral pH of around 6.0 to 7.0.
How much sunlight do long beans need when grown in containers?
Long beans require at least 6-8 hours of direct sunlight per day to thrive. Choose a location for your containers that receives ample sunlight throughout the day. If you live in a particularly hot climate, you may need to provide some afternoon shade to prevent the plants from scorching. If you don’t have access to enough natural sunlight, you can supplement with grow lights. Position the grow lights about 6-12 inches above the plants and keep them on for 12-16 hours per day.
What is the best type of support system for long beans in a small garden?
Since we are focusing on growing long beans in a small space, vertical gardening is key. The best support system will depend on the space you have available and your aesthetic preferences. A simple bamboo trellis is a popular and inexpensive option. You can also use a wire mesh fence, a tomato cage, or even create a DIY trellis using repurposed materials like old ladders or branches. The key is to provide a sturdy structure that the long bean vines can easily climb. Make sure the support system is tall enough to accommodate the full height of the vines, which can reach up to 8 feet or more. Secure the vines to the support system as they grow, using twine or plant clips.
How often should I water my long beans?
Long beans need consistent moisture, especially during hot weather. Water deeply whenever the top inch of soil feels dry to the touch. Avoid overwatering, as this can lead to root rot. A good rule of thumb is to water thoroughly every 2-3 days, depending on the weather conditions. Check the soil moisture regularly and adjust your watering schedule accordingly. Consider using a soaker hose or drip irrigation system to deliver water directly to the roots and minimize water waste. Mulching around the base of the plants can also help to retain moisture in the soil.
What are some common pests and diseases that affect long beans, and how can I prevent them?
Common pests that affect long beans include aphids, bean beetles, and spider mites. To prevent these pests, inspect your plants regularly and remove any infested leaves or stems. You can also use insecticidal soap or neem oil to control infestations. Diseases that can affect long beans include powdery mildew and fungal leaf spots. To prevent these diseases, ensure good air circulation around your plants and avoid overhead watering. If you notice any signs of disease, remove the affected leaves and treat the plants with a fungicide. Companion planting with herbs like basil and marigolds can also help to deter pests and diseases.
When and how should I harvest my long beans?
Long beans are typically ready to harvest about 60-70 days after planting. Harvest the beans when they are young and tender, about 12-18 inches long. Use scissors or pruning shears to cut the beans from the vine, leaving a short stem attached. Harvest regularly to encourage continued production. Overripe beans will become tough and stringy. Store harvested long beans in the refrigerator for up to a week.
Can I grow long beans in containers indoors?
While it’s possible to grow long beans indoors, it can be challenging to provide them with the necessary sunlight and space. If you do decide to grow them indoors, choose a sunny location near a south-facing window and supplement with grow lights. Use a large container (at least 12 inches in diameter) and provide a sturdy trellis for the vines to climb. Be sure to pollinate the flowers by hand, using a small brush to transfer pollen from one flower to another.
What are some good companion plants for long beans?
Good companion plants for long beans include basil, marigolds, nasturtiums, rosemary, and carrots. Basil and marigolds help to deter pests, while nasturtiums attract beneficial insects. Rosemary repels bean beetles, and carrots improve soil drainage. Avoid planting long beans near onions or garlic, as they can inhibit growth.
How can I save seeds from my long beans for next year?
To save seeds from your long beans, allow a few pods to mature fully on the vine. The pods will turn brown and dry out. Once the pods are completely dry, harvest them and remove the seeds. Store the seeds in an airtight container in a cool, dry place. Be sure to label the container with the variety of long bean and the date of harvest.
Is it necessary to fertilize long beans grown in containers?
Yes, fertilizing long beans grown in containers is essential, as the nutrients in the potting mix will eventually be depleted. Use a balanced fertilizer (e.g., 10-10-10) every 2-3 weeks, following the instructions on the label. You can also use organic fertilizers like compost tea or fish emulsion. Avoid over-fertilizing, as this can lead to excessive foliage growth and reduced bean production. During the flowering and fruiting stages, consider using a fertilizer that is higher in phosphorus and potassium to encourage abundant blooms and plump, flavorful beans.

Leave a Comment